Posted on 8 Comments

Snowy Woodland Tablescape

I created the following place setting and tablescape for tomorrow’s Centsational Girl/Homegoods Holiday Tablescape Contest. Well I created it for that contest and for my own Christmas decorations.

The inspiration for this particular project was the snowy woodlands of Western North Carolina. But enough chit-chat let us take a look and we can discuss more after a few photos.


The idea was to design a tablescape that embodied the spirit of Homegoods based on style, affordability, and creativity. I hope I achieved all three. I actually went to Homegoods/TJMaxx to scope out what they were doing for the holidays. I wrote about their trends here and then went ahead and followed none of them.

While, it was NOT even implied you needed to purchase a product from Homegoods I happened to fall in love with the tiered display item I used as a centerpiece. I’m not even entirely sure what its intended use is, but I loved the fretwork and patina, which immediately put me in mind of the outdoors. Since the cold weather at Christmas leaves us stuck indoors, I thought it would be great to bring the outside in. Live moss, old branches, vines, and fluffy snow decorate mirrors that mimic the cool streams of the mountains. Glass cardinals give a nod to North Carolina (State Bird) and add some pops of color for Christmas. Here are some more details:


You’ll have to be the judge as to creativity and style. However, I can attest to the affordability! Most of the tablescape is constructed with items my son and I gathered while wandering the neighborhood. I already had plates, red glass balls, some mirrors (candle mirrors), and fake snow (from a previous Christmas). I really only purchased the tiered stand, some new napkins, and the glass cardinals. Altogether it was much less than $50 and I have plans to reuse the stand all year long.

If you would like to construct something similar here’s a quick guide to how I created the tablescape.

  1. I laid out the main objects. The white “runner” is a cut open trashbag. I wanted to use the bare wood of the table but protect it from the damp moss and branches. You can see my “helper” supervising in the background.
  2. I wanted an organic centerpiece so I cut the plastic to both wrap around and touch certain place settings. BTW, if you hadn’t noticed there is a two year old helping me create this. So I can attest the main layout doesn’t take long at all.
  3. I took various types of moss, lichens, and branches and laid them to follow the curves of the outline and act as stream banks for the mirrors. In case you worried we only gathered small sections of moss since it takes forever to grow. I wanted to make sure not to denude the neighborhood. Most of the moss will get replanted in a few weeks too.
  4. I filed in the open areas with snow. I tried to mimic the natural way snow lands and melts to let some of the landscape show through.
Not shown: Other steps involved adding my red accents, switching out various colors of dishes. Though I only own one set of fine china, and an everyday set of white and green. So there wasn’t much in the way of trading the plates out. I took the red napkins and twisted them into bow shapes to place in the bowls instead of using traditional napkin rings. While, offsetting the plates to give a modern edge to the tablescape. Finally, I want to note that I had some store bought vines and lichens (from previous crafting projects) that I used on the plates and chair decorations. I figure guests want to enjoy nature without tasting it.
Posted on Leave a comment

DIY Halloween Costume: Toddler Braveheart

Instead of DIY Wednesday we are doing it a day early. The reason? A simple costume for Halloween that I simply must show off! William Wallace aka Braveheart toddler style:

It got very cold, so, yes he does have pants under that kilt… and an extra shirt under his shirt. This costume also included a buckler and sword, but being almost two years old he quickly figured out throwing the sword and shield was super fun. This was our followup to last year’s viking costume.

How to Create A Toddler Friendly Version of Braveheart aka William Wallace

Materials: Plaid, Brown T-shirt, Brown Duct tape

Optional Materials: Faux Leather, Brass buttons, Sewing Skills

Steps 1

Create a kilt. If you have sewing skills then go ahead pleat and add elastic. Otherwise simply cut a strip, wrap it around the toddlers waist and secure with a safety pin. In either case don’t worry about hemming. I even unravelled a bit of the edge to give it a worn appearance.

Step 2

Before putting the t-shirt on the toddler take an extra piece of plaid and either sew or safety pin it to the shoulder and waist of the t-shirt so this it drapes across the front. Do this BEFORE putting the shirt on. (Are you sensing the ‘before’ theme?) This will keep the toddler from getting obsessed with the plaid on the shirt.

Step 3

Paint face blue. Use a little cream makeup and put it on lightly. If it isn’t thick they can’t smear it much and McClain got a hoot out of watching me put it on in the mirror. If your toddler refuses then no big deal, just have them go as a Highland Scot.

Step 4

If you can sew: I added brass buttons to look like fancy pins at the shoulders, braided a leather belt to hang over, also sewn to the shirt. You can use strips of brown duct tape to mimic leather as well. Everything was attached so he wouldn’t have to fiddle with the costume.

I like to keep it simple and comfortable for a toddler. Certainly, I could have added more armor etc, but this gives the idea and he was free to run around and Trick or Treat in comfort.

Enjoy these articles? Get biweekly updates by joining my mailing list (no spam, no way, no how)

Posted on 11 Comments

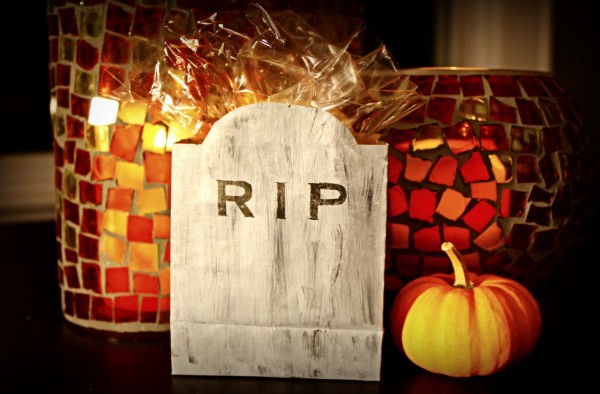
Gravestone Halloween Treat Bags

DIY Halloween Treat Bags in the shape of Gravestones

This weeks DIY project shows how to make some easy gravestone treat bags for Halloween. I am assuming you are making these for a party or small number of kids. We had over 150 trick or treaters last year so clearly they aren’t each getting hand made treat bags. However, some select family and friends will be getting Halloween favors.

DIY Halloween Treat Bags in the shape of Gravestones

Gravestone Treat Bags

Materials:

Basic paper treat bag (Grey would speed up the process but good luck finding that)

Black & white acrylic paint (cheap is fine)

Old paint brush

Scissors

Optional:

Printer & stencil plastic

Repositionable Adhesive


Step 1: Cut Your Shapes

DIY Halloween Treat Bags in the shape of Gravestones
I promise the orange plate was un-intentionally Halloween.

I laid the bag flat and cut a simple notched shape along the top. Just Google gravestone images for basic shapes. It will leave a small triangle in the side which I leveled off with the scissors. You could make a template but I just eyeballed it.

You can freehand the ‘RIP’ but my hand writing is unattractive so I printed a Gothic font out of the computer. If you were assembling a large number (Anything over 15) go ahead and get some stencil plastic and cut letters from that. The plastic will remain intact through the entire project. If you are only doing a small batch then cardstock will hold up for some painting. Make sure to save the round parts out of the ‘R’ and ‘P’.

Step 2: Prep The Bag

DIY Halloween Treat Bags in the shape of Gravestones

To get the gravestone look I did a wash of grey on the outside. Just mix white with a little black. While the paint was still damp I used the brush to smudge in a darker grey to make it look worn. Then allowed the bag to dry.

If you were making a large number of these the process could be sped up by either purchasing grey bags or spray painting in batches.

Step 3: Stencil Time, Rest In Peace

DIY Halloween Treat Bags in the shape of Gravestones

If you used a stencil now is the time to LIGHTLY coat it with repositionable spray adhesive. Then take a tiny amount of black acrylic paint on a very dry brush and tap it into the blanks of the stencil. I tried to let the grey show through in places to give it an aged look.

DIY Halloween Treat Bags in the shape of Gravestones

Voila! Fill with treats and you are done.

Posted on 2 Comments

5-Five Minute Fall Place Settings

One of the things that often holds me back from entertaining is the feeling I need elaborate decorations. Honestly, after I have managed to clean the house and corral the toys I have very little energy left to give a nice seasonal feel to the house. So to prove to myself you can make some pretty place settings in no time I created:

5 Place Settings in 5 Minutes for under 5 Dollars

I used a placemats, napkins, and china I already had to make these place settings. I figure most people own a neutral napkin and placemat they can use in a pinch. I can guarantee these are quick, easy, and cheap. Why? Because I did these last night in less than an hour (with pictures) after McClain went to bed. Of course this is also why the pictures are a little dark.

Butterflies and Dried Hydrangea Place Setting

Wired craft butterflies taped to the table. The tape is covered with mini-pumpkins and dried hydrangea.

Country Acorns Napkin Ring

Simple strips of burlap act as a napkin ring. Just use hot glue to close the ring and attach the acorns.

Fall Berries Tucked Around the Place Setting

The napkin is folded to allow a small pocket. Instead of inserting the silverware simply tuck in some fall berries. Add some more small branches along the outsides of the plates.

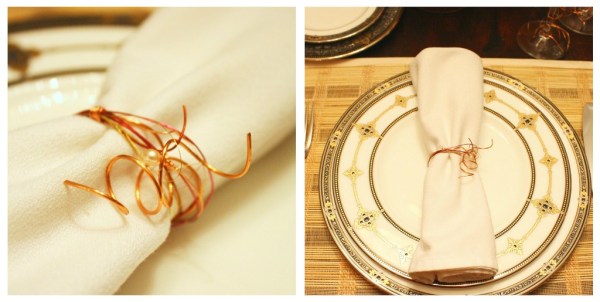
Copper Vines Napkin Ring and Wine Charms

Scrap wire in various shades of copper and gold are wrapped to mimic vines. Matching wire is placed around the stem of the wine glasses to make wine charms.

Fresh Autumn Leaf Napkin Rings and Coasters

Simply hot glue colorful fall leaves together; creating the original disposable napkin ring. A few dots of hot glue keep the leaf coasters from scattering when guests lift their glasses.

Now there are no excuses left for me to not entertain. Well except maybe cooking the food…

Posted on 2 Comments

Easy Harvest or Fall Decorations

One of the easiest ways to create pretty Harvest or Fall themed decorations involves nothing more than 8 ears of Indian corn, wire, and a stick. With these simple items you can create a pretty fall swag like this one:

Step 1:

Gather your materials. No, I wasn’t joking, it really does just require corn, wire, and a stick. I guess if you want to be technical you will need wire cutters (in this case old garden shears) and something to hang the swag with (more wire).

Step 2:

Take one ear of corn and overlap the pulled back husks of the second ear. Wrap wire around the corn at the base and through half the husks of the first ear. I suggest using half the husks so you can fluff the other husks out to fill in between the ears.

Obviously, I didn’t worry to much about the wire showing. I knew this would be hung high over my door and not really visible from a distance. You could easily hide the wire by using brown floral wire or tie with monofilament instead of wire.

Step 3:

I wired 4 ears together facing one way and 4 ears the other direction. Then I wired them to a branch (i.e. the stick) I had laying about the yard. I suggest wiring the corn together first before attaching to the branch. This allows for the corn to hang down freely and look less rigid than when wired directly to the branch.

The corn isn’t all that heavy so you could simply hand the corn attached together however I found a firm base makes it much easier to hang the whole swag on the wall Plus it allows you to arrange the corn attractively while it is on the ground. As you can see from the above picture using a rustic branch, as opposed to a dowel, blends with the harvest theme and doesn’t stand out if it shows between the ears.

Step 4:

There really is no step four because it is that easy.

Usually the grocery stores offer indian corn this time of year but you might also try your local farmers market. While your out, snag a few pumpkins to give an extra harvest touch.

Since Halloween is right around the corner I couldn’t help but add a gargoyle into the mix.