Ever heard of a composting fence? If you want to know how to make a composting fence you can click the link below for our first design of a wire mesh composting fence or scroll right on past this intro for our tutorial on making a wooden composting fence.
I discovered the concept of a composting fence a few years back and Adam so kindly surprised me with the construction of a wire mesh composting fence at the previous house. We could only find a quick reference in an article to what a composting fence’s purpose was and had to figure out how to build it on our own. The wire composting fence was cool, it worked, and we made some awesome instructions and a detailed tutorial on how to build your own composting fence (linked for your convenience).
Fast forward to now: Larger house, looootttttssss of yard waste: As in I have never seen so many sticks, I don’t even understand how the sticks keep appearing level of yard waste… Along side those sticks we have renters as neighbors. The current renters are nice, but they brought some um… interesting… items along with them. I’m not sure who moves an old pile of wood covered in a blue tarp and a large cable antenna hooked to nothing, but they did. I will admit I didn’t really want to see the stuff cause (I’m snotty like that and will pretend I don’t have hardware cloth scraps hanging out in the backyard at the moment). True story, the last renters were arrested in our front yard so I have other reasons than just aesthetics in wanting a bit of a border between the houses. The solution? Wooden Composting Fence 2.0 to the rescue.

Now to the meat for those of you that skipped the introduction:
How to Make a Wooden Composting Fence
There is one important piece you must understand about a composting fence before we continue:
It is meant to SLOWLY compost yard waste. Very dry, mostly carbon material. NOT your food scraps, wet items, etc.
Why? The items in the composting fence break down only at the ground level and never get hot like a nitrogen/carbon balanced compost pile. That being said, it is absolutely great for slowly feeding plantings around the base of the fence. It also takes care of a lot of things you might not put in your compost pile. Larger sticks, roots, lots of leaves, weeds, are all great to throw in there and those tend to take forever in the pile.
Tools and Supplies for a Composting Fence
Let’s just state this right up front: We use copper treated lumber. We have done a lot of research about the dangers and positives of using treated lumber. Not all treated lumber is created the same so we suggest reading the beginning of this article to decide if you want to use treated lumber. For untreated lumber applications I suggest finishing your fence waaaay higher off the ground so none of the boards come close to ground contact, coating your wood in some fashion, using locust or cedar wood, or using our previous design that utilized much less wood and more metal. Otherwise be ready to replace your wood every few years.
Composting Fence Supplies
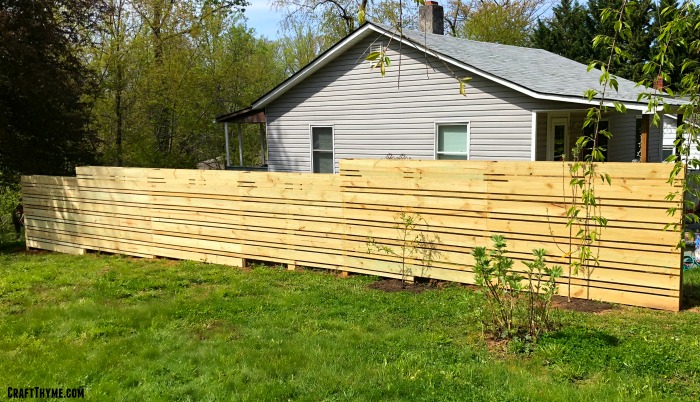
The supply list (may contain affiliate links) and directions cover how to make one panel of a wooden composting fence that is 5′ and 7′ wide. The pictured panels range from 5 to 6′ tall and 7′ wide. We built on a sloped lot and stepped them down accordingly over time. We have 7 panels shown in our photos. Why? Because that length covered the neighbors property and allows us to give a good wide spacing to espalier 4 apple trees, 2 peach trees, and 1 plum tree.
- 2-bags Quikrete: (May not be ncessary to concrete each post if you have hard clay soil and/or you are attaching many posts. If you plan to espalier fruit trees you will need to be able to attach wire and the weight of the trees over time which is why we opted to concrete our posts in.
- 2-4X6 posts (trust us, you do not want to pay for larger sizes
- 4-2X4 boards
- 22 – 8′ Dog Ear Fence Pickets I would suggest buying 2-3 extra in case you break or mis-cut one.
- 24-3″ screws
- 130-1.5″ screws
- Water (Mix with Concrete)
Tools to Build Your Composting Fence
- Post Hole Diggers
- Post Level
- 3′ Level
- Table Saw
- Miter/Chop saw (Optional, but fast for cutting ends)
- Gloves (Unless your hands are like tanned leather)
Step One: Post Assembly For Those Blessed with Upper Arm Strength
The first step is to get the posts assembled and in the ground. You are going to need upper arm strength all around, and if you don’t have it (I don’t) then there is equipment you can rent to dig post holes. I will also mention an alternative for post construction for those of us with T-Rex arms.
1. Dig a whole 2-3 feet down. Post holes are best dug wider at the bottom than the top. This keeps the concrete solid in freeze/thaw conditions. You can read more about elegant post holes here. Frankly, we just try to dig them down and level.
2. Assemble your massive post. Here is where I would diverge from the usual directions:
- Adam, being the manly man, takes the 4X6 post and attaches the 2X4 boards to either side to make a massive with the 3″ screws (4 per board at least) The final assembled ‘tree trunk’ like post is close to 8″ in width which allows space for pretty large sized yard waste. He could just pick up this giant honking post and position it in the hole.
- I can barely move the 4×6. If I was doing this by myself (note: I wouldn’t), I would HAVE to place a 4 X 6 post in the dirt and concrete it in. Once it was set I would then add the 2X4’s to either side above the ground level. So keep in mind how heavy the post gets!

Step Two: Leveling and Setting The Tree Trunk Post
I’m not going to go into details about how to set and level a post because there are a ton of tutorials that already teach this technique better than us. We pretty much follow this Quikrete tutorial (Written tutorial link here):
Couple things that make this job a bit easier are post levels because it makes getting both levels front to back a snap. Trust me it is worth the extra money for the ease of leveling. We also use 2-3 cinder blocks to hold the post in place while it sets. We had them on hand and found it easier than using boards to hold them because you can make minor adjustments by nudging the blocks slightly.
Final tip: If you plan on doing a whole long line of panels you will want to do the following.
- Dig a small post hole and set a temporary post in dirt only at the end of where you want one straight course of panels. (this could be the end of the fence, where it turns, etc) You can even use a 2X4.
- Tie a string to the temporary post and bring it to the first post you plan to set.
- Attach it (we used a screw) around the post so that the string lightly lays along the face of the board on both ends. This makes sure all your posts are facing the same angle and makes attaching the boards easy!
- Concrete your first post and continue down to your second post aligning it to the string as well.
- Once you have your Second post close to correct make sure to lay a board on top and make sure the height is level from post to post!

Step 3: Prepping Your Fence Face
If earlier you wondered why the fence pickets are 8′ but the fence panels are around 7′ well here is where you find out the mystery. You have to cut the dog ear portion of each picket off first. We used out miter saw to do 4-5 at a time. After making a nice straight cut you will want to measure how long to make your boards. You have two options:
- More than one panel: Measure from the end of the first post to the middle of the second post. Measure in a few places. If your post is truly straight and level the distance should be the same. If not you can make micro adjustments on your cuts to get a nice straight line for the next panel.
- One Panel: Measure edge to edge. Again measure in a few places to make sure all the lengths are the same.
Cut your boards to the correct length. Each side will need the following:
- 7- Full sized boards
- 6- 2″ boards (3 full sized boards)
Total (20 boards! 10 for each side)
After that you will run three of the boards through a table saw to make 6- 2″ pieces. Note: try to find pickets with the least number of knots to run through the table saw. Those tend to break or kick out.
We hate lumber waste! We are using the extra 1.5″ to make garden stakes and markers and the extra foot or so to make native bee houses.
Step 4: Attaching the Fence Panels
The composting fence needs lots of light and air to flow through it so that the contents can dry and compact. No one wants a wet-rotting mess for a fence. In order to do so you will need space between each board. There is an easy and hard way to get the space correct. You can measure in between each board OR you can take some scrap wood and cut 2-3/4″ wide spacers. Trust us, the spacers are easier! Two people make this job sooooo much easier.
- Take one full sized board and line it up with the edge and top of your first post. Your partner can do the same with the second post. Check to see if the edges line up nicely (either at the edge or middle depending on your design)
- Use two 1.5″ screws to attached the board to post one
- Repeat on post two
- Yea! Your first board is up. Celebrate with a local brew! (okay no, you have a bunch more to do)
- Take a two inch board and put a spacer underneath the first board to keep a nice 3/4″ space.
- Use a single screw to hook both ends
- Panic because the middle is sagging like crazy!
Alright don’t panic! You will take and extra fence picket and attach it to the middle. Measure down to the ground from the center and cut a picket. Use two screws to attach it flat in the center of the first board. Then use your spacer while a partner pushed the 2″ board into place and affix with a screw.
Repeat this process down the entire front of the fence, then continue these directions down the back

NOW: You can celebrate with a brew! And throw in some sticks!
Final Tips & Techniques
- For more than one panel always measure your lengths front and back. It can look level, be level, but a slight twist means a few boards might need a little extra or less cut off.
- If you are stepping a fence down we found stepping down a full and 2″ board makes a nice attractive step down.
- Don’t forget the boards at the top of the step down will be a lot longer than the ones below
- When you are done don’t be afraid to add a small board along the bottom if the step down made the height off the ground look… wonky…
Now all you have to do is throw in all your leaves, sticks, and brush! Our 7 panel composting fence will hold almost 150 cubic feet of yard waste! Meaning we won’t need to have the city haul off the brush and leaves our regular compost pile couldn’t handle anymore.