Posted on Leave a comment

DIY Pokémon Christmas Tree

It was time to up our nerd game and move to a Pokémon themed Christmas Tree. Over the years we have featured all types of theme trees, but since the entire household plays Pokémon it was like serendipity for this year’s theme. Of course we had to add DIY elements to our Pokémon Christmas theme, but did mix in a few purchased elements. Doing an entire theme tree from scratch can get pricey so this is how we created our budget friendly Pokémon theme Christmas Tree.

We will start with the DIY Pokémon elements, and give you not one, not two, but really just two tutorials, with a third honorable mention. If you want to skip around we will look at the following in this order:

  • How to make a Pokémon energy garland
  • How to make flat Pokéball glitter ornaments
  • How to make pokeball pom pom ornaments. (Or die trying)
  • Pictures and inspiration of the DIY Pokemon Christmas Tree
  • Finally, How to remove glitter from your pets and nether regions (Oh wait, no. We don’t know how to do that)

Pokémon Energy Garland

If you play or collect Pokémon trading cards you are going to end up with loads of energy cards. If you don’t they are suuuuupppper cheap (affiliate links ahead). This tutorial is so easy I didn’t even take pictures. You need the following:

I laid out all of my energy types and decided I just wanted to repeat the same pattern. I unrolled a length of ribbon, fired up the hot glue gun, and then just hot glued a card to the ribbon. Then I skipped the space of two cards on the ribbon and glued down the next. After burning my finger tips and cursing the size of my tree I was done! No wait I wasn’t…

For some reason I thought blingy glitter was a good idea. So, proceeded to had touches of elmer’s glue wherever I wanted garland, then sprinkle glitter in the color that matched the card, and then proceeded to lose my mind as I repeated the process, over and over. Good news the garland is on year two and is just fine. Bad news the dog, cat, and I are covered in glitter from this year and last.

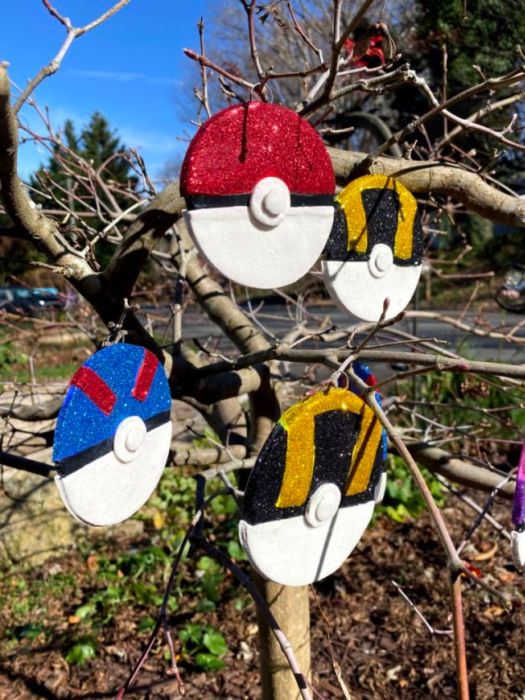
DIY Pokeball Ornaments

Alright, now for a more advanced DIY Pokémon Christmas Tree ornament. For these are are going to need the following:

I found it easiest way to create these pokeballs are to make two ornaments at a time. First roll out your white clay to a little more than 1/4 inch thick and cut a large circle.

Second, roll out your red and do the same as above.

Finally, cut a small strip of black the length of the diameter of the circles. It is very important to start from lightest clay to darkest. It is super easy to get dots of red or black into your white, unless you meticulously clean your cutters. So either go in order (or cover your mistakes with a heap of glitter like me).

Cut both circles in half and lay the out red, black strip, white and lightly mush them together. Then take your rolling pin and roll over the clay to firmly stick them together. This will make your final clay about 1/4 inch thick. Obviously, your circle is now gonna be a little wonky. Use your large cutter to bring it back into shape.

Once you are happy with your striped pokeballs you can use the small cutter (and the lid to your exacto knife) to cut out smaller circles. I rough up the center of the clay and the new circles to make sure it sticks to the flat piece.

When you are done assembling the pokeball Christmas ornament, cut a small slit and insert your metal ring or piece of wire. Close the clay around it, and when you bake the ornament it will become part of it for easy hanging.

Follow your clay baking instructions. I suggest covering your baking dish in tin foil. It keeps the white from turning tan.

Once the clay is cool then you can use glue to glitter. Unless you have sense. If you have sense and don’t want to be covered in glitter for years, you can skip this step. But if in your heart of hearts you want a Pokémon ornament so blinging it brings a tear to a shiny Charizard’s eye? Well then glitter away.

Pom Pom Pokeball

Nope, just no. I thought this was going to be an easy craft, but it wasn’t. If you want to follow my tutorial then it goes like this:

  1. Watch a Pom Pom making tutorial on YouTube using a cardboard ring. Fail
  2. Go buy a cheap Pom Pom maker and try again. Fail
  3. Go buy a more expensive Pom Pom maker and get a decent Pom Pom
  4. Use the expensive Pom Pom maker and try to incorporate red, white, and black into a ball. Make something that looked like poke dots. Fail
  5. Try again. Now the red and white are on one side of the black. Fail
  6. Fail
  7. Fail
  8. Finally figure out how to wrap one so it comes out like a pokeball.
  9. Manage to repeat this process a couple more times.
  10. Stop for the day and forget how to do it
  11. Fail
  12. Fail
  13. Make lots of pretty single color pompoms

Other Pokémon Christmas Decorations

Since this is year two of the Pokémon theme tree we did buy a few ornaments and a tree topper of Pokémon center (not an affiliate link). We added the led lights with glue to make it more festive. I also used part of my fancy card collection to make ‘ornaments’. I used hard card cases and glued on hooks. The cards are perfectly safe.

All in all we are very happy with out nerd tree. I miss our old Star Wars theme, but it felt good to give a new fresh look too! Hope you enjoy and can make your own Pokémon theme tree.

Posted on 1 Comment

Reaganskopp 2017 Christmas Tour

Details of candy colored glass ornaments and retro style tree topper for Christmas.

Let me start by saying I’ve done a lot of Christmas tours in the past, both virtual and real life. A lot of them have been more elaborate. But considering that this tour barely even happened, I think you will still find loads of holiday cheer.

I had truly planned on decorating a single tree and being done with it.  Especially, as we are doing some travel that will cut into decoration enjoyment time….  But then I thought about the kids and how this might be the last Christmas McClain believed in Santa Claus and decided to put up some decorations and stockings.  And then Adam found a really cool tinsel tree on special…  And then we decided to have a Christmas party next week…  So yeah, we ended up decorating the whole flipping house.  And since we went to all that trouble why not share a virtual tour?!

SO it all starts with getting a tree.  This year we got smart and planned ahead with a blanket and gloves.  No more resin on all the things!  And yes, for reference you can fit one giant, mother loving, live, tree and six people in a van.

Getting a Christmas Tree


Afterward it was just a case of bringing out the felt woodland Christmas decorations.  Notice how I left all the fiddly parts of Adam getting the live tree in the stand and in the house out?  Meh…  No one cares about that!

I was still in let’s pare down Christmas mode this year so I didn’t go crazy on the garland. But might have gone crazy with the lights.


Traditional red, green, gold, and white decorations complement felt woodland animals Christmas decorations

Over 900 lights to be exact.  I maaaaayyyy also have added another felt Christmas bird (or two) this year.

Felt Christmas bird with felt snow village and rustic glass ornaments

I did get all the stockings up.  So far they have only been knocked off the mantel say… 10,000 times by the kids.

Traditional red and green stockings hung with felt woodland Christmas decorations

We did felt Christmas last year with probably a little more umph, but I think they held up well.  The kids love the little vignettes I set up with the animals; because everyone needs to have felt birds playing chess on their bookcase.

After the felt Christmas tree was up in the main living room it was time to set up the amazing new tinsel tree.  Since it was a skinny tree we thought it would fit perfect in the sitting area in the master bedroom.  Frankly, it kinda became my ‘tacky’ tree.  I don’t actually think it is tacky, I think it spec’tack’ular in all of its retro glory!

We decorated our skinny tinsel tree in bright tinsel with lots of shiny candy colored ornaments.

The boys helped me find that amaze-balls Christmas tree topper in bright retro colors!

Retro tinsel tree topper in bright candy colors

I started by trying to google how to decorate a tinsel tree so I do something classy but it was like once I got started throwing on shiny stuff I couldn’t help myself.  Classy has never been my forte.  There are layers of  tinsel on the tinsel!  Because one can never have too much tinsel.  Then there are glass birds and ornaments in bright candy colors.

Details of candy colored glass ornaments and retro style tree topper for Christmas.

It literally GLOWS at night.

Colorful decorated tinsel tree at night

And because that wasn’t enough I thought why not add more color and set up my favorite colored bottle brush tree collection.

Bottle Brush Tree Collection in bright colors

At that point EVERYONE in the household was in thrall to the flurry of Christmas appearing throughout the house.  There are table runners, and snow globes, my Mother’s fabulous hand made stockings.  These stockings are a labor of L.O.V.E.

Hand embroidered felt stockings with snowman and woodland creatures

Each boy has their own handmade felt Christmas stocking.  All of them are hand pieced, hand beaded, and even hand fringed.  I’ll be honest I wouldn’t have the patience to achieve these, but ‘Granny’ sure did.  Check out the tiny details.

Details of hand embroidered and beaded felt stockings

Since we had gotten this far in the decorating it seemed only fitting to finish it up with out favorite geek-fest: Our Star Wars Christmas Tree.

Last year we created all the ornaments (with how to make handmade Star Wars Ornament tutorial) and this year we added a new R2D2 stocking and some Star Wars inspired apothecary jar.

Our star wars Christmas Tree with BB-8 tree topper

Yep, that is a BB-8 tree topper.  But we try to give props to both sides of the force.

Apothecary jar decorated for Star Wars Christmas with snow and tie fighters.

Oh and lest I forget, we added some more lights!

Details of our Star Wars Christmas trees with handmade ornaments

As you can see we are a big fan of lights at the Reganskopp household or at least I am and Adam seems happy enough to oblige. We hope you enjoyed the virtual Christmas tour and got some inspiration for your own shiny, felted, nerd Christmas.  Merry Christmas from Craft Thyme!

Posted on Leave a comment

A Felt Christmas

We want to wish you a Merry Felt-mas!  While much of our Christmas decor was Star Wars themed the other side of the house was all about felt Christmas.  I fell in love with some small felt Christmas birds a couple of years ago and the felt just grew from there.  Now we have even more felt birds, banners, trees, wreaths, table runners…  The felt list goes on and on.  You name it and we have felt Christmas’d it.  So to finish out this year’s Christmas posts and give you a final tour we welcome you to our felt Christmas.

Felt Christmas Decorations

In keeping with the felt Christmas theme we try to keep everything simple, cozy, and shades of red, green, and white.  The mantel features enough stockings for our family of six, a simple cut fabric banner, felt wreath, and some little felt animals.  We have a few Christmas pillows, that while not felt, have a warm crewel embroidered snowflake and birds.  Oddly, enough I don’t really even like birds that much IRL.  Apparently, I just like the felt ones.

Felt Christmas Mantel

In case you need some of your own felt Christmas birds I found these adorable ones on Amazon. (Affiliate links to follow)

Felt Christmas Birds

Since this is our main living room we put the live Christmas tree in there.  You will notice that the wreath is hung with the same ribbon on the tree.  I try to be all uniform and snazzy like that.  I have finally managed to replace 95% of my plastic ornaments with glass ones.  If you look closely you can see some mercury glass ornaments with everyone’s initials.  That was a splurge (even when they were on sale) from Anthropologie last year.  To add some pops we have started collecting white ceramic and glass ornaments.  Nothing really pops like white on a dark green tree.  Adam and I spent a lot of time carefully placing and re-placing each other’s ornaments.  Until we gave up on either of us getting them exactly like we wanted them.  Compromise is the soul of Christmas right?

Mercury glass letter Christmas ornaments

We add LOTs of lights (Cause why not make it glow like a thousand suns?!), crystals, but also some pretty cardboard stars to keep it glimmery but in keeping with the rustic felt Christmas theme.

Red, white, and gold Christmas tree in a felt Christmas living room.

The TV stand features a cut snowflake runner in… you got it… red felt.  With a matching tree like the one on the mantel and, of course, more felt animals.

Finally the bookcase showcases my true obsession with felt animals.  In case the fox and squirrel vignette wasn’t enough we also have a quartet of birds in felt camping and snow gear.  Don’t worry there are also Christmas books for the kids on the bookcase and a nice wooden ‘JOY’ sign to break up all the felt goodness.

Felt Christmas Animal Vignette

So if you are feeling our felt (and even if you aren’t) we just want you to know we wish you a Merry Christmas and a Happy New Year… felt Christmas style!

–Sincerely,

Adam & Brianna

Felt Christmas Birds

Posted on 1 Comment

How to Thicken a Sparse Christmas Tree

before and after thickening a sparse Christmas tree using this tutorial.

Ever notice how sparse looking an old or cheap artificial Christmas tree can be?  I’m not a huge fan of artificial trees to begin with… So, the last thing I want to do is have a dejected, sparse, Christmas tree.  Fear not!  I have the simplest tutorial that can teach you how to thicken any Christmas tree.  It can take a sad fake tree and make it look fabulous.  With these easy steps you can breath new life into an old artificial tree or add pizazz to a cheap Christmas tree.  You are going to be shocked by how easy it is to thicken a sparse Christmas tree.

No More Sparse Christmas Trees

How to Thicken a Sparse Christmas Tree tutorial.

It only takes two things to make an artificial Christmas Tree look thick and lush. (Affiliate links to follow)

Supplies

  1. Fake Garland
  2. Something to cut wire

I try to pick up fake garland the day after Thanksgiving.  It is always dirt cheap and can be used as a base to make fabulous evergreen garland, teardrop swags, and thicken a Christmas tree.

Step 1

Put up your sparse Christmas Tree.  Step back and make a face at the lackluster branches.  Look online to see about buying a new, better tree.  Gasp at the prices and proceed to revamp your old artificial tree.

Step 2

Add some lights.  Everything looks better with lights! Fun fact, I had a brief job as a costume designer.  The motto of the theater is “Make it big.  If you can’t make it big make it red.  If you can’t make it red put lights on it.”  Seems legit.

Sparse Christmas tree in need of thickening
Here is a sad sparse Christmas tree. At least it has a little twinkle.

Step 3

Now here is the fun part.  Untie your garland and push in the end until it is near the tree trunk just above the bottom row of branches.  Eye ball where the branches end on the piece of garland and then cut that length.  Cut 4 or 5 more pieces the same length.  Fluff those pieces of garland out and place them right above the bottom row of branches.  You can use a piece of the garland to wrap around another branch or the trunk to secure the piece in place.

Cutting garland to thicken a sparse Christmas Tree.

Step 4

Repeat step three moving up the sparse tree.  You will likely need to fill in 3 or 4 ‘levels’ of tree.  Bonus points if you spend time fluff and twisting, and sprucing it all up.  Personally, I am bad to just shove the branches in and move things around when I decorate if need be.

before and after thickening a sparse Christmas tree using this tutorial.
So Much Better!

Yeah, this really is one of the shortest tutorials I have ever written, but it really is that easy!  Kind of cut, shove, and go!  So, get yourself some cheap garland and make that fake Christmas tree thick and fabulous.

Posted on 7 Comments

Star Wars Christmas Tree

Ornaments for a Star Wars themed Christmas Tree

If you have read anything on our site you might have realized we are a bit nerdy.  So after finding a set of Star Wars stockings for the whole family it only made sense to make our own Star Wars Christmas tree.  However, have you seen how much Star Wars ornaments cost?  Holy night!  We had to turn to our DIY know how to make a full Star Wars Christmas tree complete with BB-8 topper and custom ornaments from all of the movies.  Here is a tour of our Star Wars Christmas tree with a few DIY and money saving tips, in case you want to make your own.

Star Wars stockings hung on a mantel as part of Star Wars Christmas Decorations

I love these stockings and you can still order them when I published this article (Affiliate links to follow).

Star Wars Christmas Tree

Here is the tree in all of it’s glory.  We stuck with colors of the light and dark side.  Blue, silver, red, and black.  With a touch of gold here and there for shimmer and C-3PO.  It is Christmas after all!  You can see here that the BB-8 tree topper is lit.  We created the topper from paper party lanterns.  I cut the excess metal from the frames and glued the lantern’s together.  Then I stuffed a small pack of battery lit LED lights.  They are on a timer and come on each evening.  They also stay cool to the touch making sure the paper lantern is nice a safe.  We got the lantern from the party section of Target but you can also order them off Amazon.

DIY advice and tutorial links on how to make your own Star Wars Christmas Tree

Star Wars Christmas Lights

If you look carefully you can see we sprung for a couple strands of Star Wars lights.  Yoda is donning a festive Santa hat and BB-8 is glowing.  We stumbled across these at CVS while waiting for flu shots.  They were way cheaper than Amazon and we got a 20% off coupon for getting flu shots in store.  You can opt to order them from Amazon. We also got some R2-D2 lights on sale recently, but we had already decorated the tree so we will save them till next year.

Details of a Star Wars Christmas Tree

DIY Star Wars Ornaments

Most of the rest of the Star Wars Ornaments were made by us.  You can read all about how to make your own DIY Star Wars Christmas Ornaments on our detailed tutorial.  They came out for less than .50 an ornament and we got to have most of the main characters from all of the films.  Though we might have opted to skip Jar Jar Binks… Some of my favorites were Yoda and just the general Star Wars logo on a nice matte red Christmas ball.  You can see those details on the tutorial mentioned above.

Ornaments for a Star Wars themed Christmas Tree

While, we didn’t exactly DIY we did reuse lots and lots of Star Wars ships.  Our kids have quite a collection of ships and they chose to keep a few to play with and let us use the rest for the tree.  The gold millennium falcon made a nice touch near the top.  I would have loved to add Boba Fett’s Slave that we have in gold, but alas, I couldn’t get Conlan to part with it for the tree.

Millennium Falcon ornament decorating a Star Wars Christmas Tree

Finishing out the Star Wars Christmas Tree

To finish it off we opted to use some large paper cutouts of Tie Fighters and X-wings that we had left over from McClain’s birthday party.  They had been ceiling decorations that we cut apart and used as large focal points on the tree.  The most perfect coincidence happened when we had just finished decorating the tree.  Granny  & Papaw came by with the yearly gift of Christmas ornaments for the boys and what should appear? Darth Vader (Conlan), Yoda (McClain), BB-8 (Cooper) and Olaf (Keaton’s went on another tree). These ended up being the perfect complement to the tree.

If you are looking to purchase ornaments here are some options:

I grabbed some black flannel fabric on sale and wrapped it around the base for a tree skirt.  We made sure to find wrapping paper with lots of silver, black, red, and blue.  We even found some silver with geometric shapes that looked “Droid” like and blue “Galaxy” paper.  All in all the Star Wars Christmas Tree and presents ended up being the perfect compliment to the Star Wars stockings we had found.  I am really happy with how our Star Wars themed Christmas room turned out.  Especially since it didn’t end up costing a fortune!

Galaxy wrapping paper in a Star Wars themed Christmas room

Make your own Star Wars Christmas Tree with these easy tips