Before we even begin this post let me just say that repotting orchids and orchids in general are not my strong suit. My mother seems to have the knack for keeping an orchid alive and all tips have been learned by watching her methods. This bark method works well for what I call the general orchid; ones you can pick up at home improvement and grocery stores (phalaenopsis for the picky of us). However, there are many types. Research your specific variety or you may end up with a dead orchid on your hands and these suckers are not cheap!
Materials needed
- Pots: Make these well draining!!! There are special pots with lots of holes on the side. I find a fast drying terracotta also works well. NO plastic. I have a tutorial on faux finishing pots for a rustic look if you want a way to jazz up the pots.
- Orchid bark: Available at any home improvement store
- Orchid: Going to need something to repot

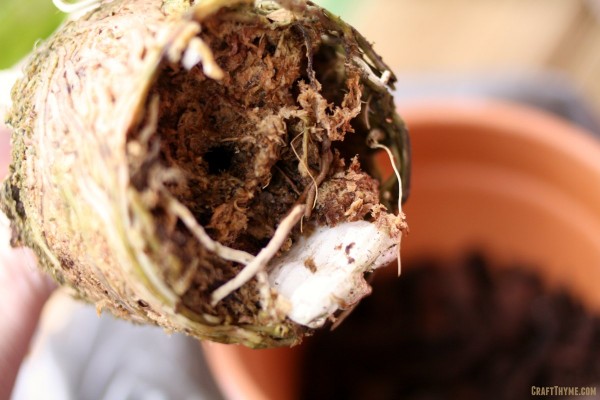
Step 1: Removing the Orchid
Most orchids you buy are crammed into these tiny plastic pots and packed with moss. This is just… no. Orchid roots need to breathe and have excellent drainage. While they like moist conditions, soggy roots are just asking to rot the whole plant from the inside. Get that poor sucker out of that tiny cup and start removing the packed in moss. Tease out the roots. Important!!!! If you see any mushy brown roots cut them off immediately.

Step 2: Save Some Moss
Unless the moss is in a poor or rotted condition I save a tiny amount to mix in the bark. I do mean tiny! I would not go more than a 1/4 of the mix of bark and moss. You are trying to remedy the situation of trapped soggy roots, not add to it with compacted wet moss. The reason I add the moss is to maintain a little more moisture. My house is very dry, so you could skip the moss entirely if you live in humid locations.
Step 3: Plunk Orchid in Pot
I am sorry this is not more complicated… Basically throw some bark/moss in the pot, fan out the orchid roots, stick in pot, and pour more bark on top. If a root sticks out, no worries!!! Be aware that orchids in bark are not terribly rooted down. Basically do not put them in a high child or cat traffic areas where they will get constantly pulled out of the pot. Ask me how I know this… Once I have them in the bark I set them in the sink and give all the roots and bark a thorough wet down. Do NOT soak! Just let the water run through. Then repeat this type of watering whenever the bark dries out.

Some orchids like cramped quarters but yes soggy feet are not one of their likes. I haven’t had much luck with shop orchids
I love them into the grave when repotting. Cattylias and dendonobriums sorry for the poor spelling seem to be more my friend. Always sterilise your tools. Orchids normally thrive on a tree in rainforest. If some roots want to show off let them
Good call. My mother grows the best orchids. Even from big box stores she gets them to rebloom for years. After she repots them it is a loooong time before they ever get repotted again.
How do you get an orchid to rebloom
From my experience the simply rebloom in the early spring. Generally right after Christmas. My mother has the best luck with her’s reblooming around that time every. single. year. I asked what she does special, and the answer was basically nothing, other than keeping them on her sunny dining room table when people aren’t eating.
I actually microwave the bark and cool it before I use it. It prevents anything that moved into the bark during store transport and storage from moving into my house. 30 seconds is enough.
Hmm… I have heard of low oven and then trying to be careful not to burn the bark, but this sounds a lot easier! Thanks for the idea. I guess you would need to be careful to not burn the bark in the microwave too.
I soaked my bark first ( new bark need to hydrate) then put my orchid in the bark and ENJOY
Great addition! I should have added that.