Posted on 26 Comments

Red & Silver Christmas Table Setting

Today’s holiday table setting is based on red, silver, gold, and mirrored shine. This Christmas tablescape utilizes only a few items, but gives a sense of elegance and expense through the use of mirrored surfaces, warm lighting, and holiday shimmer. Enough with the chit-chat and catalog description let us take a look:

You might recognize some of these tablescape elements from earlier Christmas table decor. Since that table setting utilized a lot of live moss and twigs I wanted to create something that could make it through the whole holiday season without constant maintenance.

So instead I utilized a tiered serving piece as a table centerpiece. Filled (very carefully I might add) with glass ornaments in red, silver, and gold with added sparkle from mirrored accents set around the dish. Using the same glass ornaments, red glass birds, and lights I made a holiday tree out of branches to set in the corner, and mask the fact I still haven’t placed any artwork in the dining room. Let’s take a look at some accents:

I (and my bank account) personally like to reuse Christmas decorations from previous years. The table runner and napkins were from Target in 2010. I have amassed the collection of glass ornaments mainly for a few dollars here and there at Goodwill. I have a thing for glass, however I also have cats and a toddler… It is necessary to get my glass ornaments in the least expensive manner possible i.e. dirt cheap. On the note of cheap, I used a scarf layered under the table runner to add a little more red and pattern to the table.

The crystal candlesticks were a gift at my wedding. I have to admit at 23 I was kind of like WTH? is up with these fancy-schmancy candlesticks. However, 23 year old self was a douche! I have used these puppies over and over again. Nothing elevates a look like shimmer from crystal, silver, and gold.

My favorite thing about this table decor? Even when I remove the place settings and just leave the center runner and decorations it works great with our everyday meals, plus I’m not stuck misting moss everyday.

Posted on 8 Comments

Snowy Woodland Tablescape

I created the following place setting and tablescape for tomorrow’s Centsational Girl/Homegoods Holiday Tablescape Contest. Well I created it for that contest and for my own Christmas decorations.

The inspiration for this particular project was the snowy woodlands of Western North Carolina. But enough chit-chat let us take a look and we can discuss more after a few photos.


The idea was to design a tablescape that embodied the spirit of Homegoods based on style, affordability, and creativity. I hope I achieved all three. I actually went to Homegoods/TJMaxx to scope out what they were doing for the holidays. I wrote about their trends here and then went ahead and followed none of them.

While, it was NOT even implied you needed to purchase a product from Homegoods I happened to fall in love with the tiered display item I used as a centerpiece. I’m not even entirely sure what its intended use is, but I loved the fretwork and patina, which immediately put me in mind of the outdoors. Since the cold weather at Christmas leaves us stuck indoors, I thought it would be great to bring the outside in. Live moss, old branches, vines, and fluffy snow decorate mirrors that mimic the cool streams of the mountains. Glass cardinals give a nod to North Carolina (State Bird) and add some pops of color for Christmas. Here are some more details:


You’ll have to be the judge as to creativity and style. However, I can attest to the affordability! Most of the tablescape is constructed with items my son and I gathered while wandering the neighborhood. I already had plates, red glass balls, some mirrors (candle mirrors), and fake snow (from a previous Christmas). I really only purchased the tiered stand, some new napkins, and the glass cardinals. Altogether it was much less than $50 and I have plans to reuse the stand all year long.

If you would like to construct something similar here’s a quick guide to how I created the tablescape.

  1. I laid out the main objects. The white “runner” is a cut open trashbag. I wanted to use the bare wood of the table but protect it from the damp moss and branches. You can see my “helper” supervising in the background.
  2. I wanted an organic centerpiece so I cut the plastic to both wrap around and touch certain place settings. BTW, if you hadn’t noticed there is a two year old helping me create this. So I can attest the main layout doesn’t take long at all.
  3. I took various types of moss, lichens, and branches and laid them to follow the curves of the outline and act as stream banks for the mirrors. In case you worried we only gathered small sections of moss since it takes forever to grow. I wanted to make sure not to denude the neighborhood. Most of the moss will get replanted in a few weeks too.
  4. I filed in the open areas with snow. I tried to mimic the natural way snow lands and melts to let some of the landscape show through.
Not shown: Other steps involved adding my red accents, switching out various colors of dishes. Though I only own one set of fine china, and an everyday set of white and green. So there wasn’t much in the way of trading the plates out. I took the red napkins and twisted them into bow shapes to place in the bowls instead of using traditional napkin rings. While, offsetting the plates to give a modern edge to the tablescape. Finally, I want to note that I had some store bought vines and lichens (from previous crafting projects) that I used on the plates and chair decorations. I figure guests want to enjoy nature without tasting it.
Posted on 2 Comments

5-Five Minute Fall Place Settings

One of the things that often holds me back from entertaining is the feeling I need elaborate decorations. Honestly, after I have managed to clean the house and corral the toys I have very little energy left to give a nice seasonal feel to the house. So to prove to myself you can make some pretty place settings in no time I created:

5 Place Settings in 5 Minutes for under 5 Dollars

I used a placemats, napkins, and china I already had to make these place settings. I figure most people own a neutral napkin and placemat they can use in a pinch. I can guarantee these are quick, easy, and cheap. Why? Because I did these last night in less than an hour (with pictures) after McClain went to bed. Of course this is also why the pictures are a little dark.

Butterflies and Dried Hydrangea Place Setting

Wired craft butterflies taped to the table. The tape is covered with mini-pumpkins and dried hydrangea.

Country Acorns Napkin Ring

Simple strips of burlap act as a napkin ring. Just use hot glue to close the ring and attach the acorns.

Fall Berries Tucked Around the Place Setting

The napkin is folded to allow a small pocket. Instead of inserting the silverware simply tuck in some fall berries. Add some more small branches along the outsides of the plates.

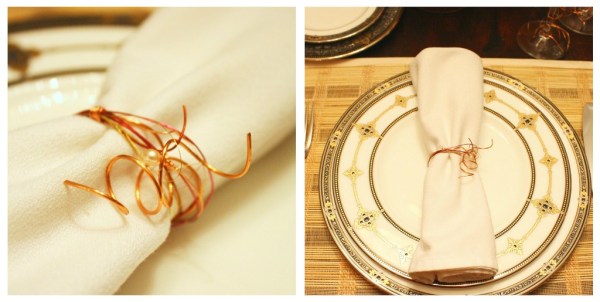
Copper Vines Napkin Ring and Wine Charms

Scrap wire in various shades of copper and gold are wrapped to mimic vines. Matching wire is placed around the stem of the wine glasses to make wine charms.

Fresh Autumn Leaf Napkin Rings and Coasters

Simply hot glue colorful fall leaves together; creating the original disposable napkin ring. A few dots of hot glue keep the leaf coasters from scattering when guests lift their glasses.

Now there are no excuses left for me to not entertain. Well except maybe cooking the food…

Posted on 10 Comments

Simple Christmas Table Setting

You know how I said I wouldn’t give away more of my house before the Canton Christmas Charity Tour of Homes? Yeah, I lied. I am so excited about how the table setting turned out in the dining room that I had to give a few more peeks at the Christmas vignette I created as my centerpiece.

Instead of the golden shimmer of the living room, I went with a frosty blue shimmer in the dining area. I created a scene of deer in a snowing forest for the table setting’s centerpiece. Clearly this is more interpretive since I have yet to see metallic deer bounding about Western North Carolina. Though I bet some of the local hunters would go ape-shit if we did have silver deer running around. But only if they were 12 point bucks, because everyone has already bagged an 8 point this year…

Back to the centerpiece, I scored this young buck and his mate at Rite-Aid, on sale for less than $7. I already had the crystal candlesticks (wedding present) and silver Christmas tree. Then I added some fake snow and glass babbles from a garland that got broken.

The whole table setting is set for two (don’t worry McClain has his own place setting at his high chair) and looks like this:

Yeah, I had to Google how to lay all that glassware out correctly… I mean we always entertain with water, red wine, and a sparkling aperitif. Doesn’t everyone?

You might notice there is one HONKING-huge light fixture hanging above the table. Words can not describe its beveled glass, brass, hugeness. Suffice to say it is UGGGGGly. Since I didn’t have the time/budget to remove this bad boy I covered it in fresh evergreen garland mixed with ivy that had flowered and made blue berries. Who knew ivy could do that?

I also bought a large pack of plastic snowflakes at the Dollartree and covered them in a large flake glitter I got in the floral section of A.C. Moore (Due to my craft hoarding habits I just happened to have that on hand from a previous project I never actually completed). These snow flakes then got suspended from the brass tentacle arms of the light-monstrosity.

While I’m still not a fan of the fixture I do love the way the snowflakes are suspended over the eating area.

Oh and I got to use more of my wedding gifts in the form of my china pattern (Vintage Jewel by Lennox) and cobalt-blue, satin placemats and napkins. I actually took two napkins (one matching the runner) and rolled them together and used the extra snowflakes as a napkin ring.

Finally I created other touches to match around the room by using unbroken bead garland on the window.

And using my stash of cobalt blue glass. I found a single bottle of cobalt blue glass in the local river when I was around 13. I have been obsessed ever since!

I hope you enjoyed the other side of my Frosty Metallic Christmas. If you want to see the whole thing and you live in Western North Carolina you can attend the Canton Christmas Tour of Homes Dec. 5. After that date I will be posting all the details for those that can’t come!