Posted on 8 Comments

How to Make Kombucha Scoby Gummy Candies

Marinading scoby to make gummies from kombucha

If you brew Kombucha you might be wondering “What the hell am I supposed to do with all these Scoby’s?” (I’m sure everyone is thinking ‘Scoby Gummy?’) I mean, each batch makes a new scoby and after 4 or 5 of the gelatinous masses you may be wondering what you can do with them. Because let’s face it, if you are making Kombucha you might be a little into not throwing everything away. In comes a use for the Kombucha Scoby! You can eat them. Even better, you can make kombucha scoby gummy candy.

I’ll let you digest that for a moment. (get it?)

If you want to skip down below I’ll walk you through how to make a sweet cinnamon, ginger scoby gummy. But if you are along for this insane ride, then read on:

Cross section of a kombucha scoby that is being prepared to make scoby gummy candy
We are going to make an edible food product out of this Kombucha gummy?

I had too many scoby (scobies? scoobies?) cluttering up my Kombucha jar already when, Adam, came home from work one day and said: “I ate a kombucha gummy at work today”. For those of you that know, Adam, I swear this is true. Like on my grave, this actually happened! The exchange went like this:

Me: You ate what?

Adam: A kombucha gummy one of my employees made.

Me: I’m sorry, I don’t think I heard you correctly. What was it made out of?

Adam: You heard me, I ate a gummy made out of that gross thing that grows on your kombucha

Me: *blinking a few times as I try to reconcile the man I know, who wouldn’t take an acidophilus pill after the stomach flu, but suddenly ate a random kombucha scoby gummy at work*

Adam: It was pretty good. He says he just dips them in honey and to cut them with scissors cause they are hard to cut.

The Adam went on about his business and I started googling things like “Kombucha Gummy”, “Can I eat a Scoby”, and “Are Scoby edible”. At that point lunch break was over and I gave Adam firm instructions to figure out how they were made. He did ask but came back with vague instructions like “Dry them” and “Dip in sweetener”. Sooooo not like a recipe and then I promptly forgot my plans to make kombucha scoby candy.

Until now! Hence:

How to Make Kombucha Scoby Gummies aka Scoby Candy

Kombucha scoby that is being prepped for cinnamon ginger scoby gummies

Step 1: Regret Your Decision to Make Kombucha Gummies

No, seriously. Have you really spent any time with your scoby? I desperately want to be an earthy hippy, but damn, scoby are nasty. I always try to transfer my scoby over with the least amount of thought and attention, lest I forever am unable to drink kombucha.

Learning how to make a kombucha scoby gummy is going to get you up and personal with your kombucha slime plug. And folks, it ain’t pretty. You have been warned.

  1. Get a bunch of Kombucha Scoby
  2. Cut them into 1 inch chunks

There are so many cringe factors during this process I began to question my life choices. I finally equated it to cutting raw chicken fat in my brain. FYI, That didn’t help.

Use a sharp knife, use scissors, pull it apart. I don’t care how you do it. But get them into smaller pieces.

Use scisors to cut a kombucha scoby for making scoby gummy candy
Soo… Yum… Yeah scoby does not generally equal candy in my mind….

Step 2: If You Actually Want to Go on After Step 1: Marinade

So now that you have this chunked pile of rubbery scoby you will need to sweeten it. (Am I being too real about the process? Let me know in the comments!) Scoby supposedly doesn’t taste like hardly anything by itself. It would take a large sum of money for me to verify this myself. If you want to send me the money I’ll see about tasting a plain kombucha scoby, but otherwise I was content to let the internet be my guide.

I treated my scoby gummies like any other pickling or sugaring process. I layered the scoby gummies in a dish and then covered them with a layer of sugar, cinnamon, and chopped ginger root. Don’t be picky here folks. I found some shriveled ginger on the counter and threw in sugar and cinnamon till it looked “okay”. Then I did layer after layer until it was all covered.

Mix cinnamon powder, ginger, and sugar to marinade scoby chunks for sweet gummies

TLDR:

  • Cinnamon Powder
  • Chunks o’ ginger root
  • Sugar
  • Scoby

Layer all ingredients and marinate overnight. Stir occasionally.

Making a dry rub of cinnamon, sugar, and ginger to marinate the scoby in overnight
I mean it looks a little more appetizing with a layer of cinnamon and sugar. Maybe…

Step 3: Oh hell, you are really going to see Kombucha Gummies through

Now that you have your bowl of awesome kombucha scoby gummy goodness marinated, its time to get it in gummy form. This part requires cooking or drying. I opted for marinating and drying, because if I have gone this far I am going to go hole hog and try to preserve the most probiotic qualities of the Kombucha Scoby. HOWEVER, if you too, severely questioned your life choices in step 1 but don’t want to throw away the bowl of scoby gummy goodness you made in step 2? Then you can use this cooked Scoby Candy tutorial I found. Otherwise, if you want to go balls out on this whole process continue on. I’m a lady balls out kind of girl:

  • Prep a cookie sheet or dehydrator rack with parchment paper.
Prepping drying racks for kombucha scoby with parchement paper
I just cut out a piece to fit slightly inside the rack and leave holes for air flow on the sides.

The Scoby is wet… Like really wet. So I left air circulation slits on both sides and just lined the trays down the middle. If you are using an oven go with 110 degrees for 48 hours. But dehydrate these puppies until they are firm and rubbery, but not brittle.

Prepping dehydrator racks with marinated scoby
Make sure to leave space around each one as they will stick together as they dry.

Why? Because you have a gelatinous mass covered in sticky sugar… You are going to need to get that puppy of the rack somehow. I have this AMAZEBALLS dehydrator I found at a yard sale. If you ever liked late 80’s early 90’s infomercials then you too will covet my original Ronco Food Dehydrator. Covet away.

Dried cinnamon ginger Kombucha Scoby Gummy
They come out looking much like dried fruit. I wonder if you could use them as such in recipes?

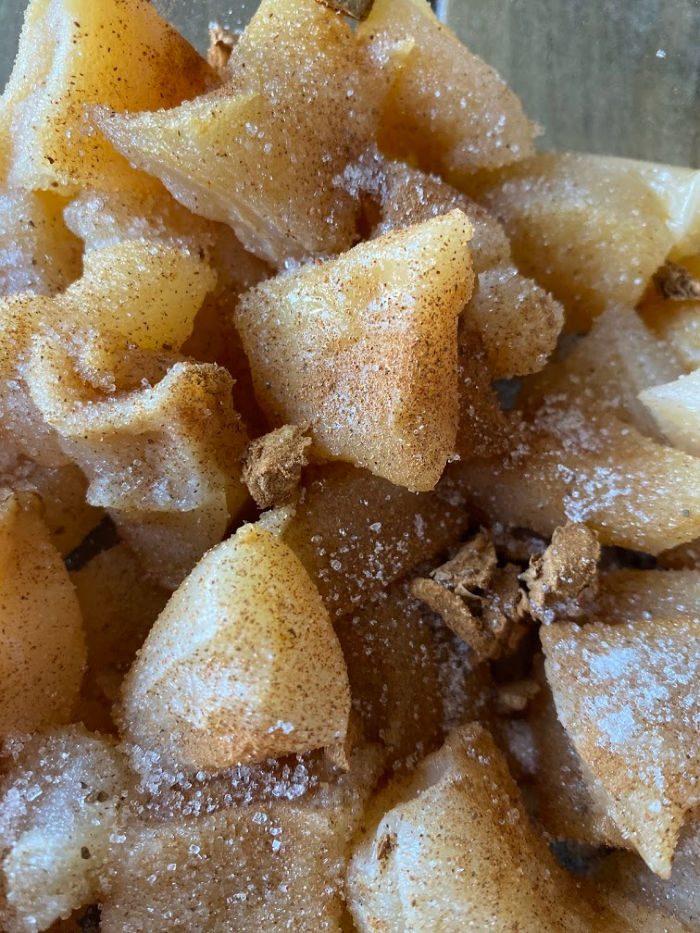
Step 4: Make Scoby Gummy Candies Visually Appear Like Something You Would Eat

Well, we have come this far on our Kombucha Scoby Gummy adventure. And while they look more like some type of holisitic, natural gummy (read: Dried Fruit) when dried I still think they need fancying up. Aka, made to look like a candy.

Again this is pretty simplistic:

  • Powdered Sugar
  • Cinnamon Powder

I mixed some together then dusted the pieces for a bit of sweetness and to keep them from sticking together.

Cinnamon & Ginger Kombucha Scoby Gummies finished with a light dusting of powdered sugar.

Step 5: Taste one. I dare you.

Welp, the big event: Tasting one of these ‘things’ you made. Because we aren’t wusses up in here, and we made this shit, so we will taste it. (Say this with me)

SURPRISE these are actually edible and good!

Also a surprise, a few of my treats got some real ginger fire! I’ll likely use ginger powder next time to even the distribution.

I’m treating mine like other dehydrated foods and assuming they have a limited shelf life (couple O’ months at best in non-hot, non-humid environments). I doubt they will make it that long, but if they do, I plan to wrap them individually in some wax paper twists and freeze or refrigerate.

10/10 would make kombucha scoby gummies while questioning my life choices. Glad I finally found a use for all these scoby!

Please let me know if you try this and any other uses you have for those extra Scoby!

How to make kombucha scoby gummies.  These natural gummy candies are simple to make and use all those extra kombucha scoby you have laying around.
Posted on Leave a comment

Mixed Berry Sangria

Mixed berry sangria garnished with lemon balm

Sangria is perfect for anytime of year.  But this mixed berry sangria recipe adds a hint of lemonade, making it perfect for summer. It is a super easy recipe for sangria that everyone will rave over at dinner parties.  You can pretend it took a lot of time and labor.  I won’t tell.Mixed berry sangria garnished with lemon balm

Ingredients

1/2 to 1 bottle of White or Blush Wine (don’t go for super expensive but don’t go for super cheap)

1/4 Cup Chambord

1/4 Cup Peach Schnapps

Lemonade

Superfine or Confectioners Sugar (if not using a sweet commercial lemonade)

2 Cups mixed berries (frozen or fresh)

Lemon Balm (for garnish)

Mixed berry and lemonade sangria recipe

Directions For Awesomeness

Fill a pitcher 1/2 full with wine.  Add the liqueurs and the berries.  Top off with lemonade.  Taste test and add sugar till sweet enough for your tastes (I like mine tart so I don’t add sugar).  Allow the mixture to set overnight as it will develop more berry flavor.  Pour into glasses and garnish with fresh lemon balm.

Pitcher of mixed berry sangria


While you are waiting for the Sangria to develop you probably have an almost full bottle of Chambord and Schnapps with a half a bottle of wine…  Do I need to fill your time in for you?

Have you ever had Chambord over ice cream?  I mean what is there not to like about alcohol and ice cream? Or Schnapps in lemonade? Or alcohol in alcohol… Did I mention I have two boys.  Ages 3 and 1. Yeah I know my way around some alcohol.  Hope you enjoy as well ;).

Enjoy these articles?  Get periodic updates by joining my mailing list (no spam, no way, no how) or subscribing to my RSS feed.

See more great crafts and decor at these link parties: Pink Recipe Box, Somewhat Simple, The Stitchin’ Mommy, Lovely Crafty Home, Pint Sized Baker

Posted on Leave a comment

Gingerbread Cake: Last Minute Holiday Baking

One thread you’ll notice if you read here long is that I am consistently completing tasks at the last minute. I loathe being late, but I can’t say I manage to get things done weeks in advance. As usual I needed a last minute Holiday recipe and ummm… Well last year I recommended my chocolate dipped pretzels, which, would have been wonderful IF I had reviewed my recipe. Yeah, I burned chocolate… again.

Since this happens a lot I have a fall back recipe. I think the recipe originally started with one I found in a magazine, but I have tweaked it until it makes a nice moist semi-sweet cake that looks like this:

You can bake in a large bunt pan, but I like to bake them in mini-loaf pans and give them as small gifts. As cakes go this one seems to rise well, not stick, and are predictably tasty. Best part they make a great breakfast treat if there are any left over :).

Recipe

Dry ingredients:

  1. 2 & 3/4 cup Flour
  2. 1 tsp Cinnamon
  3. 2 tsp Ginger
  4. 1 tsp Baking Powder
  5. 1 tsp Baking Soda
For additional spice you can also add 1 tsp nutmeg.
Creamy ingredients:
  1. 1 & 1/4 cup Shortening
  2. 1/4 cup Packed brown sugar
  3. 1/4 cup White sugar
  4. 2 Eggs
  5. 1 cup Molasses
Liquid:
  1. 1 cup Water

Directions:

Mix all the dry ingredients together in a bowl. In a separate bowl use a hand or stand mixer to whip the shortening until fluffy. Then fully cream in the brown and white sugar. Once completely whipped mix in the eggs and molasses. Then mix the dry and liquid into the creamy ingredients.

It works best to alternate 1/3 dry with 1/3 water. Just mix until everything is incorporated. Try not to over mix.

Bake at 350 degrees for 35 minutes for small loaf pans or 50 minutes for single cakes. I spray the pans with non-stick cooking spray. I tried traditional greasing with flour but had it stick a few times. Let it cool at 15 minutes and turn out to finish cooling after that.

For Added Sweetness

It is easy to make a simple lemon glaze to pour across the top.

  1. 1 cup Powdered Sugar
  2. 2 tbsp Lemon Juice
Optional candied ginger for garnish.
Mix the sugar with vanilla and lemon juice. If watery add more sugar and if still dry add water until liquid enough to pour. Pour over the cakes and top with crystallized ginger. Let dry to form a hard glaze then wrap cakes to keep moist.
Enjoy!
Posted on 1 Comment

Last Minute Christmas Dish or Gift

Need a last minute snack or hostess gift to bring to a holiday party in the next couple of weeks? Well I’ve got your answer right here. As we know I’m not much for cooking and a lot of times baking is just out of the question. My answer: Chocolate dipped pretzels.

Bonus: If you’re not a douche-canoe like me then you will really only need a measuring cup and spoon to create this dish. Low Cleanup!

Let’s start with some pretties:

Here’s the recipe (Makes around 24 rods):

1 cup chocolate Chips

1 tbsp butter or crisco

1 bag of pretzel rods

1 candy cane

1 glass of wine

The Secret Ingredients (Holiday Style)

Step one:

Get all the pent up family-Christmas frustrations out on the candy cane or 4 small candy canes by beating it into small pieces with a mallet or the back of a spoon. I put mine in a sandwich bag to keep the pieces from flying. At this point if you still feel stressed drink the wine and beat more candy canes with mallets.

Step two:

Open the pretzels and eat any broken ones.

Step three:

Give your baby kitchen tools (non-sharp) and/or a candy cane to entertain them while your being domestic in the kitchen.

Must…Entertain…The baby.

Step four:

Don’t be a douche-canoe when melting your chocolate chips. I was too lazy to read the directions and hadn’t melted chocolate in a awhile so I burned it not once, not twice, but three times both in a double boiler and microwave. Just don’t do that. Burnt chocolate is no fun. Put 1 cup of chocolate chips in a microwave proof cup or bowl with the tbsp of butter or crisco. Put it in the microwave for one, 1, ONE minute. Even if you have a crappy microwave start with one. Take it out and stir the hell out of it. Then if it still needs more try 10 seconds at a time.

Only I can make a one dish recipe take multiple dishes. I didn’t bother taking photos of the third time I burned the chocolate.

Step five:

Dip pretzels in chocolate and lay out on a piece of parchment paper/wax paper/ cookie sheet. I always make half mint by sprinkling on crushed candy cane while the chocolate is still melted. I leave the other half plain in case someone doesn’t like mint. Finally, just let them harden. If you need them completed in a hurry just put them on a cookie sheet and stick in the freezer for 5 minutes.

Just a few notes:

I always bring mine to a party the same or next day so I don’t bother tempering the chocolate. Also, they look really pretty wrapped in a small cellophane bag as a small hostess gift.

Anyone else got a quick and easy holiday recipe/gift they would like to share?