Let me start by saying I’ve done a lot of Christmas tours in the past, both virtual and real life. A lot of them have been more elaborate. But considering that this tour barely even happened, I think you will still find loads of holiday cheer.
I had truly planned on decorating a single tree and being done with it. Especially, as we are doing some travel that will cut into decoration enjoyment time…. But then I thought about the kids and how this might be the last Christmas McClain believed in Santa Claus and decided to put up some decorations and stockings. And then Adam found a really cool tinsel tree on special… And then we decided to have a Christmas party next week… So yeah, we ended up decorating the whole flipping house. And since we went to all that trouble why not share a virtual tour?!
SO it all starts with getting a tree. This year we got smart and planned ahead with a blanket and gloves. No more resin on all the things! And yes, for reference you can fit one giant, mother loving, live, tree and six people in a van.
Afterward it was just a case of bringing out the felt woodland Christmas decorations. Notice how I left all the fiddly parts of Adam getting the live tree in the stand and in the house out? Meh… No one cares about that!
I was still in let’s pare down Christmas mode this year so I didn’t go crazy on the garland. But might have gone crazy with the lights.
Over 900 lights to be exact. I maaaaayyyy also have added another felt Christmas bird (or two) this year.
I did get all the stockings up. So far they have only been knocked off the mantel say… 10,000 times by the kids.
We did felt Christmas last year with probably a little more umph, but I think they held up well. The kids love the little vignettes I set up with the animals; because everyone needs to have felt birds playing chess on their bookcase.
After the felt Christmas tree was up in the main living room it was time to set up the amazing new tinsel tree. Since it was a skinny tree we thought it would fit perfect in the sitting area in the master bedroom. Frankly, it kinda became my ‘tacky’ tree. I don’t actually think it is tacky, I think it spec’tack’ular in all of its retro glory!
The boys helped me find that amaze-balls Christmas tree topper in bright retro colors!
I started by trying to google how to decorate a tinsel tree so I do something classy but it was like once I got started throwing on shiny stuff I couldn’t help myself. Classy has never been my forte. There are layers of tinsel on the tinsel! Because one can never have too much tinsel. Then there are glass birds and ornaments in bright candy colors.
It literally GLOWS at night.
And because that wasn’t enough I thought why not add more color and set up my favorite colored bottle brush tree collection.
At that point EVERYONE in the household was in thrall to the flurry of Christmas appearing throughout the house. There are table runners, and snow globes, my Mother’s fabulous hand made stockings. These stockings are a labor of L.O.V.E.
Each boy has their own handmade felt Christmas stocking. All of them are hand pieced, hand beaded, and even hand fringed. I’ll be honest I wouldn’t have the patience to achieve these, but ‘Granny’ sure did. Check out the tiny details.
Since we had gotten this far in the decorating it seemed only fitting to finish it up with out favorite geek-fest: Our Star Wars Christmas Tree.
Yep, that is a BB-8 tree topper. But we try to give props to both sides of the force.
Oh and lest I forget, we added some more lights!
As you can see we are a big fan of lights at the Reganskopp household or at least I am and Adam seems happy enough to oblige. We hope you enjoyed the virtual Christmas tour and got some inspiration for your own shiny, felted, nerd Christmas. Merry Christmas from Craft Thyme!
Want a rabbit hutch that looks elegant? Well, we did! We wanted to DIY an indoor rabbit hutch for our new family members Ollie and Biscuit. We got these rabbits from Adam’s work as a co-worker’s friend was trying to rehome her bunnies before embarking on a lot of travel. You might wonder how we decided to get some rabbits and it went something like this:
Forwarded email from Adam: Want to get some rabbits?
Me via Instant message: Ummmm… Sure?
Adam via IM: The boys will love them.
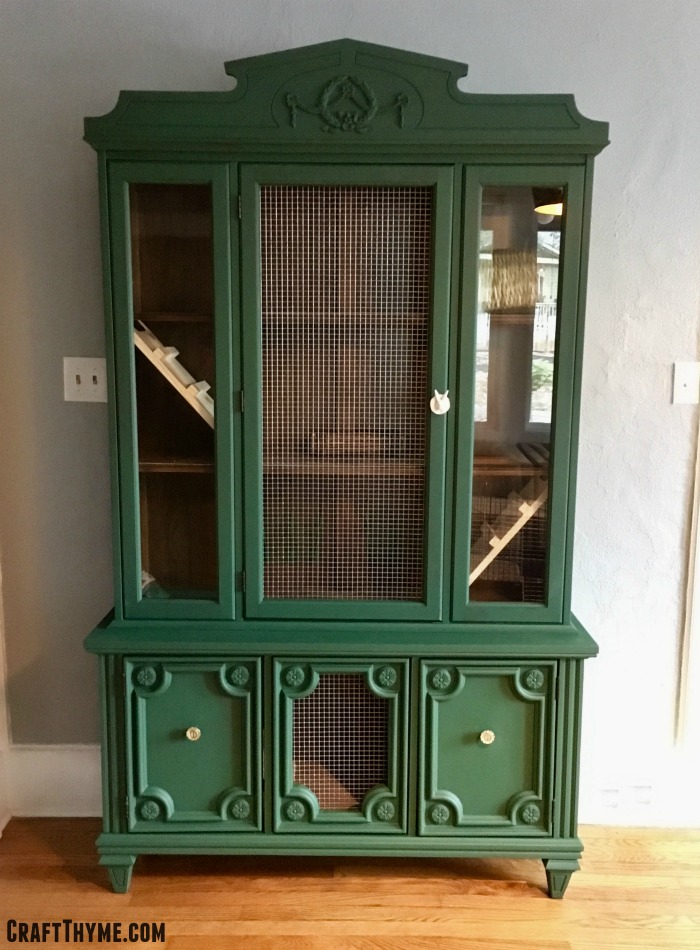
So we have rabbits. All kids need pets, right? These rabbits needed a indoor space… We are talking adorable, cute, pampered, litter trained, indoor rabbits. So we needed an adorable, awesome, and elegant space for the rabbits. Queue the DIY indoor rabbit hutch. We found an old china cabinet on craigslist for $25 that just said: refab me into the most awesome indoor rabbit hutch ever!
Of course, this china cabinet wouldn’t fit in any car we have… Because that would be waaaay to0 easy. So, thanks again Richard, for helping deliver said china cabinet. (No really THANK YOU! I have had rabbits in the middle of my living room for two weeks…)
In comes the china cabinet and before you can even say “DIY indoor rabbit hutch” Adam has already ripped out the middle glass panel. So yeah, no picture of that! From that we did a lot of measuring, talking, internet research, and experience from having the rabbits. Our main goals:
More space with interesting areas for the rabbits
Something that looked good in our house
Reduce how much litter, hay, and rabbit pellets end up all over the floor
Provided good ventilation for the buns
EASY TO CLEAN! (Brianna’s major requirement)
Make it quirky and interesting
We designed the bottom hutch space to hold litter pans and sleeping areas. There are ramps that go up to an eating area. Above that are two more levels with a timothy hay tunnel, chewing twigs, and toys for fun. We created areas for the hay to stay in the hutch and planned how to make this easy to clean!
Once we had the ideas sketched out we just got going! It took minimal supplies. Affiliate links may follow:
DIY Rabbit Hutch Supplies
1 – 1 x 8. UNTREATED. We used it to cut the ramps and grips. Make sure it has no chemicals that could harm the bunnies.
Hinges: We bought three hinges so that the ramps can be to clean. They simply push up so we can just sweep and litter out from underneath
Peel and Stick Tile 13 – 12 x 12 We lined all the shelves with peel and stick tile to make it easy to sweep bedding, litter, and bunny poops out of the hutch.
1/2″ Hardware Cloth (Chicken wire or other metal wire would work. Indoor rabbit hutches don’t have to protect the rabbits from predators like an outdoor hutch would)
Screws & Staples
Additional Supplies (Optional)
Paint (We made our own chalk paint with this awesome recipe we had used before)
New Knobs: Oh yes, that is a rabbit knob! We happened to find three awesome knobs on sale for $2.50 at Anthropologie (Trust me I am too cheap to buy anything there full price)
For this build we really winged it. Adam used a skil saw to cut out holes for the ramps and a jig saw as a I wanted a fancy opening on the bottom. Yep, that’s me, “Can we cut this center panel out?! It will look hella cool and ventilation… But mostly it would look awesome…And RABBITS!” Once the rough holes were cut, Adam, ran a quick sand on the pretty rough cut holes so the buns wouldn’t get hurt on rough edges. We didn’t worry about beautiful cuts as we were going to cover the floor in tile anyway.
Painting a Indoor Bunny House
As soon as the holes were cut on the DIY indoor rabbit hutch I went to work on the paint. The cheap wood finish was pretty intact in the interior of the cabinet so I focused on a rustic look. The green came from the deepest green of a painting we have in the living room. Those poppies were painted by Adam’s grandmother and one of my favorite paintings. (Poppies are my fav flower… Now if I could just get them to grow!)
Love this painting!!!!I actually taped for once!
Ramps for Rabbits
Adam made simple 45 degree cuts on the end of each ramp. He just measured from holes to floor and took a guess on length. He made small cuts to make the treads and give the rabbits something to grip while climbing. Quick nails to hold everything together and then sanding to make sure none of the rabbits could get hurt. We bought some hinges and connected them to the end to the end of each board and then to the inside of the rabbit hutch.
Other Items
Rabbits need lots of good ventilation (according to the internet :)) and make lots of poop (real life experience). They also need free access to lots of timothy hay and water. To accomplish all of these we did the following:
We used heavy duty staples to affix the hardware cloth to the open panels.
We lined all the shelves with peel and stick tile. My hands will never be the same after cutting all that tile to fit the space! BUT poop clean up is as easy as sweeping it out of the shelf an into the trash.
We drilled small holes to hold hay feeders along the back solid wall (helping to reduce the hay all over my living room)
After that it was simply a case of setting it in the living room and adding some fun toys like willow sticks and timothy hay tunnels!
OH! And before I forgot. The lovely lady who gave us the rabbits also gave us a metal rabbit playpen for them to run around in. We added hooks to the back of the DIY indoor rabbit hutch so that we can simply hook the play space on. We open the bottom door and let them run around. Being litter trained the worst I have had to clean up was a few hard bunny presents from the living room.
In Practice with an Indoor Rabbit Hutch
We LOOOOOVVVVEEEE having something nice in the living room. It allows the kids to interact with the bunnies and keep them as part of the household.
I might be a bit of a neat freak (As some people might have mentioned, Adam) and super sensitive to smells! So I am psyched to be able to just renew litter easily and keep it from floating all over the house. A cage was just allowing them to kick litter everywhere! I just can’t stand a smelly animal space and want something that is super easy to clean and this fits the ticket.
They also have a play place!
Also, I honestly am over the moon about how cool it looks. The green was perfect and looks great with the painting. The chalk paint gave it a soft matte finish that keeps the color fun but not overwhelming. I, frankly, would be happy with just a china cabinet that looks this good! But it is even better as a nice home for Ollie and Biscuit!
Here at Craft Thyme we focus most of our efforts on creating quality tutorials. There is a lot of planning (Adam), work, photo editing, grammatically poor writing (Brianna), and general craziness that goes into making a useful tutorial. We love doing it and our readers seem to enjoy the efforts but there is so much more that goes on behind the scenes!
Did you know that we both work full time outside of the home?
Did you know that we have a combined household of 4 amazeball kiddos and two ferocious kitties? (Don’t ask about the chickens…insert sad face here… Spring will see a new coop!)
Did you know I came home to a pelting of water balloons this week?
Did you know we have supplies to completely redo our entire front sidewalk and landscape, plans and supplies to build a sweet composting fence, and are working on a permaculture-principle inspired plan for the property?
Which got us thinking (Ut oh). Despite being pretty private people perhaps we could let everyone in a little bit on what goes on behind the scenes. The idea is that at the beginning of each month we let everyone know what they may have missed (Hint: Instagram/ Facebook) AND what our plans are for the coming month. It is a little for you (Because who doesn’t want to know I was in a beer stein holding contest last weekend. Spoiler: I lost). And a lot for us so that we can keep track of what we are building, crafting, and gardening.
Here I am losing a second time at stein holding.
We will break it down to the pertinent sections so you can skip to what you want to follow along in.
DIY
It is Summer, which in Craft Thyme world, means 90% of our DIY is outdoors. Yes, my kitchen is still atrocious, yes, the kids bathroom still is pink, blue, and some shall not be named cream color, and yes, the treadmill is gathering dust. (Not exactly DIY related but just one of those failings) BUT there is outdoors!
Butterfiles
Warm Breezes
Mosquitos (oh wait that’s a negative)
So, we build outside. We built the first level of some hella cool tiered garden boxes that we still need to write up a post about. And because we got such positive feedback we went ahead and wrote up the timber and pea gravel stairs into a nice tutorial.
Let’s see… Adam changed out a toilet seat so we finally got rid of that awesome wood-70’s vibe toilet we had going on. I cleaned like a mad woman after having the house cleaned because OMG! the kindergarten teachers come out and visit your house to meet your kids in this day and age.
We are kind of reaching the end of Summer in the mountains so we are flummoxed as to whether to continue on the beds, start on the composting privacy fence, start on the sidewalk, or head indoors and work on the sun porch… One of these things will be happening this month!
Crafts
It feels like I should probably not call this Craft Thyme this month. I think I might have sewn some super hero pillows but that may have been in July… September is not looking so good on the crafts either because any of the above projects are going to take …drumroll please… more digging. Digging is tiring, goes faster with two people, and does make up for the lack of treadmill.
I do want to get some minimal fall decorations up in September. I used to love decorating for each season but renovating this beast of a lovely home, keeping 4 kids alive, and working the day job is the most I seem to be able to manage lately. So I am shooting for at least a crafty fall wreath this month.
Gardening
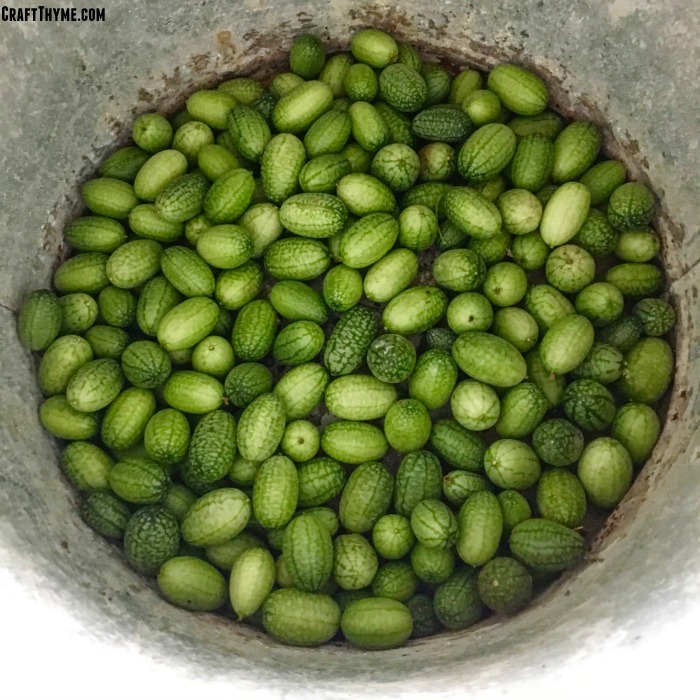
Oh gardening… Well I have a lot of cucumbers at least… The aftermath of the great groundhog wars left the garden in shambles. I’m JUST now getting ripe tomatoes, pulling carrots, and picking cucumbers. They had to have ample time to regrow their leaves after the groundhogs decided to pillage and destroy. The kohlrabi, beans, all the brassicas…ALL THE BRASSICAS, squash, melons, pumpkins, peppers, and and some flowers just did not make it through the ravaging. Le Sigh… Perhaps next year. I toyed with the idea of doing a fall/winter garden but just didn’t get it done. I may throw in some garlic but will just plan it all out and start again next year. I need some time to build up the soil anyway.
Cucumbers for days…
We did write a guide on prepping your raised beds! It has served us well and worked really nicely through some very dry weather we had at the end of the summer. Once I get some compost all worked in these should be really set for next year. Our experimental method seems to hold water very well but still allow for good drainage. Getting that optimal miz has been a real trial and error through the years.
I plan to get the raised garden beds all prepped for the fall/winter so they are set for a nice and fruitful growing season come spring. Our big plans for this month are to clean out that end of summer ick from the garden. All the wasted spindly plants… Weeds that have crept in… I mean just look at this sad garden. At least it looks like the zinnias I threw in at the last minute will manage to bloom before frost.
OMFG can you see this?! Weeds, pests, just general neglect… Must. Clean. Up.
Lots of building, cleaning, and prepping in the month of September. We will work on getting the raised bed tutorial up at least. Additionally, I have been doing a ton of research on permaculture and edible perennial plants. I hope to share some in-depth guides by the end of the month so you can get fall bare-root trees in place and plan for the spring!
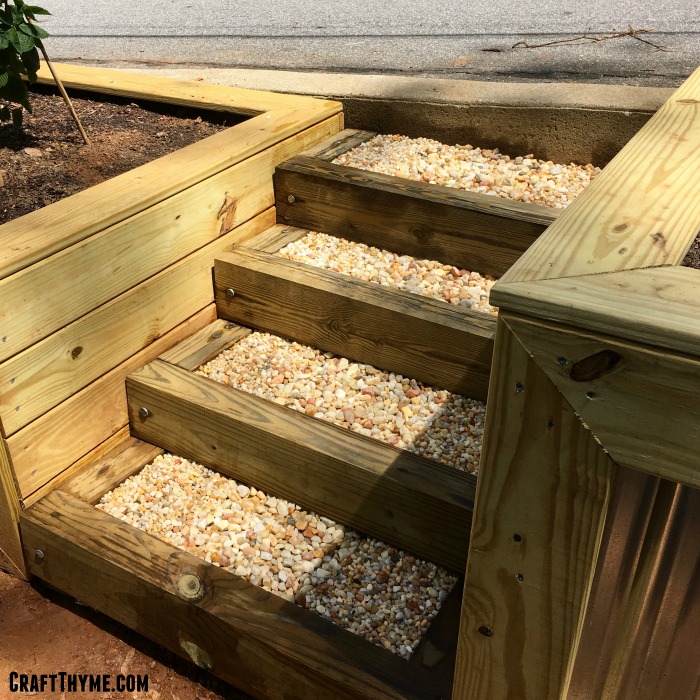
Pea gravel stairs? Timber stairs? Outdoor garden stairs? We really aren’t exactly sure what to call the new outdoor staircase that we built in our tiered raised garden beds, but we figured we had better get a ‘how to build timber and pea gravel staircase’ article up pretty quick after posting a picture on our Facebook page. People started asking! Which is kind of a big deal for a tutorial here at Craft Thyme. It seems kind of funny because we almost did not go to the trouble to build these timber stairs. We had been mulling over just using pre-fab risers when Adam got a nice Lowes gift card for his birthday (Thank you In-Laws!). With that little extra bump we decided to go all out and make, what I consider, really fabulous timber and pea gravel stairs. Of course this tutorial is for just one of three staircases we will end up building. On to the tutorial on building: pea gravel, timber, outdoor, (insert name), really freaking awesome stairs!
Building Fabulous Outdoor Timber and Pea Gravel Stairs
Below are directions on how to build four 12″ deep and 3′ wide stairs that rise around 3′ in height. There are a lot of rise over run calculators on the web you can use to figure out a different installation. Just remember that dimensional lumber is never the exact dimensions. 6″ was closer to 5.75″! Measure your wood! Also affiliate links may follow.
We will save you the details of this part, but suffice to say you are going to need to dig. A lot… We have some pretty nice topsoil on our property but after a certain point we have hard red clay, roots, and rocks. So many roots and rocks… Anyway, we took turns removing the dirt far back enough to set the first stair. We cut in the sides of the soil just wide enough to fit the legs of the ‘U’ shaped stairs. Trust me you don’t want to dig anymore than necessary.
You are going to be building these stairs from the bottom up. So, plan to leave a little mound of dirt that will go through the center of your steps up to the top. Less dirt removal = less dirt to return to each step AND less digging!
Step 2: Is Actually Step 1
The second step is to build the first step! You are going to cut your timbers and form a ‘U’ shape. First cut your front timber the width of your opening. In our case it was slightly under 36″. Then cut two timbers to make the legs of the ‘U’. We opted to not place the timbers the entire way to the back of the wall. We did this for two reasons. First we have (as mentioned in the digging/sweating part) hard packed clay. This dirt is S.O.L.I.D. and digging it out is a beotch. Secondly, since the dirt is so stable we opted to save timber length. We opted to go 3′ back on the legs. We figured this would give us the stability needed and save us an extra 2′ on timbers(and digging!).
After cutting the timbers you are going to need to make your ‘U’. We pre-assembled ours and slid it into place. How did we assemble?
Soooooo… Many…. Roots…
Use the long width of your board (5.5″) side to make the rise of your stair. Place one of the 3′ legs behind it and hammer your 8″ spike right down the center. We had concerns about the wood splitting and considered pre-drilling a pilot hole. Of course being the way we are, we opted to just hammer away. And by we, I mean Adam. Those spikes take some real force to get into the wood. My job was to hold the wood and close my eyes so that I wouldn’t flinch every time he hammered in the spike. Want to talk about a trust-fall of marriage proportions. Will you hold a piece of wood, while your significant other hammers in a large metal spike with a small sledge hammer, by your hands and face? Yeah… Complete this same set of shenanigans on the other leg and then slide the first stair into place.
Step 2.5: Leveling the Step
While this is kinda part of the above step it is super important to get the first step in level and firm. All other stairs are going to be built off of this one so you need to make certain you have this one right. As you can see in the photos above we couldn’t find our ‘not 18ft long level’ so we ended up using a post level. It worked fine, but it probably would have been a lot easier with a 1 foot to 18 inch level. If you look closely at the bottom stair you will see that it appears to be floating. This is because we have several shims under it to make certain the step is nice a straight. We plan to go and back fill the step once we have made the path in front of it level as well. So much leveling…
Step 3: Making Your Stairway to Heaven Or the Road
The next parts of the process are very similar to step 1. You will make a second ‘U’ shape with the timbers. Simply make the arms of the ‘U’ two feet instead of three. Place it directly on top of the first stair and set it back 12 inches. You are going to want a nice 12 inches of clearance for those of the larger foot variety. I imagine that might not be deep enough for some gargantuan feet but it worked well enough for our family. Once you have your stair in place make sure it is level. Shim if necessary! Picking out straight timbers in the store makes this process a lot easier. I might occasionally yawn and roll my eyes as Adam carefully stares at each board, but in situations like these, a nice straight beam makes for a much faster installation.
Once you have the stair in place it is time to drive in another spike. It is questionable as to whether this step is necessary but we wanted to make very sure this staircase wasn’t going anywhere. Plus I kinda liked the industrial look of the spikes. Just make sure to hammer your spike inside the 12 inch range. Otherwise you are going to have a wobbly step when you put the next level on. As an alternative, if you did not want to see the spike you could pre-drill a hole to countersink the head of the spike. In case you think I was making up the muscle strength needed to drive in a spike if you do not drill a pilot hole I made a tiny video! If you are upper-arm strength challenged (me) you are going to want to drill first then hammer.
Step 4: More of the Same
Continue the same process as step 3. We made the next tier have arms that were also two feet to tie them into the dirt better and give a good base for the last step that only had 12 inch arms. Our particular installation was constrained by the city road and curb so the wooden arms of each ‘U’ could only go back so far for stability. Because of this we did tie in a few hidden screws to the raised beds on either sides just to make sure that the hundreds of times the kids run up and down the stairs they never pull away from the curb. It really seemed to me that, if you have the ability to put in longer wooden arms and bury them in the dirt you wouldn’t need to worry about these stairs going anywhere.
Step 5: Styling and Profiling
After all the steps on your pea gravel and timber staircase are in place the next part is super easy! Take any dirt you have and pack it firmly into each step, while trying to get the dirt semi level. We packed the dirt 2-3 inches below the top of each step. You could pack more but I have this huge deal with landscaping fabric… I loathe the stuff and did not want to see it, but I also wanted a good permeable weed barrier underneath my pea gravel. So I needed to leave enough space to get a good thick coat of rock, but not so much that we were buying 50 bags of rock to fill up each step.
To insure the horribleness that is landscaping fabric was trapped forever I made sure to staple it to the inside of the staircase and bury the backside underneath each stair. This is optional as you could just fill the stairs, but I really wanted to try to cut down on weeds and also how much rock sunk into the dirt.
After that it is simply a case of filling in your steps! We used a mix of two sizes of pea gravel. As you can see there is a larger gravel in the middle and smaller at the edges. Why? Cause we think it looks cool. I think it would also look cool with a black river stone, mulch, flagstones and pea gravel, crushed marble, bricks, you name it! There are a lot of options for styling these outdoor timber stairs.
You will be seeing more of these type of stairs on Instagram as we have two more of these outdoor staircases to build! Follow us there to get more behind the scenes construction shots as we build two more tiers of raised beds!
We have all seen the juice commercials where the actors are standing waist deep in water, cranberries floating around them. Doesn’t everyone know cranberries grow in a bog? Well NO, they don’t. Cranberries, are awesome ovals packed with vitamins, antioxidants, and a tart punch. It is a shame they only make their fresh appearance at Thanksgiving, but I have really enjoyed craisins since they came on the market and wanted to try my hand as growing cranberries at home. They are one of my secret foods that I love. I try to make a homemade cranberry sauce each year. Since we have been doing plant profiles on my gardening favorites and temperate perennials I thought we should profile the lowly cranberry next! (Affiliate links may follow)
Tell me more about Cranberries
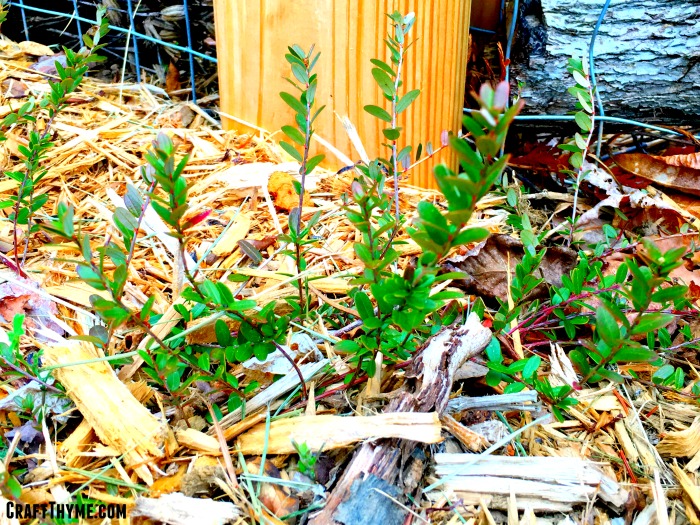
What? You want me to tell you more about a cranberry plant and how to grow them?! I thought you would never ask. Vaccinium macrocarpon (aka Cranberry: Yep, being all fancy and Latin again) grow naturally in damp areas on tiny evergreen vines. Unlike many vining plants, cranberries, grow as an evergreen ground cover and not up a trellis. Like blueberries they enjoy slightly acidic soil but need more dampness to thrive. We planted ours late summer before last and though the foliage is considered evergreen it did not necessarily mean it stays green. Ours turned a pretty reddish hue; spring saw the tiny leaves turn dark green again.
Cranberries are native to North America, specifically the North Eastern area. Cultivars have expanded the zones that you can successfully grow cranberries. So my zone 6b-7a should still technically allow me to grow cranberries and it proved true. We did leave them at the prior house (sniff, sniff) but I have been waiting for the local vendor to put their plants on end of summer sale so that I can add cranberries back into our home mix. The suggested growth zones are 2-7. Cranberries grow best in areas where glaciers, during the ice ages, left pockets of minerals and silt. Mixed with years of damp organic matter piling on top and you have a perfect place for smaller vining ground cover.
One of the things I find most fascinating about cranberries is the size of the berry in comparison to the vine. We bought vines that were already bearing fruit, which means they have to be 3 years old already. If your only experience with a cranberry is from a can, then allow me to explain. The berries themselves are oval shaped and probably 3/4 of an inch long. In comparison the leaves are maybe half that size. It looked way out of proportion to me! Additionally the berries are a light green to almost white before the ripen to that dark cranberry red.
Here is my very chapped hand for size comparison to a cranberry plant. This is why you should wear gloves when gardening…
The plant is very long lived. There are estimates that some cranberry vines can be 100+ years in the North Eastern US. Though commercial vines are replaced much more frequently, you are likely to get many years out of any plants you grow. Temperate perennial food FTW!
How to Grow Cranberries
I am going to cry foul on the traditional cranberry advice. We bought ours at the end of the summer, plunked them in the ground and mulched heavily. We have thick clay soil, so with mulch everything tends to hold water like nobody’s business. I guess we were in luck as this is NOT the recommended way to plant them. Luckily they spread on runners, like strawberries, so I plan on remedying my planting mistakes around the plant and give it more favorable conditions as they spread. So, you know, do as I say not as I do, but note that I have found cranberries relatively easy to plant and keep alive. (Not like my kiwis *sigh*)
If you want to go with traditional planting methods then here is what I should have been doing. Depending on what type of soil you have you are going to want to dig 5-6 inches of top soil out. I know this is probably going to kill gardeners everywhere, but cranberries do not want all that lovely top soil. Excavate soil in all the places you want the vine to spread. Remember they can grow up to 7 feet in length creating runners the whole way.
So what are we going to replace all this soil with? Mostly peat (1/3 or more), some top soil, and sand. Pretend you are trying to mimic a shallow wetland and add lots of peat. I’m not sure how well the new peat substitutes work. Knowing how peat needs to be somewhat conserved I might be tempted to try one of the new eco-friendly faux-peats if I was going to cultivate a large area. BUT! Cranberries need that slightly acidic soil, so make sure to supplement if you do not go with traditional peat. FYI, traditional peat is acidic in nature. Interestingly enough, once you cultivate your cranberries you have technically created a ‘bog’. A bog is what they call any field created for cranberry production. It does not have to be a flooded field. So I guess I lied in the title, since as soon as you plant them you are putting them in a cranberry bog. Please forgive me!
After you complete your soil prep you will want to plant the plants about 1 to 3 feet apart and add a thin layer of sand. Some sources disagree on whether or not the sand is necessary. Since, mine seem to be thriving in mulch I would say probably not necessary, but I will be raking the mulch back and trying it with sand next year for one very important reason. WEEDS! Cranberries hate weeds, but if you want them to produce runners and spread they need to be able to touch bare soil. Bare soil is weed country! So the sand will work as a mulch to keep the weeds down but allow all the runners to root out.
Okay, this next piece is IMPORTANT for what you are trying to achieve with your cranberries. If it is year 1 or 2 then you are trying to achieve runner growth because they are not going to produce much fruit anyway. Which means fertilize lightly with nitrogen throughout the growing season. In year three it is time to decide, do you want more growth or fruit? Fruit grows in 6-8 inch upright branches that grow up from the runners. A plant that has plenty of food grows lots of runners. A cranberry that has less nitrogen will focus on growing uprights to produce fruit. The choice is up to you. A good mix of runners and upright growth is what you are going for since this plant is around for a long time.
Other than making sure the soil is optimal and has a bit of food, the only other major piece will be to make sure they stay evenly damp. Again, this is not the flooded bog you see on TV, but just making sure the soil does not get dry for days on end.
Note the upright steams. These are what will actually make tiny flowers and grow large red cranberries.
So Why The Flood?
Cranberry farmers flood cranberry bogs for a couple of reasons. They will flood the vines with water to protect them from severe freezing in the deep winter. They will also flood them in the early spring as pest management. But mostly they flood them for harvest. See, cranberries float… Which means you can flood a field of ripe cranberries, have them float to the top and skim them off. It is not only easier, but leads to less bruising and prettier fruit. Home growers like me aren’t going to need to flood the cranberry bog. Just make sure it has nice consistent water throughout the growing season. So if you are zone 7 or above give this cute cranberry ground cover a try!