When Brianna and I first moved into our home, our décor could only be described as “New Construction Chic” – otherwise known as a completely blank slate. While the home was outfit with oil rubbed bronze faucets and a few single-bulb Edison light fixtures, there wasn’t a single other fitting or furnishing in our home. Without window coverings, our living room, bedrooms, and bathrooms (oh my!) were like fish bowls, towel/toilet paper holders were non existent, and without shower curtains things were going to get very smelly very quickly.
We knew that we wanted to extend the oil rubbed bronze and Edison theme further into our home, and given everything stated above, we had to act fast. There are plenty of curtain rods, toilet paper holders, and shower curtain rods out there on the market to choose from that would match the small amount of existing décor, but neither of us was willing to fork over $20-$40 per fixture to make this happen. After all, we had 4 windows that needed immediate covering, needed 3 toilet paper holders, one towel holder, and two shower curtain rods. At best these finishes would have cost us well over $250 (yikes!). Fortunately, we’re DIYers!

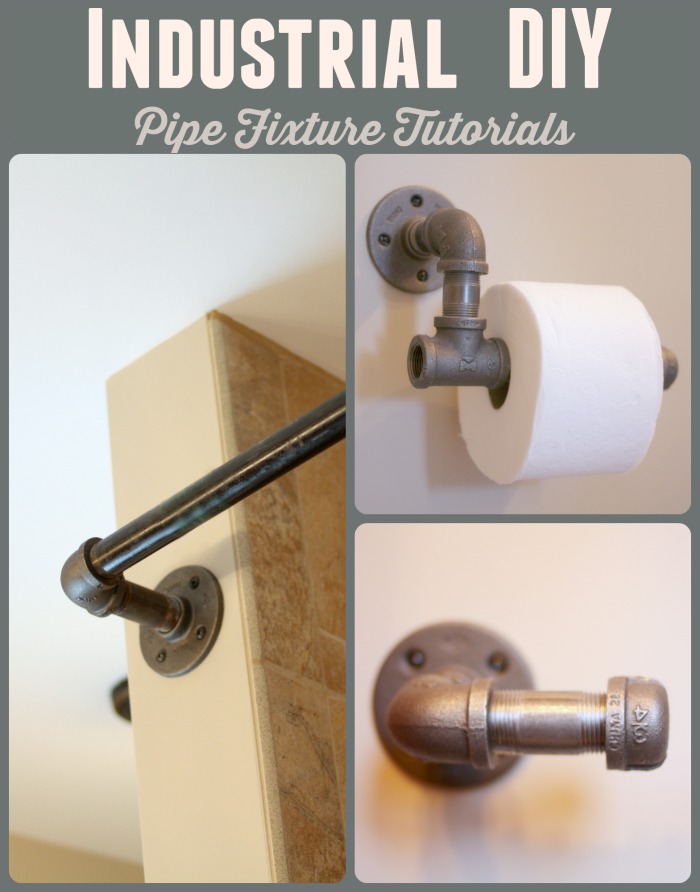
In this first of two posts you’ll learn how we added industrial finishes to our bathrooms by building creative shower curtain rods, toilet paper holders, and hand towel holders through the use of black iron pipe.
Transforming New Construction Bathrooms
We could live with people seeing in the living room for the time being. We could use the bathroom downstairs, set toilet paper on the floor, and close the door for privacy. But we could NOT take a shower without a shower curtain. So let’s begin there….
Master Bathroom: Curved Shower Curtain Rod
Shower rod selection can be a real PITA. Each shower in our home is a shower/tub combo. The one thing neither of us wanted was to take a shower and get surprised when the cold, wet shower curtain decided to sneak up and give you a nice mid-shower hug. The problem is that our master bathroom didn’t lend well to installing a curved shower rod without the need to drill through tile – and neither of us wanted to do that. In addition, the master closet door frame is immediately adjacent to the shower, and we didn’t want to mount a rod there either. We had quite the conundrum on our hands. In the end, we decided to build our own L-shaped shower curtain rod that would avoid the need to drill into the existing tile and fall above the closet door’s frame. Now… for supplies!
Supplies
Zoro.com* is THE source for affordable black iron pipe fittings. Yes, most of your big box home improvement stores will carry a selection of these type fittings, but man are they expensive! Zoro offers a superior selection for less than half the cost.
For the master bathroom shower curtain rod we purchased:
- 2 – 3/4″ Black Iron Floor Flanges*
- 1 – 3/4″ 90-Degree Black Iron Elbow*
- 1 – 2-1/2″ x 3/4″ Welded Steel Nipple*
- 1 – 50″ x 3/4″ Black Iron Pipe (Lowe’s)
When buying black iron pipe from your big box store, they typically carry two different grades of pipe; one for general use, the other for well water use. At a cost of around $13 for a 10-foot pipe, the lower grade pipe is substantially cheaper and perfect for this type of project. And better yet, most retailers offers free pipe cutting and threading as a service, thereby allowing you to complete multiple projects for the price of one length of pipe. I bet you can’t see where we’re going with this one… Determining the appropriate length can be a bit tricky, as you have to take into account the depths and lengths of whatever fittings you use in your project. For this project, you really need to measure the distance between the elbow and the opposite flange to determine how long of a pipe section you need – and then add at least 1/4″ – 1/2″.
Putting it all Together
Assembly of these components is easy and should be completed prior to the installation of any piece of hardware. I cannot stress this point enough. There’s no need to crank your fittings super tight – simply hand tightening them will be sufficient. I got a little overzealous about getting something hung and ready for use and forgot this very important piece of information. I soon found myself taking pieces down and redoing them…. Lesson learned.
To mount, we used bronze/black square head screws to complete the industrial look.


The end result was just what we hoped to achieve. Assembly and installation took all of 5 minutes and the total cost for the master shower curtain rod came to a very reasonable $12.94 – much better than $37.99 for a comparable rod at a big box store!
Guest Bathroom: Straight Shower Curtain Rod
Our guest bathroom has your standard shower stall setup and was therefore much easier to complete. Although we still had the “I don’t want to drill into tile” issue like we did in the master bath, there were no door frames or moldings to contend with. So in order to achieve the extra distance between us and the often huggable shower curtain, we simply crafted a standard shower curtain rod and installed it a few more inches away from the shower/tub threshold.
Supplies
The supply list for the guest bathroom shower curtain rod included:
- 2 – 3/4″ Black Iron Floor Flanges*
- 1 – 47″ x 3/4″ Black Iron Pipe (Lowe’s)
Assembly and Installation
Again, assemble everything prior to installation. My advice on a standard rod like this is to hand-tighten your flanges to your length of pipe, put the rod into place, and then loosen your flanges a bit with the rod in position. This method will ensure a tight fit of your rod prior to finishing your installation with screws (and drywall anchors if necessary).

Again, thrilled with the final product. Total cost: $9.90
Toilet Paper Holders
We’re not the type of people that want to have to constantly perform the reach around (or down) to grab a roll of toilet paper. So in keeping with our theme, we decided to build unique toilet paper holders for each of our 2.5 bathrooms. Crafting these babies can be a lot of fun, as the options and styles are nearly endless. Our designs fit any standard size roll insert and can handle the overall width of the largest rolls on the market (I’m thinking about the roll extenders that Charmin once provided – totally not necessary here!)
In the end, we crafted three different styles of toilet paper holders:

Style 1 Supplies (from Zoro.com*)
- 1 – 3/4″ Black Iron Floor Flanges*
- 1 – 2-1/2″ x 3/4″ Welded Steel Nipple*
- 1 – 3/4″ 90-Degree Black Iron Elbow*
- 1 – 6″ x 3/4″ Welded Steel Nipple*
- 1 – 3/4″ Black Iron Cap*
- Total cost: $5.38
Style 2 & 3 Supplies
- 1 – 3/4″ Black Iron Floor Flanges*
- 2 – 2-1/2″ x 3/4″ Welded Steel Nipple*
- 1 – 3/4″ 90-Degree Black Iron Elbow*
- 1 – 3/4″ Black Iron Tee*
- 1 – 6″ x 3/4″ Welded Steel Nipple*
- 1 – 3/4″ Black Iron Cap*
- Total cost: $6.94 each
Assembly and Installation
As before, assemble everything prior to installation. Give everything a really good hand-tightening! Mount your new fixture at a height and level that works for you. Try to mount to your new creation to a stud if possible, and if not, appropriately sized/weighted drywall anchors will do the trick.
Hand Towel Holders
Perhaps the simplest fixtures to craft, our hand towel holders are simple, functional, and add the perfect additional industrial pop to our bathrooms. We chose to install these in our guest bathrooms (there’s no where to do so in our master), and they always spark conversation after someone lifts a towel and sees what’s lying underneath.
Supplies
- 1 – 3/4″ Black Iron Floor Flanges*
- 1 – 2-1/2″ x 3/4″ Welded Steel Nipple*
- 1 – 3/4″ 90-Degree Black Iron Elbow*
- 1 – 3″ x 3/4″ Welded Steel Nipple*
- 1 – 3/4″ Black Iron Cap*
- Total Cost: $5.01

How do you make the threads “safe”? I’ve cut my hand a couple times on the exposed threads.
You have a couple of options here. One recommendation is to sand the threads. I know it sounds crazy, but they do make sandpaper for metal. You’ll want to focus only on the threads so as not to cut through the black finish on the rest of the pipe, and it wouldn’t hurt to pop a quick clear coat over top for additional protection. You could alternatively rub the threads with wax (either using a candle or paraffin wax).
[…] Pipe fixtures: http://craftthyme.com/achieving-an-industrial-decor-with-black-iron-pipe-part-i/ […]
I am currently doing my entire house with an industrial look. I appreciate the information you’ve shared. It’s very helpful so thank you! I just wanted to point out that black steel pipe will start to rust in humid and wet environments. Galvanized steel will not. Black steel pipe is designed for air and gas distribution while galvanized is specially treated for water distribution. You can buy galavanized equivalants for around a dollar more and in some cases just a few cents more on each piece and part of the project, paint it the same color as the black steel and iron with Rust-Oleum and prevent having a rust problem.
Home Depot has paint that exactly matched the black iron.
Thanks again for all the cool ideas!
Good points all around. We had a modern house with great ventilation at the time so it was never an issue for us! thanks for sharing for everyone else.
Have you ever tried s safety rail and ladder for a bunk bed?
No, I haven’t! We bought our bunk beds.
Great ideas and tutorial! I have a quick question though. I am making a straight curtain rod that will screw into a flange on both sides. How do I go about measuring the space and accounting for the flange and threading so I only have to have the pipe cute and rethreaded once? I would hate to get it too short or long and have to make the long drive back to Home Depot and pay to have it cut and threaded again because it didn’t fit. The length of the space is 58.75”
You will never be able to get it threaded to the bottom of the thread without some serious muscle and pipe wrenches. What we do is measure how much the flange takes up from the wall. Then subtract that from the overall length. So if you space is 58.75″ and then your flanges will stick out 1.5″ from the wall you will want to subtract 58.75-3 = 55.25″ That is the space your pipe will need to fill. Knowing you won’t be able to thread it down the whole way add a little back on there. Here it really is a guessing game but you figure you are going to want to thread at least .5 inches in each side you will want to get your pipe cut to 55.25 + 1 = 56.25. After that to install, really twist down on the flanges so it is slightly smaller than the 58.75″. Put one side up and then back the pipe out slightly on both ends till it is nice and snug. Almost like a tension rod. Hope that helps!
Did you spray paint them? If so what color?
We did not. We like the black iron color.
Won’t these pipes eventually rust? Or have you done something that will prevent rusting?
Eventually, due to the natural humidity in your home, they will rust slowly. In the years since we’ve completed our installations, the only place we’ve seen any rust is in the shower. To prevent, a quick spray of any clear coat (preferable a matte finish to keep the same look) will provide ample protection and prevention.
Thank you, Adam! That’s helpful.
[…] from craftthyme.com […]
Not a single store that sells the pipes in my town offer to cut and thread the pipes … So now I have to find a place that offers this and it’s of course an added cost & that site for less expensive items is threaded differently then the ones here … so I’m really not saving a whole lot as I’m forced to buy everything from “big box stores” – man this sucks !
Love this idea and wanted to transform a small room into a closet and use the pipes for hanging my clothes … but not a single person was able to help me figure out how to measure the length of pipes I needed (I called a few different brand stores too)
Hi, I don’t know if it will help, because I haven’t start my project, I’m waiting for the flanges to arrive. I leave in the Bahamas and I’m always on a tight budget.
I want to do pipe shelves, by using PVC pipes instead. I will use cast iron flanges but the rest will be PVC pipe. I will spray the pipes and connectors with 3M adhesive glue, put some thin almost dusty sand, and paint over with a good runny coat of matte black and bronze paints and maybe a hint of gloss here and there.
You would need PVC glue, a little bit more connector but all of this is cheap, but at least they come with threads, if you still want to screw them. Otherwise just the PVC blue glue would be enough (but as far as I understand the PVC pipe have the same size thread as the one in metal).
You may want to use the 1” size, and not going too long otherwise it might bent with the weight of the clothing. when I’m done with my project I will post it.
I would love to see the finished project. We have a cast iron faux paint tutorial that might be helpful! Cast Iron Tutorial
Do you have a diy for a towel ring? What do you use for the ring? I would like a metal ring. And how in the world do you put it thru the T?
We have never made a ring. We have made towel pegs and hooks. Good Luck! We would love to see pictures if you make one.
They all looked great! Did you look for studs or used anchors to mount them?
Combo of both!
Hi! Love everything on here! Any suggestions for a longer towel holder? And perhaps some pieces to hold a wooden shelf? The Zoro site is helpful and prices are amazing. Thanks for the recommendations!
Zoro sells up to 12 inch nipples for fairly cheap. Any big box store will carry longer lengths or you can get pipe cut to your exact needs. We actually have a post on how to make shelves with pipe and wood: http://craftthyme.com/industrial-pipe-and-wood-bookshelves/
I’m confused as to how you did this project so cheap.
I just did this for 3 showers, and I paid close to $100 (all parts from Lowes) which includes the pipes, the spray paint, the mineral spirits, the stainless steel screws, the wall anchors. Besides the cost, I spent 2 hours per pipe getting all the black oil off with mineral spirits, washing the pipe, spray painting it, letting it dry for 24 hours, then securing it to the wall.
So, really, this entire project took me 3 days and $100.
Is there a shortcut to this process?
Well first, as mentioned above we got everything but the pipe from Zoro. They had a free shipping offer when we ordered ours. Their fittings are black and therefore didn’t need spray painting. Finally we didn’t take off every label and just left it rustic. Any grease came off with regular cleaner and in the case of hand rails we wiped then down with wax paper to remove any additional dirt and give them a smoother finish. Much faster that way!
[…] our posts on Achieving an Industrial Décor with Black Iron Pipe – Part I, Part II, and Part III? In this post, Brianna and I are back for more tips on adding functional […]
[…] http://craftthyme.com/2015/07/achieving-an-industrial-decor-with-black-iron-pipe-part-i/ […]
I am in the process of making some towel bars for my bathroom and was wondering if you have had any issues with the pipes rusting in your bathroom? We had a small about of rust on a couple threaded pieces just being in the garage. Did you seal your pipes at all?
Mandy,
We’ve noticed a bit of rust in a few applications, but they’ve not led to much concern or action on our behalf. One thing we have done, for instances such as yours where you could potentially pick up a fleck of rust on a towel, is to assemble, tape off the main body of the pipe, and then spray a matte finish poly coat over the threaded sections. It holds up well and the finish is a close match. Happy crafting!
So in love with these clever ideas! Shared today on my FB page! via the Hobnob Social! Thanks for linking up!
Kim
Thanks for the share Kim! We keep stopping by Hobnob – love it!
[…] Part I of this series, you got a glimpse of how Brianna and I transformed our bare bones bathrooms with fixtures […]
Hi Friend, thanks for sharing your Industrial Chic at Friday Favorites! I really hope to see you at our next party!The doors open at 7PM every Thursday at mustlovehome.com Hugs – Christine @ Must Love Home
Great idea for the industrial look! Thanks for sharing with SYC.
hugs,
Jann
Thanks Jann! We’ve got more coming tomorrow – be on the watch!
I love the way these turned out! I’m a big fan of DIY and using building materials differently. And the price is amazing!
We’re experimenting with new finishes all the time. Wait till you see what’s to come!
These turned out great!
Thanks Meghan! They add the perfect amount of flare.
I love them all. You two are extremely stylish and creative. Great job!
Thank you! Wait till you see Part II coming in the next week or so. We’re really going to show readers how to stretch their dollar!