Posted on 9 Comments

Autumn Decoration

Autumn decorations made from butternut squash

The cool air at night just gets me all excited for Fall! It is my absolute favorite season (though followed closely by spring).  To celebrate the foreseen end to the humidity and heat of summer I added some autumn decor to the side table.

Autumn table decor made from butternut squash


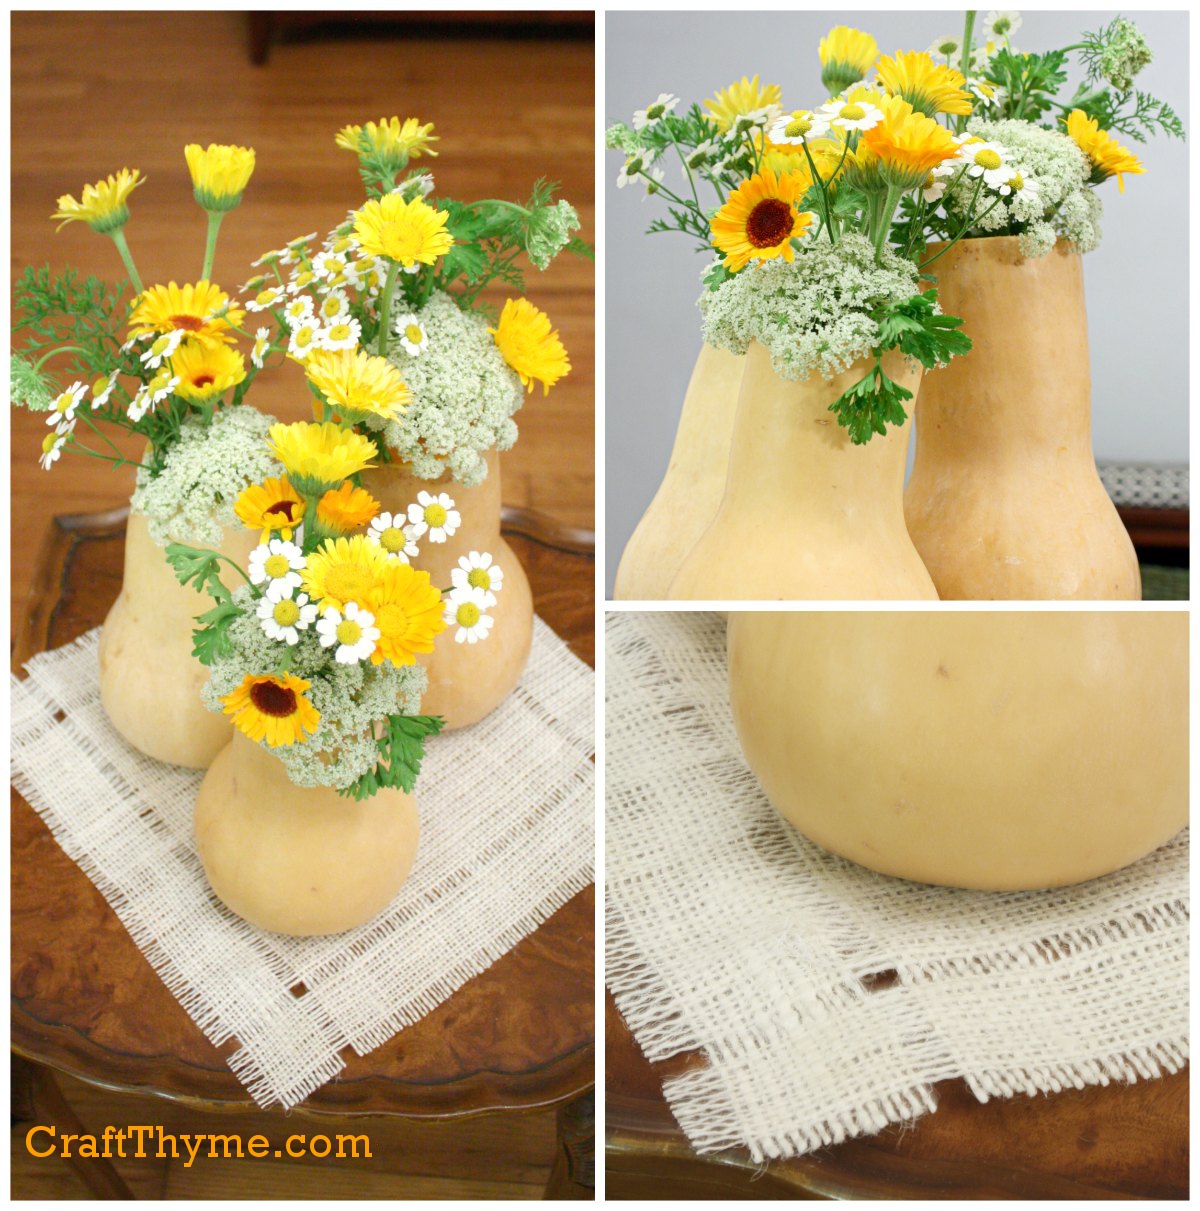
Why yes, I am so glad you asked, those ARE butternut squash vases.  I have had a glut of butternut and self seeded calendula.  Since it really isn’t time to bring out the ‘full on fall’ (though I really want to)  items I tried to keep the arrangement summery by using yellow calendula (I had orange and cream too), carrot blossoms (since I was lazy and let some go to seed), feverfew, and parsley.

Autumn decorations made from butternut squash


The trio looked a little lonely so I got a scrap of white burlap to ground the arrangement.  I pulled out some strands in the burlap to mimic a pulled linen look and add a little visual interest.  I kind of want to make place mats from burlap since it was so easy to create.

I love using vegetables and fruit in decorating!  At my wedding in the early 2000’s my Uncle flew in from Washington State (we live in NC) and proceeded to core an ungodly number of apples and mini pumpkins to use as candle holders on my tables while we rehearsed the wedding.  They looked amazing and I have been hooked on fruit and vegetables ever sense.

If you would like some tips on making them into water tight vases see Thursday’s Tutorial by clicking here. (available 8/29)

Enjoy these articles? Get periodic updates by joining my mailing list (no spam, no way, no how) or subscribing to my RSS feed.

See more great decorations, decor, and DIY at these link parties: My Snippets of Inspiration, Yellow Bliss Road

Posted on 1 Comment

Crayon Crafts With Wax Paper

Remember all the crayon crafts you did as a kid?  Everything from leaf rubbings to general coloring.  My favorite was anything to do with melting crayons.  Perhaps I had a little pyromaniac in my soul but I loved the liquid wax.

I was happy to redo this childhood craft of melting crayons in wax paper to make interesting designs.  They make great sun catchers too!  On Thursday I’ll take my crayon ‘art’ and make a back to school garland.

Melted Crayon and Wax Paper Sun Catchers

Supplies

Crayons (grabbed some old ones from the kids)

Wax Paper

Iron

Grater

Supplies to make wax paper sun catchers

Step 1: Grate some Crayons

It doesn’t take a lot of crayon shavings.  Maybe a 1/4 of a small crayon.

grated crayons

Step 2 Scatter and Smother

Get an old towel and lay out a sheet of waxed paper  on it. Drop the crayon bits over the surface and then cover with another sheet of waxed paper.  The old towel is to catch any melted wax that might squirt out.  Crayons are washable, but can stain in large concentrated amounts.

Laying out grated crayon on wax paper

Step 3  Strike While The Iron Is Hot

This is an example of a hot iron just lightly brushed across the surface.  Hold it down more and smoosh (technical term) the wax around the paper until you are pleased with the result.

melted crayon

I cut these sheets into circles to create a garland you’ll see on my Back to School Mantel.  But they look great hung in front of a window catching the sun through various thicknesses of color.

Enjoy these articles? Get periodic updates by joining my mailing list (no spam, no way, no how) or subscribing to my RSS feed.

See other great crafts and DIY at these link parties: Curly Crafty Mom

Posted on 12 Comments

Old Fashioned Paper Bag Book Covers

DIY book covers from paper bags with a modern twist.

Creating your own paper bag book covers is as simple as this 4 step how to. Of course, I am way past my school years and my kids aren’t quite to the ‘back to school’ point, but the back to school fever got me thinking I needed a decorating refresh before I start putting up Halloween items. I used the basic paper bag book cover and then embellished it. The tape based embellishments work perfectly to reinforce the covers for students and decorate the covers for me.

DIY book covers from paper bags with a modern twist.

Supplies (Not Shown, because I think we all know what a ruler looks like)

Paper (paper bags can be split at the seams and laid flat, thick craft paper works just as well)

Ruler

Scissors

Pen or Pencil

Decorative Tape (for embellishing)

Step 1: Can you trace?

Lay out the book on your paper. If the paper is decorative make sure the ugly side is up so you can mark on it. Open the book in the middle so the spin is wide open. Trace around the edges.

Step 1 to DIY book covers

Step 2: Add Allowance

Place the book off to the side and grab the ruler. Add about 1.5 inches along the top sides of the tracing and 4 inches along the sides. No one is going to come mark you down if you fudge the measurements a bit.

Step 2 in DIY book cover creation
That is not an over exposed photo. My arms really are that white.

Step 3: Cut and Fold

Cut along the allowance you just drew. Fold the top and bottom inward along the original book line you traced.

Step 3 in how to make a paper bag book cover
I bet everyone can cut… This photo is more about folding the right direction.

Step 4: Putting the book into the grooves, fold, slots, pocket… Whatever you want to call the paper thing you just folded.

Take the book and open it back up to one of the covers. Align that cover with one of the sides you traced. Take the edge of the paper and start feeding the cover into the folds you made. Feed enough in until you are close the the original tracing line. Then close the cover, flip the book over and repeat on the other side. You will get the sharpest crease if you pull the jacket over the closed book and kind of crease it along the edge before feeding the cover into the slots. (see the last image)Final step in paper bag book cover creation

Voila you are done!

Embellish

I always remember how my book jackets would tear at the corners and bottom of the spine as a kid. To solve this and add some pep to the cover I took decorative tape and covered the spine and sealed the corners.

The ‘classic’ bag paper book is edged in faux leather aka brown duck tape and the ‘modern’ white book got trimmed in paisley duck tape.

Enjoy these articles? Get periodic updates by joining my mailing list (no spam, no way, no how) or subscribing to my RSS feed.

See more great crafts and decor at these link parties: Craftberry Bush, Young and Crafty, Craftionary, Pin Junkie, The Jenny Evolution, The Stitchin Mommy, DIY Vintage Chic, By Stephanie Lynn

Posted on 9 Comments

Liquid Leaf

The sugar cube seashell holder and sand dollar were made out of paperclay and covered in liquid leaf. I like the poured look.

This isn’t so much a tutorial as more an answer to a few inquiries I had about the gold elements from the Pink Lemonade Table Decor.  There are a variety of metallic paints, waxes, glazes, leafs, foils, etc. for when you want to add shine to a project.  Each one has a place depending on the project and the look you are going for.  In this case I wanted a poured metallic look to cover the inside of real and scultped seashells and the outside of paperclay sand dollars.

I used Liquid Leaf* to finish these items. The below picture is from Plaid’s website. They have not paid me to say these nice things. In fact I doubt they know this website exists…

Liquid Leaf

You can achieve a leaf-like finish by thickly brushing on a coat and letting it dry.  I use some throw away flux brushes so I don’t have to worry about clean up.

The sugar cube seashell holder and sand dollar were made out of paperclay and covered in liquid leaf. I like the poured look.
The paperclay items did need a wash of thin white acrylic paint so that the leaf wasn’t immediately sucked into the surface. Trust me, I forgot to prime one of them and it used a ton of leaf and left lots of paint strokes.

You can get a metallic accent by brushing a thin coat on as I did with this Goodwill tray.  I did white-wash it with a layer of acrylic paint first and then used the liquid leaf along the bottom edge.

tray accented with liquid leaf

Finally liquid leaf works well on a lot of materials.  I finished the inside of real seashells as well as my faux created ones.

Vignette with various items accented in liquid gold leafTo be honest I initially planned on using rub-n-buff but I couldn’t find the tube in the basement.  However, I like the look of poured and cast metal that the liquid leaf created.  I’ll definitely use it again when I need this particular effect.

Notes

Make sure to put a thick coat on if you want a poured look.

DO NOT touch until fully dry.  Just don’t.  Let it dry.

You may need to cover the with a clear acrylic top coat.  Tarnish can occur and heavy use items will rub.

It stinks.  Ventilation is key.  Otherwise it is easy peasy to apply.

Enjoy these articles?  Get periodic updates by joining my mailing list (no spam, no way, no how) or subscribing to my RSS feed.

Posted on 26 Comments

Gold Foil, The Right Way to Gold Leaf Fabric

Fabric with washable gold foil or leaf added

There are plenty of metallic fabric paints on the market, and while they excel at adding shimmer they don’t have that rich metallic leaf look that is so popular on various commercial t-shirts.  It took a little bit of research but I finally figured out how they get gold leaf on fabric and keep it washable.  Allow me to introduce you to Gold Foiling Fabric.

Fabric with washable gold foil or leaf added
Adding bling to your napkins

Supplies

Supplies to gold leaf or gold foil fabric

Fabric -This fabric had been ombre dyed using this tutorial

Transfer Adhesive* (Full disclosure about this affiliate link: I wasn’t thrilled with the Martha Stewart Transfer Glue I used here.  I might try a different brand.  The important point is that is is tacky when set and stays adhered through gentle washing. Maybe it was user error…)

Metallic Foil Sheets* (These are different than gold leaf. They are thicker and have a backing to the metallic portion)

Sponge applicator

Step 1:  It’s Sticky

Transfer glue on fabric

I wanted a random/worn pattern to my finished foil look so I put the glue at random and used varying thicknesses of glue.  You can get a smoother finish by putting a nice, thick, even application of glue.  You can even use a stencil and apply glue in a pattern.  The important part is to get enough on that the glue quits soaking into the fabric and leaves an even coat on the top layer.

The directions will tell you how long to let the glue set.  My suggestion is to lightly test with your finger.  The glue should stick to your finger but not leave the fabric when set.

Step 2:  Burnish and Repeat

Placing gold foil on fabric

Alright, I know this probably makes sense to everyone else, but put the shiny side up…  You are gluing the backing to the fabric. That was one of my duh moments.  To get a really good bond press the sheet into the glue.  Then burnish the top of the foil with a precision instrument paint brush handle.  Mostly because that was what I had laying around.

Slowly peel the foil from the fabric.  The plastic sheet should peel off and the gold leaf effect remain.  Leaving you with some nice shimmer like this.

Ombre fabric with gold leaf edging turned into a napkin

These final napkins where used in my Summer Pink Lemonade Table Setting seen here.

Notes

I already mentioned one important point.  Shiny-side up.  When done I let mine sit for 24 hours to fully cure.

I did hand wash them and the gold stayed put.  I believe it would hold up through a gentle cycle as well.  I just wouldn’t put these napkins up to a BBQ or Crab leg challenge.  But for a special occasion they work great.

It took a bit of practice to do a good application of glue and foil.  If it is your first time I would suggest buying an extra sheet or two of foil to practice with.  The napkins were completed after many trial runs that took to realize how to apply the glue and that burnishing helped.

Finally save your foil sheets if they have any left.  The little flecks make for an interesting effect when pressed into glue

Enjoy these articles?  Get periodic updates by joining my mailing list (no spam, no way, no how) or subscribing to my RSS feed.