Posted on 4 Comments

THE List of Perennial Berries for Your Yard

THE Perennial berry list with over 30+ berries you can grow in temperate climates

It started with a friend pointing out a sale on blueberries. Our response: “Oh we have 13 blueberry bushes”. Their response was, “Oh, they also have raspberries.” Check.

Blackberries?
Check.
Strawberries?
Check.

How many berries do you grow?

Here at Craft Thyme we have 14 types of berries currently growing on our property! Mostly because we love berries. And just for the record I am calling berries anything with small fruits. We aren’t being all scientific and taxonomic up in here.

Yes, it may be shocking but there are well over 14 different types of perennial berries you can grow in temperate zones. Best part perennial berries are pretty much the gardeners best friend. They are easy, fit in even small yards, resist tons of pests, require little care, and show up again and again. Other than potentially fighting off the neighborhood kids or birds your crops are kind of a given. Especially on some of these lesser known varieties, which seem to have better luck with the wildlife.

So what type of perennial berries can you grow in your garden space? Here is a list of perennial berries. Below are the ones I am currently growing and a further list of more uncommon berries worth exploration! All in all I have researched dozens of varieties of berries and listed 29 perennial ones below. I’m also kinda wordy so I had to highlight a few of my favorites with some affiliate links in case you want to buy some for yourself!

Perennial Berries

THE Perennial berry list with over 30+ berries you can grow in temperate climates: BlackberriesBlackberry: (Zones 4-9) I picked up a thornless unnamed variety of blackberry in 2004 and planted it by my back porch. I did literally nothing. It had sun and whatever rain fell. I never fertilized it, I sometimes cut out dead limbs in the spring and wove new vines in the stair railing. But that, folks, was that. In three years I had vines running 10 feet up my stairs and so many blackberries I couldn’t eat them all. It smelled like a winery under the bush from the multitude of fermenting blackberries. From that random purchase I was hooked. Every house I have owned is left with a thornless blackberry somewhere. Arapaho and Apache have been some of my easy favorites.

THE Perennial berry list with over 30+ berries you can grow in temperate climates in your own backyard: Fruiting RoseFruiting Rose aka Rosa Rugosa (Zones 3-9) I’m not sure this counts as a berry, but we just planted one of these roses. They are supposedly pretty maintenance free, unlike the typical fancy rose, and make delicious, vitamin C packed rose hips.


THE Perennial berry list with over 30+ berries you can grow in temperate climates: StrawberriesStrawberries (Zones 3-9)


Blue Berry High Bush (Zones 4-7) THE Perennial berry list with over 30+ berries you can grow in temperate climates: Blueberries


THE Perennial berry list with over 30+ berries you can grow in temperate climates: and in your own back yard!: Low Bush BlueberriesBlueberry Low Bush (Zones 2-8) Yes, blueberries as groundcover do exist. Lowbush blueberries range from 6″ to 2′ tall, though you can trim them to keep them very low to the ground. In our local mountains you can find many of these wild low blueberries for natural picking. However, I purchased a named cultivar. What name? Who knows, I have the tag somewhere but I am wAAAAAAAy behind documenting my garden journal for this year. *sigh* Anywho, we are trialing these by the pond next to the cranberries since they like similar conditions.

THE Perennial berry list with over 30+ berries you can grow in temperate climates: Goji BerriesGoji Berries (Zones 3-10) Why? Well they aren’t exactly my taste, but hey everyone else in the world counts them as a superfood, so I have a couple plants knocking about the yard. Small bushes with little upkeep so there they stay.


THE Perennial berry list with over 30+ berries you can grow in temperate climates: HoneyberryHoneyberry (Zones 2-7)


THE Perennial berry list with over 30+ berries you can grow in temperate climates: MulberryMulberry (Zones 4-9) FYI a groundhog will eat each and every leaf off a mulberry tree if you happen to have it in a pot they can knock over… Just saying… Oddly it will survive this defoliation, so there is that.


THE Perennial berry list with over 30+ berries you can grow in temperate climates: ElderberriesElderberry (Zones 3-8) Hey, guess what?! Groundhogs like these too! We got a few berries last year, but added more plants this year. I have them in a shady location to help deal with excess rainwater runoff. Since they aren’t in the sun I don’t ever expect to have scads of these berries, but what I do get I plan to make an extract to use in cocktails. Cause we live in Asheville, and that’s the hispter kind of shit you do.


THE Perennial berry list with over 30+ berries you can grow in temperate climates: Raspberries
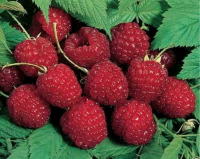
Raspberry (Zones 3-9) This might be my husband and mine favorite type of berry. Do you know raspberries quit ripening when you pick them? So yeah, if you want the taste of an amazing, sweet, fragrant raspberry unlike any you have had in the grocery store you are going to need to grow your own. On that note, I’m not a huge fan of proprietary plants. It just irks the shit out of me when you try and slap a trademark on life. That being said, I am also a sucker for clearance plants. A couple of years ago I picked up a trademarked thornless raspberry called Raspberry Shortcake… Yes, I hate myself sometimes too… Anyway I stuck this plant in the dirt and got lots of green leaves. It was a cute, tiny, compact, thornless bush, but it was just a bush. No raspberries to be seen. Only reason I haven’t dug the damn thing up was because I had other things going on in the yard. So it stayed there. Staying compact, looking cute, and doing nothing. Then this year! Holy mother of berries. We get two complete handfuls of the largest, firmest, and juiciest raspberries I have ever seen every. single. day. For almost a month now! It has outperformed my traditional vines but untold amounts and has had virtually zero pests and literally no love from me. I will be seeking these out and adding them all over the place from this point on.

THE Perennial berry list with over 30+ berries you can grow in temperate climates: CranberriesCranberry (Zones 2-7) I was chocked to learn you can grow cranberries without a bog!  So much so I wrote a whole post about how to grow cranberries here.


THE Perennial berry list with over 30+ berries you can grow in temperate climates: Serviceberry or JuneberryServiceberry aka Juneberry (Zones 4-8) Finally tasted these this year and they are amazing!  Sweeter and larger than a blueberry.


THE Perennial berry list with over 30+ berries you can grow in temperate climates: Little known lignonberriesLignonberry (Zones 2-8) It looks like a tiny boxwood. Which is really kind of a selling point in my humble opinion.


THE Perennial berry list with over 30+ berries you can grow in temperate climates: BoysenberryBoysenberry (Zones 6-9) This crossed plant is a new one for us this year. I’m hoping we love it as much as all our other berries. So far growth has been easy peasy.


THE Perennial berry list with over 30+ berries you can grow in temperate climates: Kiwiberries aka Hardy KiwiKiwiberry (Zones 3-9) Not on my easy list. I know I said berries are easy… But really not this one. I have an entire article about kiwi berries, but they take years to produce, are super specific on site needs, and frankly are a challenge for me as an experienced gardener. If I ever reliably crack the kiwiberry nut I’ll let you in on the secret. Until then just be prepared for a challenging plant.


Nanking Cherry (Zones 3-6) Cherry or Berry… You decide cause Adam and I certainly can’t agree. He said this should be in a post about fruits. I said, well not much of anything, I just typed what I wanted anyway. ;)


These are the berries I might plant in the future, but haven’t yet purchased:

  • Seaberry aka Sea Buckthorn (Zones 3-8)
  • Aronia/ Chokeberry (Zones 3-7) Favorite permaculture podcasters just couldn’t like the taste no matter how hard they tried. So, I kinda put these low on my list.
  • Currant (Black, Red, White) (Zones 2-9) Let’s just sum up all the currants, gooseberries, and jostaberries in one fail swoop. I want them. I know from trips to the British Isles that I love the taste. Guess which plants you can’t ship to North Carolina… At one time our state was really into white pine timber and these plants can help spread disease to white pines so we still can’t have them shipped in. I found one local person with red currants for sale but they wanted 25! TWENTY-FIVE! dollars for a teeny-tiny plant. I. Can’t. Even….. So yeah, totally wish I had paid my $25.
  • Gooseberry (Zones 3-8)
  • Jostaberry (Zones 3-8)
  • Jujube (Zones 5-10)
  • Goumi (Zones 5-9)
  • Wintergreen (Zones 3-8) Soooo want to add these to our forest area. Once I have finished my eradication of poison ivy these are going in.
  • Sand Cherry (Zone 3-6)
  • Highbush Cranberry (Zones 3-7)
  • Autumn Olive (Zones 4-8)
  • Chokecherry (Zones 2-7)
  • Wineberry (Zones 4-8) Some consider this Asian native invasive. Berries are often photgraphed as the have a jewel like quality.
  • Salmonberry (Zones 5-9)
  • Huckleberry (Zones 7-9)

I couldn’t resist throwing in a couple non-perennial berries.

  • Groundcherry: Not a perennial but super tasty berry I grow each year. The sweetest ones will be after the husk has fallen to the ground. If you can grow tomatoes then you can grow groundcherries. they are usually smaller and need only light staking. I let them kinda just hang off my raised beds and sprawl.
  • Strawberry Spinach:  I have been tempted to try this one as you can eat the greens and it makes a small semi-sweet red berry.

So what berries have we missed?! I know there are a lot more blackberry/raspberry hybrids like tayberry, but was trying to stick to mostly true types! Please add your favorite perennial berries in the comments below.

THE Perennial berry list with over 30+ berries you can grow in temperate climates

Posted on 49 Comments

Egg Laying and Chicken Tracking Spreadsheet How To

Dashboard for free egg production and chicken tracker

Edit: We now have a 2024 Version Available!

Do you have chickens? Do you like spreadsheets? Then I have the Egg Laying Spreadsheet for you! No really, joking pitch aside, I have created this free chicken tracker and egg production spreadsheet for you in 2018 and now use this post to show you how to fill it out. We have updated it over the years and it tracks all your poultry, not just chickens. However, the guide below will still get you started. If you need the newest version see the link at the very top of the page!

Who is this chicken tracker and egg laying spreadsheet for?

Both the home hobbyist, the small farmer, and geek extraordinaire.

Truth time: I made this egg production spreadsheet for myself because I am a geek and wanted to know if my chickens ever broke even, cost-wise, when I sell their excess eggs (Spoiler: I’d keep the chickens anyway). I love tracking all types of things, but I just cannot do it on paper. I like using Google Sheets because they are free and easily accessible from my phone.  Right now I am offering the poultry tracker and egg production spreadsheet only as a Google Sheet. However, if you desperately need this Egg Laying Spreadsheet in an excel format let me know in the comments. If there is enough interest I’ll convert it for you.

We have had a number of enhancements over the year thanks to people like you!  Please keep giving us your feedback about what else you might want to see.

Here is what the Egg Laying Spreadsheet contains:

  • At a glance chart (auto fills)
  • Summary statistics, example: average eggs per hen, eggs per month (autofills)
  • Poultry Log
  • Egg Log
  • Expense Tracking (optional)
  • Income Tracking (optional)

Best Part! You enter you expenses, income, and eggs in each sheet and the statistics and charts automatically update! Booyah!

Egg Laying Spreadsheet Dashboard

My day job is in Business Intelligence so I know people need a variety of ways to digest data. For visual learners the Egg Laying spreadsheet starts with some at-a-glance charts. First you can see how your monthly profit is going and how your running year-to-date profit is headed.  Trust me, the fake data you see below is nothing like my actual profit…  Which is well below zero this year.

My favorite part are the egg spreadsheets. Even if you have no interest in profit and loss you can see your total eggs, egg size, and color all compared!

Dashboard for free egg production and chicken tracker

Poultry Summary Statistics

Need more numbers?  Average eggs per hen? Year-to-date profit on your chickens, quail, ducks?  Then the Summary Statistics page in the Egg Laying Spreadsheet is all for you.  All items automatically populate from the items you enter in the next few sheets and is far expanded beyond the view you see below.

egg size and color tracker for checking the production of your backyard flock

Poultry Log

This is the main portion of the spreadsheet. It started as a place to keep information about all of our new chicks but has evolved to meet a variety of your needs. The whole spreadsheet links from knowing when your chicks start laying, if they died or were sold, and other notes. The key fields that need to be filled in correctly for the Egg Laying Spreadsheet to work:

  • Laying Date
  • Death/Sale date if applicable
  • Type of Animal

Those three items will automatically calculate if you have a laying chicken, duck, or quail hen.  It will stop counting if you have sold or the hen passed away.  Don’t worry you can track your roosters, they just won’t count in your hen totals.

Log of chickens for entering and tracking details of a small flock

Egg Log

This is the fun spreadsheet! I simply pull this sheet up on my phone when I collect eggs and put in the numbers. It is pretty simple, just put how many eggs of each type and color in the appropriate slots. The totals will auto-calculate for you and update the summaries and charts as you go. I have left what exactly goes in sizes and colors up to you.  I tend to put cream eggs with white and tan eggs with brown, etc. but that decision is up to the individual chicken owner. The newest charts include species and egg size tracking. Pro-tip: you can put in total eggs in the EZ total column (not shown), and skip color and sizes but you will lose your size, color, and species charts.

egg tracker for color and size from hens

Expense & Income Tracker

For those chicken owners that want to get a little more into the numbers the expense and income sheets exist. I have some suggested categories for chicken owners, but in reality you can put whatever you want. I am hoping to add more statistics and charts based on the categories in the future. Some examples I am considering: Cost of each egg per amount of feed, Average Carton Price, etc.

If you are a hobbyist and just want to look at how many eggs you have, you can skip these pages or fill out the bare minimum:

  • Date
  • Amount

expense tracking spreadsheet for chicken owners

Categories that must be filled out are marked with an asterisk *.  Filling those columns in is all that is required to use the Chicken Egg Tracking Spreadsheet. I really want feedback from you about what else you might want this spreadsheet to do. Please let me know in the comments and if you found it useful then please share this on social media. 

I spent a lot of time creating something I thought might be of value to you, chicken owners, and would like to have your feedback. Please let me know in the comments what other items you might want to see in the spreadsheet. I’ll see about future enhancements for later this year!

Free chicken tracker and egg laying spreadsheet

Posted on 2 Comments

How to Make a Wooden Composting Fence

Wooden composting fence with espalier fruit trees

Ever heard of a composting fence?  If you want to know how to make a composting fence you can click the link below for our first design of a wire mesh composting fence or scroll right on past this intro for our tutorial on making a wooden composting fence.

I discovered the concept of a composting fence a few years back and Adam so kindly surprised me with the construction of a wire mesh composting fence at the previous house.  We could only find a quick reference in an article to what a composting fence’s purpose was and had to figure out how to build it on our own. The wire composting fence was cool, it worked, and we made some awesome instructions and a detailed tutorial on how to build your own composting fence (linked for your convenience).

Fast forward to now: Larger house, looootttttssss of yard waste: As in I have never seen so many sticks, I don’t even understand how the sticks keep appearing level of yard waste… Along side those sticks we have renters as neighbors. The current renters are nice, but they brought some um… interesting… items along with them. I’m not sure who moves an old pile of wood covered in a blue tarp and a large cable antenna hooked to nothing, but they did. I will admit I didn’t really want to see the stuff cause (I’m snotty like that and will pretend I don’t have hardware cloth scraps hanging out in the backyard at the moment). True story, the last renters were arrested in our front yard so I have other reasons than just aesthetics in wanting a bit of a border between the houses. The solution? Wooden Composting Fence 2.0 to the rescue.

Wooden composting fence with espalier fruit trees

Now to the meat for those of you that skipped the introduction:

How to Make a Wooden Composting Fence

There is one important piece you must understand about a composting fence before we continue:

It is meant to SLOWLY compost yard waste. Very dry, mostly carbon material. NOT your food scraps, wet items, etc.

Why? The items in the composting fence break down only at the ground level and never get hot like a nitrogen/carbon balanced compost pile. That being said, it is absolutely great for slowly feeding plantings around the base of the fence. It also takes care of a lot of things you might not put in your compost pile. Larger sticks, roots, lots of leaves, weeds, are all great to throw in there and those tend to take forever in the pile.

Tools and Supplies for a Composting Fence

Let’s just state this right up front: We use copper treated lumber. We have done a lot of research about the dangers and positives of using treated lumber. Not all treated lumber is created the same so we suggest reading the beginning of this article to decide if you want to use treated lumber. For untreated lumber applications I suggest finishing your fence waaaay higher off the ground so none of the boards come close to ground contact, coating your wood in some fashion, using locust or cedar wood, or using our previous design that utilized much less wood and more metal.  Otherwise be ready to replace your wood every few years.

Composting Fence Supplies

The supply list (may contain affiliate links) and directions cover how to make one panel of a wooden composting fence that is 5′ and 7′ wide. The pictured panels range from 5 to 6′ tall and 7′ wide. We built on a sloped lot and stepped them down accordingly over time. We have 7 panels shown in our photos. Why? Because that length covered the neighbors property and allows us to give a good wide spacing to espalier 4 apple trees, 2 peach trees, and 1 plum tree.

  • 2-bags Quikrete: (May not be ncessary to concrete each post if you have hard clay soil and/or you are attaching many posts. If you plan to espalier fruit trees you will need to be able to attach wire and the weight of the trees over time which is why we opted to concrete our posts in.
  • 2-4X6 posts (trust us, you do not want to pay for larger sizes
  • 4-2X4 boards
  • 22 – 8′ Dog Ear Fence Pickets I would suggest buying 2-3 extra in case you break or mis-cut one.
  • 24-3″ screws
  • 130-1.5″ screws
  • Water (Mix with Concrete)

Tools to Build Your Composting Fence

Step One: Post Assembly For Those Blessed with Upper Arm Strength

The first step is to get the posts assembled and in the ground. You are going to need upper arm strength all around, and if you don’t have it (I don’t) then there is equipment you can rent to dig post holes. I will also mention an alternative for post construction for those of us with T-Rex arms.

1. Dig a whole 2-3 feet down. Post holes are best dug wider at the bottom than the top. This keeps the concrete solid in freeze/thaw conditions. You can read more about elegant post holes here. Frankly, we just try to dig them down and level.
2. Assemble your massive post. Here is where I would diverge from the usual directions:

  • Adam, being the manly man, takes the 4X6 post and attaches the 2X4 boards to either side to make a massive with the 3″ screws (4 per board at least)  The final assembled ‘tree trunk’ like post is close to 8″ in width which allows space for pretty large sized yard waste. He could just pick up this giant honking post and position it in the hole.
  • I can barely move the 4×6. If I was doing this by myself (note: I wouldn’t), I would HAVE to place a 4 X 6 post in the dirt and concrete it in. Once it was set I would then add the 2X4’s to either side above the ground level.  So keep in mind how heavy the post gets!

Posts for composting fence

Step Two: Leveling and Setting The Tree Trunk Post

I’m not going to go into details about how to set and level a post because there are a ton of tutorials that already teach this technique better than us.  We pretty much follow this Quikrete tutorial (Written tutorial link here):

Couple things that make this job a bit easier are post levels because it makes getting both levels front to back a snap.  Trust me it is worth the extra money for the ease of leveling.  We also use 2-3 cinder blocks to hold the post in place while it sets.  We had them on hand and found it easier than using boards to hold them because you can make minor adjustments by nudging the blocks slightly.

Final tip:  If you plan on doing a whole long line of panels you will want to do the following.

  1. Dig a small post hole and set a temporary post in dirt only at the end of where you want one straight course of panels. (this could be the end of the fence, where it turns, etc)  You can even use a 2X4.
  2. Tie a string to the temporary post and bring it to the first post you plan to set.
  3. Attach it (we used a screw) around the post so that the string lightly lays along the face of the board on both ends.  This makes sure all your posts are facing the same angle and makes attaching the boards easy!
  4. Concrete your first post and continue down to your second post aligning it to the string as well.
  5. Once you have your Second post close to correct make sure to lay a board on top and make sure the height is level from post to post!

Step 3: Prepping Your Fence Face

If earlier you wondered why the fence pickets are 8′ but the fence panels are around 7′ well here is where you find out the mystery.  You have to cut the dog ear portion of each picket off first.  We used out miter saw to do 4-5 at a time.  After making a nice straight cut you will want to measure how long to make your boards. You have two options:

  • More than one panel: Measure from the end of the first post to the middle of the second post.  Measure in a few places.  If your post is truly straight and level the distance should be the same.  If not you can make micro adjustments on your cuts to get a nice straight line for the next panel.
  • One Panel: Measure edge to edge.  Again measure in a few places to make sure all the lengths are the same.

Cut your boards to the correct length. Each side will need the following:

  • 7- Full sized boards
  • 6- 2″ boards (3 full sized boards)

Total (20 boards! 10 for each side)

After that you will run three of the boards through a table saw to make 6- 2″ pieces. Note: try to find pickets with the least number of knots to run through the table saw.  Those tend to break or kick out.

We hate lumber waste!  We are using the extra 1.5″ to make garden stakes and markers and the extra foot or so to make native bee houses.

Step 4: Attaching the Fence Panels

The composting fence needs lots of light and air to flow through it so that the contents can dry and compact.  No one wants a wet-rotting mess for a fence.  In order to do so you will need space between each board.  There is an easy and hard way to get the space correct.  You can measure in between each board OR you can take some scrap wood and cut 2-3/4″ wide spacers.  Trust us, the spacers are easier!  Two people make this job sooooo much easier.

  1. Take one full sized board and line it up with the edge and top of your first post.  Your partner can do the same with the second post.  Check to see if the edges line up nicely (either at the edge or middle depending on your design)
  2. Use two 1.5″ screws to attached the board to post one
  3. Repeat on post two
  4. Yea!  Your first board is up.  Celebrate with a local brew!  (okay no, you have a bunch more to do)
  5. Take a two inch board and put a spacer underneath the first board to keep a nice 3/4″ space.
  6. Use a single screw to hook both ends
  7. Panic because the middle is sagging like crazy!

Alright don’t panic!  You will take and extra fence picket and attach it to the middle.  Measure down to the ground from the center and cut a picket.  Use two screws to attach it flat in the center of the first board.  Then use your spacer while a partner pushed the 2″ board into place and affix with a screw.

Repeat this process down the entire front of the fence, then continue these directions down the back

NOW: You can celebrate with a brew! And throw in some sticks!

Final Tips & Techniques

  • For more than one panel always measure your lengths front and back.  It can look level, be level, but a slight twist means a few boards might need a little extra or less cut off.
  • If you are stepping a fence down we found stepping down a full and 2″ board makes a nice attractive step down.
  • Don’t forget the boards at the top of the step down will be a lot longer than the ones below
  • When you are done don’t be afraid to add a small board along the bottom if the step down made the height off the ground look… wonky…

Now all you have to do is throw in all your leaves, sticks, and brush!  Our 7 panel composting fence will hold almost 150 cubic feet of yard waste!  Meaning we won’t need to have the city haul off  the brush and leaves our regular compost pile couldn’t handle anymore.

Posted on 7 Comments

Modern Chicken Coop Custom Design By US!

Modern chicken coop design that we custom built and designed

The custom built, modern, chicken coop is finally here folks. I quit totaling hours, cost, and number of minor flesh wounds received somewhere back in March. Building a custom chicken coop is definitely a labor of love BUT you get an end result that can REALLY meet your needs.  We chose to make a modern chicken coop design to match our urban locale.  We needed something fresh to update our 1927 home space and to compete with all the new modern houses in the neighborhood.

If you are more a video person we made a video tour of the features and construction of this modern chicken coop design on our YouTube Channel. (Also embedded in the post for you convenience)

Modern chicken coop design that we custom built and designed

We had some specific needs in mind with this modern chicken coop design.  First, our chicken coop needed to be predator proof, easy to clean, lots of space, and aesthetically pleasing. We live in an urban environment with a good mix of old houses and very modern structures. This means we can’t let the chickens roam all day but that we can build a modern looking structure and still have it blend nicely with the 1927 house. If it looks large in the pictures, that is because IT IS. It is hooouge… 14 by 7 feet in the main structure alone. The u legs of the runs are 4 feet wide and 6 foot and 10 foot long respectively. This gives us slightly more space than needed for 14 large chickens. If you are thinking of making your own coop I have a series of chicken calculating spreadsheets that I will make available soon for everyone to use.. We want to keep the chickens in a location with above standard size spacing since the whole point of raising fancy backyard chickens is to have a good environment for their egg production. Happy, healthy chickens make yummy eggs.

Modular nesting boxes for easy cleaning
Nesting boxes and roosting bars all come apart for easy cleaning and replacement

We also planned the chicken coop with our neighbors in mind. We are highly sensitive to our neighbors needs, simply because it seems like the neighborly thing to do. We wanted to make it look good and smell decent because, frankly, I would want that type of thoughtfulness from my neighbors as well. Plus, I have to look at the chicken coop and smell it all the time too!

We probably keep our coop a bit cleaner than most to reduce flies in the city. I also plan to plant lots of herbs around the coop to deter insects and cover smells. Plus who doesn’t love the yummy scent of mint, lavender, and thyme? This modern chicken coop design incorporates a lot of neat features to make cleaning a breeze. Double coop doors with a linoleum under sand make raking our droppings a breeze. Roosting bars and nesting boxes are removable for thorough cleaning. Run doors and human sized runs make raking out wood chips for final composting a lot easier. (Note: Behind the structure I am building a couple compost bins to hold old litter we usually remove a few times a year and replace fully with fresh litter.  I am super excited to graduate into my own building projects!)

Red, black, and grey detail shot of our modern designed custom chicken coop
Plus, who doesn’t want to look at this awesome modern coop design back when scooping poop? It is honestly my favorite part of the coop!

Safety was paramount to the entire design. When we first moved over to our new home we had chicken issues abound (You can read our tale of chicken woes). Plus I have had enough bear encounters for a lifetime! Remember how I said urban? Yeah we have an odd urban bear population in the mountains… These bears seem to like chickens an awful lot. Anyway, we did as much as we could to deter predators.

First, the structure has cemented posts to anchor it to the ground. Then we wasted ridiculous amounts of money to bury hardware under the entire structure. It kills me to spend money on something you are just going to hide but the hardware cloth keeps digging predators out but allows the thick layer of chips to slowly compost while in location. Half inch hardware cloth and metal roofs cover all exposed surfaces. These are anchored with screws and washers instead of staples. It takes a lot longer to install but really stands up to random dog attacks. All the external doors, including the nesting boxes, have wooden stops to make sure they can’t be easily pushed in and to minimize small gaps in the frames. We used heavy duty slide clasps and hinges for the same reason. If we end up having raccoon issues we can add bolts or locks to the clasps to make sure they can not get in.

Natural roosting bars for our modern chicken coop.
Roosting bars are strapped in over vinyl floors to make easy cleaning!

Chickens, outside of their will to die by predator, are actually pretty self sufficient when grown. You really just have to offer protection from major elements and lots of ventilation. The coop location is meant to assist with both. Our climate is more often cold than hot. That being said August is not the most pleasant. We set the coop back in a U shape of vegetation (called a sun scoop in permaculture world). In the winter they get sun at different sections of the coop throughout the day. In the heat of the summer they will get morning sun, but shade from the worst afternoon heat. The large windows can be closed in the winter to allow more wind protection but open in the Spring, Summer, and Fall to allow for lots of ventilation. An underfloor ramp allows for fresh air all year around but cuts down on wind. Finally we took the time to line the roof of the coop. That way chickens on roosting bars couldn’t come in contact with cold metal and get frost bite or hot metal and overheat.

Red and black modern ramp for our custome built chicken coop

Finally we wanted to make this easy, fun, and accessible for our enjoyment. This area was formerly an overgrown dog lot. The kids liked to play down in that area as it is shady in the Summers, but even they stayed away from the overgrown infestation of English and poison ivy. We beat back the wilderness and have all manner of edible and aesthetically pleasing plantings planned for the area. We left cleared around it and plan to have nice paths down and around so you can enjoy the plantings and sit and watch the chickens. Lots of doors and human sized runs allow us to go in with the chickens and easily pass them treats and eventually let them into the yard to hang out. The nesting boxes make for quick egg retrieval and plenty of space to leave the broody ones alone. Finally, we made much of the area view-able from the house so we can always just peek out and see how the ladies are doing.

Overall we are stoked with how it turned out. Now to get our last batch of chicks old enough to join the rest of the flock! Hopefully the chickens will enjoy it just as much as the humans.

Modern Chicken coop design for your loved backyard chickens. This custom chicken coop design features red, black, and grey with metal shed roofs.


Posted on 23 Comments

Make a Indoor Rabbit Hutch From a China Cabinet

What?! A twenty-five dollar Craigslist china cabinet becomes what?! An indoor rabbit hutch. Perfect for your pampered bunnies.

Want a rabbit hutch that looks elegant?  Well, we did!  We wanted to DIY an indoor rabbit hutch for our new family members Ollie and Biscuit.  We got these rabbits from Adam’s work as a co-worker’s friend was trying to rehome her bunnies before embarking on a lot of travel.  You might wonder how we decided to get some rabbits and it went something like this:

Forwarded email from Adam: Want to get some rabbits?

Me via Instant message: Ummmm… Sure?

Adam via IM: The boys will love them.

Our new family members; Ollie and Biscuit our mini-lop rabbits

So we have rabbits.  All kids need pets, right?  These rabbits needed a indoor space…  We are talking adorable, cute, pampered, litter trained, indoor rabbits.  So we needed an adorable, awesome, and elegant space for the rabbits.  Queue the DIY indoor rabbit hutch.  We found an old china cabinet on craigslist for $25 that just said: refab me into the most awesome indoor rabbit hutch ever!

Of course, this china cabinet wouldn’t fit in any car we have… Because that would be waaaay to0 easy.  So, thanks again Richard, for helping deliver said china cabinet.  (No really THANK YOU!  I have had rabbits in the middle of my living room for two weeks…)What?! A twenty-five dollar Craigslist china cabinet becomes what?! An indoor rabbit hutch. Perfect for your pampered bunnies.

In comes the china cabinet and before you can even say “DIY indoor rabbit hutch” Adam has already ripped out the middle glass panel.  So yeah, no picture of that!  From that we did a lot of measuring, talking, internet research, and experience from having the rabbits.  Our main goals:

  • More space with interesting areas for the rabbits
  • Something that looked good in our house
  • Reduce how much litter, hay, and rabbit pellets end up all over the floor
  • Provided good ventilation for the buns
  • EASY TO CLEAN!  (Brianna’s major requirement)
  • Make it quirky and interesting

We designed the bottom hutch space to hold litter pans and sleeping areas.  There are ramps that go up to an eating area.  Above that are two more levels with a timothy hay tunnel, chewing twigs, and toys for fun.  We created areas for the hay to stay in the hutch and planned how to make this easy to clean!

What?! A twenty-five dollar craigslist china cabinet becomes what?! An indoor rabbit hutch. Perfect for your pampered bunnies.

Once we had the ideas sketched out we just got going!  It took minimal supplies. Affiliate links may follow:

DIY Rabbit Hutch Supplies

  1. 1 – 1 x 8. UNTREATED.  We used it to cut the ramps and grips.  Make sure it has no chemicals that could harm the bunnies.
  2. Hinges: We bought three hinges so that the ramps can be to clean.  They simply push up so we can just sweep and litter out from underneath
  3. Peel and Stick Tile 13 – 12 x 12 We lined all the shelves with peel and stick tile to make it easy to sweep bedding, litter, and bunny poops out of the hutch.
  4. 1/2″ Hardware Cloth (Chicken wire or other metal wire would work.  Indoor rabbit hutches don’t have to protect the rabbits from predators like an outdoor hutch would)
  5. Screws & Staples

Additional Supplies (Optional)

  1. Paint (We made our own chalk paint with this awesome recipe we had used before)
  2. New Knobs: Oh yes, that is a rabbit knob!  We happened to find three awesome knobs on sale for $2.50 at Anthropologie (Trust me I am too cheap to buy anything there full price)

Equipment

  1. Drill
  2. Saw

Optional Equipment

  1. Miter Saw
  2. Jig Saw
  3. Skil Saw
  4. Hand Sander

Transformation Steps

For this build we really winged it.  Adam used a skil saw to cut out holes for the ramps and a jig saw as a I wanted a fancy opening on the bottom.  Yep, that’s me, “Can we cut this center panel out?!  It will look hella cool and ventilation… But mostly it would look awesome…And RABBITS!”  Once the rough holes were cut, Adam, ran a quick sand on the pretty rough cut holes so the buns wouldn’t get hurt on rough edges.  We didn’t worry about beautiful cuts as we were going to cover the floor in tile anyway.Rough cuts are all that is needed to make this indoor rabbit hutch

Painting a Indoor Bunny House

As soon as the holes were cut on the DIY indoor rabbit hutch I went to work on the paint.  The cheap wood finish was pretty intact in the interior of the cabinet so I focused on a rustic look.  The green came from the deepest green of a painting we have in the living room.  Those poppies were painted by Adam’s grandmother and one of my favorite paintings.  (Poppies are my fav flower…  Now if I could just get them to grow!)

Painting that inspired the green diy rabbit hutch
Love this painting!!!!
Homemade chalk paint decorates an indoor bunny house
I actually taped for once!

Ramps for Rabbits

Adam made simple 45 degree cuts on the end of each ramp.  He just measured from holes to floor and took a guess on length.  He made small cuts to make the treads and give the rabbits something to grip while climbing.  Quick nails to hold everything together and then sanding to make sure none of the rabbits could get hurt.  We bought some hinges and connected them to the end to the end of each board and then to the inside of the rabbit hutch.

Details of building a rabbit ramp.

Other Items

Rabbits need lots of good ventilation (according to the internet :)) and make lots of poop (real life experience).  They also need free access to lots of timothy hay and water.  To accomplish all of these we did the following:

  1. We used heavy duty staples to affix the hardware cloth to the open panels.
  2. We lined all the shelves with peel and stick tile.  My hands will never be the same after cutting all that tile to fit the space! BUT poop clean up is as easy as sweeping it out of the shelf an into the trash.
  3. We drilled small holes to hold hay feeders along the back solid wall (helping to reduce the hay all over my living room)

After that it was simply a case of setting it in the living room and adding some fun toys like willow sticks and timothy hay tunnels!

Lots of details for the bunnies! White rabbit cabinet pulls, hay feeders, secret hiding spaces, ramps, and more in this DIY indoor rabbit hutch

OH!  And before I forgot.  The lovely lady who gave us the rabbits also gave us a metal rabbit playpen for them to run around in.  We added hooks to the back of the DIY indoor rabbit hutch so that we can simply hook the play space on.  We open the bottom door and let them run around.  Being litter trained the worst I have had to clean up was a few hard bunny presents from the living room.

In Practice with an Indoor Rabbit Hutch

We LOOOOOVVVVEEEE having something nice in the living room.  It allows the kids to interact with the bunnies and keep them as part of the household.

I might be a bit of a neat freak (As some people might have mentioned, Adam) and super sensitive to smells!  So I am psyched to be able to just renew litter easily and keep it from floating all over the house.  A cage was just allowing them to kick litter everywhere!  I just can’t stand a smelly animal space and want something that is super easy to clean and this fits the ticket.

Details of additional rabbit play space on our indoor rabbit hutch
They also have a play place!

Also, I honestly am over the moon about how cool it looks.  The green was perfect and looks great with the painting.  The chalk paint gave it a soft matte finish that keeps the color fun but not overwhelming.  I, frankly, would be happy with just a china cabinet that looks this good!  But it is even better as a nice home for Ollie and Biscuit!

Before and after of a Craigslist china cabinet turned into an DIY indoor rabbit hutch
Before and After