Posted on 15 Comments

Fireplace Mantle Makeover

Completed wooden mantel

When we first bought our home, Brianna and I loved all but two things: the accent wall color in the living room and the fireplace mantle.  The accent wall was easy to take care of – just simply slap on a coat of paint!  (Valspar Winter Flannel for those curious minds.) Fixing our “dinky mantle” however required a little more work.  It, and the fireplace surround, were supposedly built to mirror the built-in shelves to the right of the room. Apart from being white, we just weren’t seeing it.  So in keeping with our theme, we took a day and decided to transform our mantle into something that really stood out in the space.

The Before: Behold the “Dinky Mantle”

This is the mantle we started with

Supplies

  • 3 – 1″ x 8″ x 8″ White Pine Lumber
  • 2 – Foam Brushes
  • Rust-Oleum Dark Walnut Stain
  • Rust-Oleum Semi-Gloss Polyurethane
  • Cotton Rags (for stain removal)
  • 1-1/4″ Brad Nails
  • Brad Nailer
  • Air Compressor

A few notes about your lumber selection:
You can work with any type wood.  White pine tends to be the most affordable of the “furniture grade lumber” and it fit into our budget the best at the time.  It’s a good standard lumber and it stains well.  If you hope to achieve a consistent look and feel with your finished piece, try to pick pieces of lumber with a similar wood grain.  The sizes and lengths noted above were what we needed for our application/space.  Your needs will most certainly differ.

Step-By-Step Instructions

This project is what I like to refer to as a beer project.  Outside of operating a saw and a nail gun (which you should ALWAYS do sober – 100% sober), there are a lot of “stain, wipe, dry” and “poly, dry, poly, dry” steps during which you should have ample opportunity to enjoy a tasty beverage.

Step 1: Measure

Ok, so you probably did this prior to purchasing your lumber in order to ensure you bought enough, but when it comes time to cut your lumber, you want to be certain that you’ve measured correctly. Measure again, take note of the dimensions you need to cut, translate those measurements by marking your lumber, and get ready to break out the saw of your choice.

measure-mantel

Step 2: Cut!

Carefully cut your wood to your desired dimensions.  For our project, our cut list was as follows:

  • 1 – 64″ (Mantle Front)
  • 2 – 61″ (Mantle Top & Bottom)
  • 2 – 7-1/4″ (Mantle Sides)

Yes, this left quite a bit of wood left over.  Think: FUTURE PROJECT!  You may be able reduce waste by purchasing longer lumber, but I very often have trouble finding straight lumber of this dimension in longer lengths.

Step 3: Stain and Rub Your Wood

With everything cut, break out your favorite shade of wood stain.  Apply your stain as per the provided instructions.  Wipe off the excess product after 2-3 minutes.  If you’re happy with the color, great!  If not, wait the indicated number of hours, apply a second coat, and rub everything down again.

Rubber gloves are essential to keeping your skin unstained. Somehow, I always forget this…

stain-wood-mantel

Step 4: Break out the Poly

When you’re happy with the look of your stain, it’s time to apply a protective coat of polyurethane.  The type of finish is up to you; matte, satin, semi-gloss, or gloss.  We’d played around with matte poly finishes in the past and weren’t too happy with the end result.  For this application, we ended up going with a semi-gloss finish and were thrilled with the final look.

It may take more than one coat of poly to achieve a uniform coat.  Let the polyurethane dry as per the manufacturer’s instructions and reapply.  Repeat until you’re happy with the resulting finish.

Step 5: Assembly and Installation

This is where all of your hard work comes together, and for us, this step was a breeze!  Our new mantle is simply a cover-up of the existing, so all of our major mounting was already taken care of for us.

  1. Starting with the top, center the piece of lumber you selected for this position over your existing mantle.  Using your brad nailer, fasten this board to the existing mantle.  Be generous with your use of nails; they’re tiny and you won’t see them.
  2. Add your side panels by nailing them to the ends of the top panel you just installed  Carefully align your nail gun and you should be able to shoot straight nails fairly easily.
  3. Mount your front panel.  Again, carefully position your nail gun, and you’ll shoot true. It helps to have a partner here to hold and square things up.
    • Pro tip: Don’t yell at your helper.  Treat them nicely.  They work better in pleasant working conditions.
  4. Install the bottom panel.  With all other facets in place, your bottom panel should fit in like a glove.  Shoot and be true.

mantel-assembly

Yes, I could have put everything together beforehand, simply slid the entire piece over the existing mantle, and nailed things down.  However, doing it the way we did allowed for on-the-spot micro adjustments and re-squaring.  So yes, more effort to do it my way, but a much “straighter” final product.

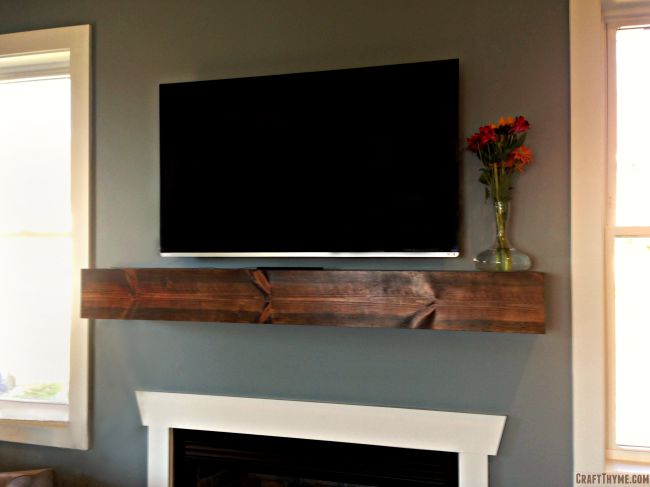
Step 6: Beer and Admiration

My favorite step! Grab another pour of your favorite beer, sit back, and admire your handiwork!

Completed wooden mantel

Of course, we didn’t stop there…

We loved the look of our new mantle; however, that fireplace surround just didn’t stand up to what we’d just created.  It was going to have to change….  Yippy!  Another project!  Stay tuned for our follow up post on how we continued to transform our fireplace to fit our style.

Posted on 4 Comments

Building an Industrial Table Lamp

How to DIY an industrial table lamp. #industrial #table #lamp

Unexpected Accent Décor

As you’ve seen from our previous posts on achieving an industrial décor (check out Part I, Part II, and Part III if you haven’t already), Brianna and I are always looking for ways to carry our theme throughout our home.  At the same time, we also don’t want to be ALL UP IN YOUR FACE about it either.  The last thing we want is for it to feel like you’re walking into a warehouse when you enter our home.  So how do we find that careful balance?

Focus and subtlety. We try to be very careful not to go overboard in any single space.  Our mantra:

  • If you’re going to have a big piece in a room – limit it to one big piece.
  • If you need something more – add interesting, eye-catching accent pieces as appropriate.
  • Add items you love/have sentimental value!!! (Added by Brianna)

The goal is to keep the focus where you intended (that’s why you went with that big piece in the first place, right?) and to add pops of décor that are interesting and don’t pull your focus (for too long).

You recently saw how we added a salvaged wood headboard to our master bedroom.  In this post we’ll take a closer look at one of our favorite accent pieces in our bedroom, and more importantly, show you how to build it!

Building a Meat Grinder Lamp

Yes, we built a lamp out of a meat grinder.  Why?  Honestly, I was walking through the Antique Tobacco Barn, saw an awesome, rusted old meat grinder for a great price and declared “I’ll do something with that one day!”  That something turned out to be a bedside lamp.  How’d we do it?  Here you go!

Supplies

  • Meat Grinder (one that has seen better days)
  • Steel Wool
  • Light Socket
  • 3 feet of 18-Gauge Lamp Wire
  • 2-Wire Electrical Plug
  • Edison-Style Light Bulb
  • Super Glue
  • Foam Paint Brush (optional)
  • Small Amount of your Favorite Paint Color (optional)

Preparation

Depending on how loved or neglected your meat grinder was in its past life, you may or may not have a lot of work ahead of you.  Our grinder had a lot of surface rust, an unknown white substance, and a few “bits” still rattling around inside. While we wanted to keep the repurposed look-and-feel, we wanted to clean things up a bit before putting it on the nightstand and touching it every day.  Enter the steel wool.

Dismantling your meat grinder should be pretty easy.  On any given model, there are typically only 5-6 parts, none of which should be sharp of warrant the use extreme caution.  Remove each component, and get to scrubbing with the steel wool.  The steel wool will do a great job at knocking away much of the neglect of the years while still preserving the harsh metallic look.

Our grinder’s wooden handle was pretty (ok, really) grimy.  As an optional step, or for a pop of color, consider sanding or painting your grinder handle.  We chose to use the same orange from our Pantry Door Project.

When done, wipe down your pieces and re-assemble the meat grinder.

How to DIY an industrial table lamp. #industrial #table #lamp

Assembly

Step 1: Wiring up your light socket

Light sockets are fairly easy to come by in a number of different styles from your local big box store.  We had ours from a past project where we had applied a faux cast iron finish.

Fortunately, the skill level required here is novice.  I know this is scary, but I promise you, it’s not.  You can do this!

  1. Remove the base and top sheath of the light socket.
  2. Slide the base of the light socket onto your lamp wire.  (DO NOT SKIP THIS STEP)
  3. Strip one end of your lamp wire, twist the wire, and shape it into a “candy cane” that will hook around the one of the screws of the light socket.
  4. You’ll likely need to loosen the screw on the light socket in order to hook your newly curved wire.
  5. Do this, then tighten the screw with the wire snugly placed between the screw and the metal backing of the socket’s center.
  6. Repeat for the other wire and side of your socket.
  7. Replace the top sheath of your light socket and push it down into the base.  You should feel/hear a click when the socket is re-attached.

Step 2: Wiring up your lamp’s plug.

This step is very similar to the light socket wiring.  As in exactly similar.  Here are your easy to follow steps:

  1. As you did before with your socket, remove the housing from your electric plug.
  2. Slide this housing over your lamp wire.
  3. Again, strip one end of your lamp wire, twist, curve, hook, and screw.
  4. Repeat for the other side of the plug/wire.
  5. Replace the plug housing.

Your lamp circuit is now complete! At this point, you can test your new creation by adding a light bulb and plugging in your lamp.  Utter the phase “Let there be light”, turn your switch, and be amazed at your ability to create light!

Step 3: Attaching your “lamp” to the meat grinder

Nearly all meat grinders have a bolt at the bottom (our new top) that is used to mount the grinder to a table or counter.  If not already removed, take it out.  Feed the other end of your lamp wire through this hole.  Get geared up for more wiring!

Bring out the super glue!  Admittedly, we used Gorilla Glue, but anything will likely work.  I like Gorilla Glue because it’s not activated till you add a little water.  It’s my way of making sure that I don’t glue myself to myself.

Unplug your lamp!  This isn’t completely necessary, because as you now know, the actual electrical connections are inside the socket, but we always err on the side of caution.

You’ll want your socket to sit directly on top of the former bolt hole.  As you can see from the photo, while the very bottom of the socket just BARELY fits inside the hole, a majority of the socket rests on top.  And that’s okay!  Add a good drop of glue and set your socket on top.  Gravity was enough to assist us in the drying process, but clamping may be necessary.  Let your baby dry as long as you can.  I know it’s exciting, but this is something you’re going to use regularly; let is sit so it can take the brunt of regular use.

How to DIY an industrial table lamp. #industrial #table #lamp

Step 4: Completion and Admiration

When your lamp is dry, go ahead and add your favorite light bulb.  We’ve collected more than 10 different styles of Edison bulbs over the last few months and opted for the “Christmas Tree” filament bulb.  Plug in your lamp, flip the switch, grab a libation of your choice (wait until after the electrical work is done for this step), flip the switch, and admire your handiwork.

Pro tip: Buy Edison-style bulbs on eBay.  We were able to snag our bulbs for around $2 each as opposed to $7 each in your big box stores!

How to DIY an industrial table lamp. #industrial #table #lamp

Posted on 11 Comments

Achieving an Industrial Décor with Black Iron Pipe – Part III

Tutorial on creating iron pipe curtain rods and pipe bannisters

In Part I of this series, you got a glimpse of how Brianna and I transformed our bare bones bathrooms with fixtures constructed out of black iron pipe.  In Part II we tackled an affordable way to craft standard and extra-long curtain rods in our living room.  Here in Part III we’ll take you upstairs and show you how you can continue this theme by installing industrial banisters sturdy enough to handle everything our four boys can throw at them.

Tutorial on creating iron pipe curtain rods and pipe bannisters

Industrial Banisters

The one accent that we wanted to add to our home “just because” was an industrial banister.  It wasn’t a need at the time, but we were really digging the theme that we’d started and the standard white painted banisters just weren’t doing it for us.  They were cheap, construction-grade quality, and after two days had gauges and chips in the paint from moving in.  Imagine what that while would look like after daily use from a family of 5 and a half – Ick!  So in a bold leap of faith, we tore down the two existing banisters, plastered and painted the walls, and attempted a statement piece by using 1-1/4″ black iron pipe to craft two new banisters.

Supplies

Assembly and Installation

Fortunately, assembly and installation is super easy.  That is, assuming you have a helping hand…  Preferably one that won’t get upset at you easily when you slip up and accuse her of not holding her mouth right.  (I promise, I really do love her.)

Step 1: Measure the Distance

Unlike the earlier projects, measure the distance you wish to cover first. Why? For this one, you’ll have to assemble everything before you mount anything to the wall.  By the time you add in additional the pipe fittings, you can expect the final piece to be 2-4″ longer than you measured.  Be sure to account for that when you head out to get your pipe.

Step 2: Assemble your Banister

  1. Connect a nipple to a flange.
  2. Connect an elbow to the other side of the nipple.
  3. Hand-tighten everything, then back it out just a little bit.  You’ll need a little flexibility to achieve the right angle when mounting your new banister to the wall.

Step 3: With a Willing Partner, Mount your Banister

I cannot stress how important it is to have 1) Someone’s Help, and 2) Heavy Duty Drywall Anchors during this process.  If you don’t have either, don’t proceed until you do.  Pipe of this width and length is heavy and awkward to handle.  We don’t want you to get hurt or damage your walls before you get to enjoy your new banister – after all, you’re so close to being done!

  1. With your partner, hold your new banister against the wall in the location that you’d like to mount it.
    • If you slightly loosened your elbows in Step 2 you should be able to get the perfect angle you’re looking for.  The fact that there is some wiggle room in the pipe parts won’t matter as soon as you have it mounted to the wall.
  2. Using a pen, pencil, crayon, etc., mark the hole locations of the flanges on each end.
  3. Remove the banister and drill out each hole as per the instructions on the drywall anchors you purchased.
    • Note: The anchors we purchased could sustain a sheering force of up to 142 pounds.  Each.  Yes, this was necessary; we have 4 boys.
  4. Install the drywall anchors as per the provided instructions.
  5. Nicely ask your partner to help hold the banister back up to the exact previous location and screw the banister to the wall/anchors.

Step 4: Cleanup and Admiration

Initially the pipe may be a little gunky and dirty from the hardware store.  Give it a good wipe down.  If it still feels a little odd to the touch, apply the secret rub:  Wax Paper.  Take a length of wax paper, wrap it around the banister, and (yes, I’m going to say it) wax your rod.  After you finish, it – and you – will feel much better.  Grab a beer, stand back, and admire your work.

Total Cost: $40.99 each

Tutorial on creating iron pipe curtain rods and pipe bannisters

Tutorial on creating iron pipe curtain rods and pipe bannisters

Posted on 22 Comments

Achieving an Industrial Décor with Black Iron Pipe – Part II

Tutorial on creating iron pipe curtain rods and pipe bannisters

In Part I of this series, you got a glimpse of how Brianna and I transformed our bare bones bathrooms with fixtures constructed out of black iron pipe.  Here in Part II we’ll take you further into our home and show you how you can use these same fittings to construct both standard and extra-long curtain rods throughout your/our living room.

Tutorial on creating iron pipe curtain rods and pipe bannisters

Standard Length Curtain Rods

Curtain rods are never hard to find in a big box store.  They are typically offered in 10-25 different styles for anywhere from $5 to $50.  For most, people can find what they’re looking for in these venues.  But not us.  No, we can’t be that simple.  We wanted something to match what was in our minds, and what we saw on the market just wasn’t doing it for us.  And neither were the prices.  A minimum of $25 per rod for something “substantial” isn’t cheap, and that wasn’t going to cut it for our limited “we just moved into a new house and have nothing” budget.  It was at this point that we decided to pull the theme from upstairs down.  Bring on the black iron pipe and fittings!

First we had to construct two standard length curtain rods for the windows on either side of the fireplace.  I came up with a simple design and mounting system, got Brianna’s approval (the most important step of any project), then ordered my supplies.

Supplies

Assembly and Installation

Yes, my supply list is right; I am going to use 1/2″ gauge pipe with 3/4″ pipe fittings.  How?!  Why?! Keep reading….

Step 1: Build and Mount your Brackets

This part is easy.  (Actually the whole thing is easy. And cheap.)

  1. Connect a nipple to a flange.
  2. Connect a tee to the other side of the nipple.
  3. Hand-tighten everything
  4. Mount the bracket you just hand crafted (go you!) to the wall at a level you see fit.

To mount, we used bronze/black square head screws to complete the industrial look.  Try to find a stud if you can, or use appropriate drywall anchors to ensure a snug, secure fit.  Make sure the tee runs horizontal to the floor; miss this step, and well, you’ll have a great towel holder that’s just out of reach for your guests.  If you end up here you should be able to tighten or loosen things just enough to get you back to good.

Step 2: Determine the Length of your Rod

Yes, you could have done this earlier, but trust me, you’ll be much happier with the end result if you wait until now to measure the length of pipe you’ll need to complete your curtain rod. Measure the distance between the outside edges of your tees.  To that distance, add an absolute minimum of 3″ so that your pipe can overhang and be capped.  For our installations, we added 6″ total giving us 3″ of overhang on each end.

Step 3: Slide your Rod into the Holes

Slide your length of 1/2″ rod into your 3/4″ tee.  The 1/2″ rod will fit easily through the tee and allow for easy adjustment back and forth while you to get your curtain(s) in place.  Now do you see why we went with 1/2′ pipe?

To install your curtains, insert one side of your rod into an open tee, slide your curtain onto the rod, and then pull the pipe back into place so that it rests in the unoccupied tee.  When complete, install the pipe caps on either end, and voila!

Total cost per standard rod: $11.67

Tutorial on creating iron pipe curtain rods and pipe bannisters

Extra-Long Curtain Rods

We’ve always loved the idea of being able to completely transform a room’s feel and appearance as day turned to night.  The front wall of our home has two tall windows whose total span (windows and wallspace) covers more than 12′.  After some convincing, Brianna sold me on the idea of floor to ceiling curtains that would span the entire wall.  Here’s a preview:

Tutorial on creating iron pipe curtain rods and pipe bannisters

During the day we’d let the light shine in.  At night, we’d close the curtains and have a wall of fabric.  However, to make this happen, we needed to find a 12′-long curtain rod.  After a bit of searching, we weren’t coming up with anything for less than $120.  Time to build our own!

Supplies

Assembly and Installation

This project follows the standard rod build instructions for the most part, but has a twist in the middle.  Here goes:

Step 1: Build and Mount your Outside Brackets

  1. Connect a nipple to a flange.
  2. Connect a 3/4″ tee to the other side of the nipple.
  3. Hand-tighten everything
  4. Mount the brackets you just hand crafted to the wall at a level you see fit.

Use the same screws as before, and again, make sure the tee runs horizontal to the floor.

Step 2: Build and Mount your Inside Bracket

  1. Connect a nipple to a flange.
  2. Connect the special 3/4″ x 1/2″ x 1/2″ tee to the other side of the nipple.
  3. Hand-tighten everything
  4. Mount this bracket centered between the two mounts you’ve already installed. Same height.  Still horizontal to the floor.

Step 3: Determine the Length of your Rods

Measure the distance between the outside edges of your tees to the close edge of the center support tee.  To that distance, add an absolute minimum of 2″ so that your pipe can overhang and be capped.  For our installations, we added 4″ total giving us 3″ of overhang on each end and 1″ to screw into the center tee.

Step 4: Slide your Rods into their Holes

Slide a length of 1/2″ pipe into your 3/4″ tee.  Again, the 1/2″ rod will fit easily through the tee and allow for easy adjustment back and forth while you to get your curtain(s) in place.  When your curtain on and ready to go, slide the rod back towards the center support and screw the 1/2″ pipe into the 1/2″ tee opening.  Repeat for the other side of your new, nearly complete extra-long curtain rod. And oh yeah, cap the ends when complete!

Total cost for the extra-long curtain rod: $25.05

Tutorial on creating iron pipe curtain rods and pipe bannisters

 The Completed Whole-Room Look

Tutorial on creating iron pipe curtain rods and pipe bannisters

Coming up in Part III

In Part III we’ll take you upstairs and show you how we’ve continued our theme in our stairwell by swapping out the existing construction-grade banisters and creating our own.  This pop of style is both eye catching, functional, and can handle anything our four boys can throw at it!


Posted on 42 Comments

Achieving an Industrial Décor with Black Iron Pipe – Part I

Tutorials on how to create iron pipe shower curtains, toilet paper holder, and towel bars for an industrial look.

When Brianna and I first moved into our home, our décor could only be described as “New Construction Chic” – otherwise known as a completely blank slate. While the home was outfit with oil rubbed bronze faucets and a few single-bulb Edison light fixtures, there wasn’t a single other fitting or furnishing in our home. Without window coverings, our living room, bedrooms, and bathrooms (oh my!) were like fish bowls, towel/toilet paper holders were non existent, and without shower curtains things were going to get very smelly very quickly.

We knew that we wanted to extend the oil rubbed bronze and Edison theme further into our home, and given everything stated above, we had to act fast. There are plenty of curtain rods, toilet paper holders, and shower curtain rods out there on the market to choose from that would match the small amount of existing décor, but neither of us was willing to fork over $20-$40 per fixture to make this happen. After all, we had 4 windows that needed immediate covering, needed 3 toilet paper holders, one towel holder, and two shower curtain rods. At best these finishes would have cost us well over $250 (yikes!). Fortunately, we’re DIYers!

Tutorials on how to create iron pipe shower curtains, toilet paper holder, and towel bars for an industrial look.

In this first of two posts you’ll learn how we added industrial finishes to our bathrooms by building creative shower curtain rods, toilet paper holders, and hand towel holders through the use of black iron pipe.

Transforming New Construction Bathrooms

We could live with people seeing in the living room for the time being. We could use the bathroom downstairs, set toilet paper on the floor, and close the door for privacy. But we could NOT take a shower without a shower curtain. So let’s begin there….

Master Bathroom: Curved Shower Curtain Rod

Shower rod selection can be a real PITA. Each shower in our home is a shower/tub combo. The one thing neither of us wanted was to take a shower and get surprised when the cold, wet shower curtain decided to sneak up and give you a nice mid-shower hug. The problem is that our master bathroom didn’t lend well to installing a curved shower rod without the need to drill through tile – and neither of us wanted to do that. In addition, the master closet door frame is immediately adjacent to the shower, and we didn’t want to mount a rod there either. We had quite the conundrum on our hands. In the end, we decided to build our own L-shaped shower curtain rod that would avoid the need to drill into the existing tile and fall above the closet door’s frame. Now… for supplies!

Supplies
Zoro.com* is THE source for affordable black iron pipe fittings. Yes, most of your big box home improvement stores will carry a selection of these type fittings, but man are they expensive! Zoro offers a superior selection for less than half the cost.

For the master bathroom shower curtain rod we purchased:

When buying black iron pipe from your big box store, they typically carry two different grades of pipe; one for general use, the other for well water use. At a cost of around $13 for a 10-foot pipe, the lower grade pipe is substantially cheaper and perfect for this type of project. And better yet, most retailers offers free pipe cutting and threading as a service, thereby allowing you to complete multiple projects for the price of one length of pipe. I bet you can’t see where we’re going with this one… Determining the appropriate length can be a bit tricky, as you have to take into account the depths and lengths of whatever fittings you use in your project. For this project, you really need to measure the distance between the elbow and the opposite flange to determine how long of a pipe section you need – and then add at least 1/4″ – 1/2″.

Putting it all Together
Assembly of these components is easy and should be completed prior to the installation of any piece of hardware. I cannot stress this point enough. There’s no need to crank your fittings super tight – simply hand tightening them will be sufficient. I got a little overzealous about getting something hung and ready for use and forgot this very important piece of information. I soon found myself taking pieces down and redoing them…. Lesson learned.

To mount, we used bronze/black square head screws to complete the industrial look.

How to create DIY industrial pipe shower curtain rods

How to create DIY industrial pipe shower curtain rods

The end result was just what we hoped to achieve. Assembly and installation took all of 5 minutes and the total cost for the master shower curtain rod came to a very reasonable $12.94 – much better than $37.99 for a comparable rod at a big box store!

Guest Bathroom: Straight Shower Curtain Rod

Our guest bathroom has your standard shower stall setup and was therefore much easier to complete. Although we still had the “I don’t want to drill into tile” issue like we did in the master bath, there were no door frames or moldings to contend with. So in order to achieve the extra distance between us and the often huggable shower curtain, we simply crafted a standard shower curtain rod and installed it a few more inches away from the shower/tub threshold.

Supplies
The supply list for the guest bathroom shower curtain rod included:

Assembly and Installation
Again, assemble everything prior to installation. My advice on a standard rod like this is to hand-tighten your flanges to your length of pipe, put the rod into place, and then loosen your flanges a bit with the rod in position. This method will ensure a tight fit of your rod prior to finishing your installation with screws (and drywall anchors if necessary).

How to create DIY industrial pipe shower curtain rods

Again, thrilled with the final product. Total cost: $9.90

Toilet Paper Holders

We’re not the type of people that want to have to constantly perform the reach around (or down) to grab a roll of toilet paper. So in keeping with our theme, we decided to build unique toilet paper holders for each of our 2.5 bathrooms. Crafting these babies can be a lot of fun, as the options and styles are nearly endless. Our designs fit any standard size roll insert and can handle the overall width of the largest rolls on the market (I’m thinking about the roll extenders that Charmin once provided – totally not necessary here!)

In the end, we crafted three different styles of toilet paper holders:

How to make DIY industrial toilet paper holders

Style 1 Supplies (from Zoro.com*)

Style 2 & 3 Supplies

Assembly and Installation
As before, assemble everything prior to installation. Give everything a really good hand-tightening! Mount your new fixture at a height and level that works for you. Try to mount to your new creation to a stud if possible, and if not, appropriately sized/weighted drywall anchors will do the trick.

Hand Towel Holders

Perhaps the simplest fixtures to craft, our hand towel holders are simple, functional, and add the perfect additional industrial pop to our bathrooms. We chose to install these in our guest bathrooms (there’s no where to do so in our master), and they always spark conversation after someone lifts a towel and sees what’s lying underneath.

Supplies

Tutorial on how to make DIY industrial towel holder

Check out Part II in the series:

How to craft both standard and extra-long curtain rods to carry an industrial décor throughout your home.