Posted on Leave a comment

A Felt Christmas

We want to wish you a Merry Felt-mas!  While much of our Christmas decor was Star Wars themed the other side of the house was all about felt Christmas.  I fell in love with some small felt Christmas birds a couple of years ago and the felt just grew from there.  Now we have even more felt birds, banners, trees, wreaths, table runners…  The felt list goes on and on.  You name it and we have felt Christmas’d it.  So to finish out this year’s Christmas posts and give you a final tour we welcome you to our felt Christmas.

Felt Christmas Decorations

In keeping with the felt Christmas theme we try to keep everything simple, cozy, and shades of red, green, and white.  The mantel features enough stockings for our family of six, a simple cut fabric banner, felt wreath, and some little felt animals.  We have a few Christmas pillows, that while not felt, have a warm crewel embroidered snowflake and birds.  Oddly, enough I don’t really even like birds that much IRL.  Apparently, I just like the felt ones.

Felt Christmas Mantel

In case you need some of your own felt Christmas birds I found these adorable ones on Amazon. (Affiliate links to follow)

Felt Christmas Birds

Since this is our main living room we put the live Christmas tree in there.  You will notice that the wreath is hung with the same ribbon on the tree.  I try to be all uniform and snazzy like that.  I have finally managed to replace 95% of my plastic ornaments with glass ones.  If you look closely you can see some mercury glass ornaments with everyone’s initials.  That was a splurge (even when they were on sale) from Anthropologie last year.  To add some pops we have started collecting white ceramic and glass ornaments.  Nothing really pops like white on a dark green tree.  Adam and I spent a lot of time carefully placing and re-placing each other’s ornaments.  Until we gave up on either of us getting them exactly like we wanted them.  Compromise is the soul of Christmas right?

Mercury glass letter Christmas ornaments

We add LOTs of lights (Cause why not make it glow like a thousand suns?!), crystals, but also some pretty cardboard stars to keep it glimmery but in keeping with the rustic felt Christmas theme.

Red, white, and gold Christmas tree in a felt Christmas living room.

The TV stand features a cut snowflake runner in… you got it… red felt.  With a matching tree like the one on the mantel and, of course, more felt animals.

Finally the bookcase showcases my true obsession with felt animals.  In case the fox and squirrel vignette wasn’t enough we also have a quartet of birds in felt camping and snow gear.  Don’t worry there are also Christmas books for the kids on the bookcase and a nice wooden ‘JOY’ sign to break up all the felt goodness.

Felt Christmas Animal Vignette

So if you are feeling our felt (and even if you aren’t) we just want you to know we wish you a Merry Christmas and a Happy New Year… felt Christmas style!

–Sincerely,

Adam & Brianna

Felt Christmas Birds

Posted on 1 Comment

How to Thicken a Sparse Christmas Tree

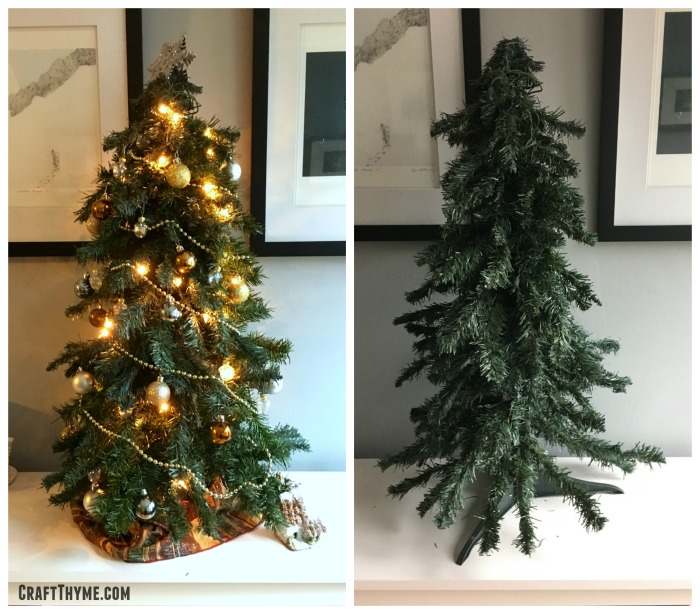
before and after thickening a sparse Christmas tree using this tutorial.

Ever notice how sparse looking an old or cheap artificial Christmas tree can be?  I’m not a huge fan of artificial trees to begin with… So, the last thing I want to do is have a dejected, sparse, Christmas tree.  Fear not!  I have the simplest tutorial that can teach you how to thicken any Christmas tree.  It can take a sad fake tree and make it look fabulous.  With these easy steps you can breath new life into an old artificial tree or add pizazz to a cheap Christmas tree.  You are going to be shocked by how easy it is to thicken a sparse Christmas tree.

No More Sparse Christmas Trees

How to Thicken a Sparse Christmas Tree tutorial.

It only takes two things to make an artificial Christmas Tree look thick and lush. (Affiliate links to follow)

Supplies

  1. Fake Garland
  2. Something to cut wire

I try to pick up fake garland the day after Thanksgiving.  It is always dirt cheap and can be used as a base to make fabulous evergreen garland, teardrop swags, and thicken a Christmas tree.

Step 1

Put up your sparse Christmas Tree.  Step back and make a face at the lackluster branches.  Look online to see about buying a new, better tree.  Gasp at the prices and proceed to revamp your old artificial tree.

Step 2

Add some lights.  Everything looks better with lights! Fun fact, I had a brief job as a costume designer.  The motto of the theater is “Make it big.  If you can’t make it big make it red.  If you can’t make it red put lights on it.”  Seems legit.

Sparse Christmas tree in need of thickening
Here is a sad sparse Christmas tree. At least it has a little twinkle.

Step 3

Now here is the fun part.  Untie your garland and push in the end until it is near the tree trunk just above the bottom row of branches.  Eye ball where the branches end on the piece of garland and then cut that length.  Cut 4 or 5 more pieces the same length.  Fluff those pieces of garland out and place them right above the bottom row of branches.  You can use a piece of the garland to wrap around another branch or the trunk to secure the piece in place.

Cutting garland to thicken a sparse Christmas Tree.

Step 4

Repeat step three moving up the sparse tree.  You will likely need to fill in 3 or 4 ‘levels’ of tree.  Bonus points if you spend time fluff and twisting, and sprucing it all up.  Personally, I am bad to just shove the branches in and move things around when I decorate if need be.

before and after thickening a sparse Christmas tree using this tutorial.
So Much Better!

Yeah, this really is one of the shortest tutorials I have ever written, but it really is that easy!  Kind of cut, shove, and go!  So, get yourself some cheap garland and make that fake Christmas tree thick and fabulous.

Posted on 7 Comments

Star Wars Christmas Tree

Ornaments for a Star Wars themed Christmas Tree

If you have read anything on our site you might have realized we are a bit nerdy.  So after finding a set of Star Wars stockings for the whole family it only made sense to make our own Star Wars Christmas tree.  However, have you seen how much Star Wars ornaments cost?  Holy night!  We had to turn to our DIY know how to make a full Star Wars Christmas tree complete with BB-8 topper and custom ornaments from all of the movies.  Here is a tour of our Star Wars Christmas tree with a few DIY and money saving tips, in case you want to make your own.

Star Wars stockings hung on a mantel as part of Star Wars Christmas Decorations

I love these stockings and you can still order them when I published this article (Affiliate links to follow).

Star Wars Christmas Tree

Here is the tree in all of it’s glory.  We stuck with colors of the light and dark side.  Blue, silver, red, and black.  With a touch of gold here and there for shimmer and C-3PO.  It is Christmas after all!  You can see here that the BB-8 tree topper is lit.  We created the topper from paper party lanterns.  I cut the excess metal from the frames and glued the lantern’s together.  Then I stuffed a small pack of battery lit LED lights.  They are on a timer and come on each evening.  They also stay cool to the touch making sure the paper lantern is nice a safe.  We got the lantern from the party section of Target but you can also order them off Amazon.

DIY advice and tutorial links on how to make your own Star Wars Christmas Tree

Star Wars Christmas Lights

If you look carefully you can see we sprung for a couple strands of Star Wars lights.  Yoda is donning a festive Santa hat and BB-8 is glowing.  We stumbled across these at CVS while waiting for flu shots.  They were way cheaper than Amazon and we got a 20% off coupon for getting flu shots in store.  You can opt to order them from Amazon. We also got some R2-D2 lights on sale recently, but we had already decorated the tree so we will save them till next year.

Details of a Star Wars Christmas Tree

DIY Star Wars Ornaments

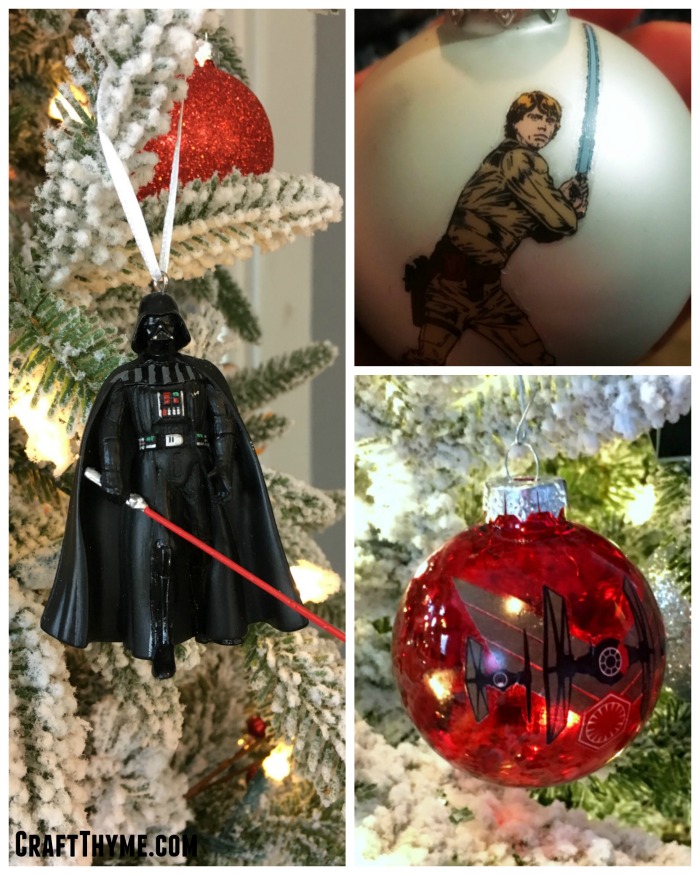
Most of the rest of the Star Wars Ornaments were made by us.  You can read all about how to make your own DIY Star Wars Christmas Ornaments on our detailed tutorial.  They came out for less than .50 an ornament and we got to have most of the main characters from all of the films.  Though we might have opted to skip Jar Jar Binks… Some of my favorites were Yoda and just the general Star Wars logo on a nice matte red Christmas ball.  You can see those details on the tutorial mentioned above.

Ornaments for a Star Wars themed Christmas Tree

While, we didn’t exactly DIY we did reuse lots and lots of Star Wars ships.  Our kids have quite a collection of ships and they chose to keep a few to play with and let us use the rest for the tree.  The gold millennium falcon made a nice touch near the top.  I would have loved to add Boba Fett’s Slave that we have in gold, but alas, I couldn’t get Conlan to part with it for the tree.

Millennium Falcon ornament decorating a Star Wars Christmas Tree

Finishing out the Star Wars Christmas Tree

To finish it off we opted to use some large paper cutouts of Tie Fighters and X-wings that we had left over from McClain’s birthday party.  They had been ceiling decorations that we cut apart and used as large focal points on the tree.  The most perfect coincidence happened when we had just finished decorating the tree.  Granny  & Papaw came by with the yearly gift of Christmas ornaments for the boys and what should appear? Darth Vader (Conlan), Yoda (McClain), BB-8 (Cooper) and Olaf (Keaton’s went on another tree). These ended up being the perfect complement to the tree.

If you are looking to purchase ornaments here are some options:

I grabbed some black flannel fabric on sale and wrapped it around the base for a tree skirt.  We made sure to find wrapping paper with lots of silver, black, red, and blue.  We even found some silver with geometric shapes that looked “Droid” like and blue “Galaxy” paper.  All in all the Star Wars Christmas Tree and presents ended up being the perfect compliment to the Star Wars stockings we had found.  I am really happy with how our Star Wars themed Christmas room turned out.  Especially since it didn’t end up costing a fortune!

Galaxy wrapping paper in a Star Wars themed Christmas room

Make your own Star Wars Christmas Tree with these easy tips

Posted on 4 Comments

Dyeing Bottle Brush Trees Really Works

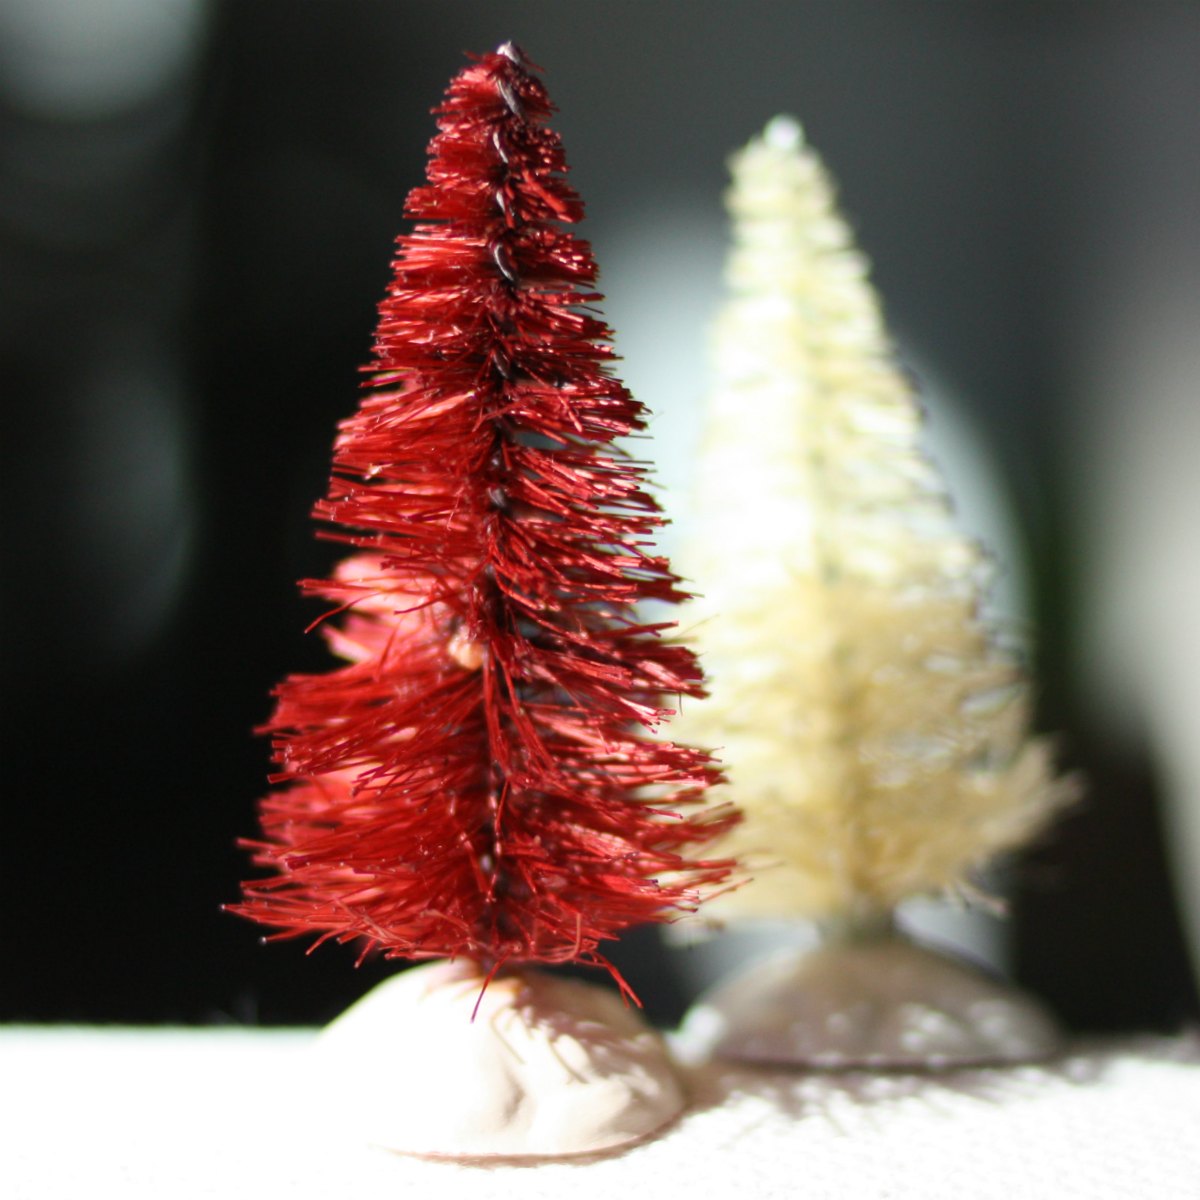
Red and white dyed bottle brush trees for Christmas

I have to admit I was as surprised that dyeing bottle brush trees worked just as well as bleaching them.  The process goes hand in hand so if you have green Christmas trees you want to dye lighter or different colors check out how to bleach them first.  If you already have light colored trees to dye then read this handy how to.  You can make any color but I chose red to go with my Christmas decor.

DIY how to tutorial on dyeing bottle brush trees


Supplies

Step 1

Prepare the dye bath.  This step always seems easy BUT invariably I end up getting dye on my skin, or making a bad color, or boiling the water instead of warming it…  I didn’t bother with salt or basically directions.  I’m a rebel like that.  Just mixed some dye and warm water.

Preparing a dye bath for bottle brush trees


Step 2 Dying to Dye Them

Put trees in dye.  Swish LIGHTLY (see notes for why it needs to be lightly).  I let mine sit about 30 minutes. I hope this is pretty self explanatory

Dip dyeing bottle brush trees


Step 3 Rinse and Repeat.  Well just rinse and set them to dry

I am hoping I don’t really need to write text for this step.  It says it all in the title.Detail pictures of red and white dyed bottle brush trees


Notes

Here is what happens when you use a freshly bleached (wet) tree and then over swish.  The ‘needles’ got over saturated.  It basically looks like my cat hacked it up.  You can still redeem this tree when dry.  But that requires lots of combing and re-wetting stubborn areas to dry in a nice way.  Honestly, don’t do this.

Also got your dye very hot?  Then yeah if you have cheap plastic bases you may end up warping them a bit.

Dyeing bottle brush tree fail

Other than that you have some great bottle brush trees in any color you need for Christmas and other holidays.

Red and white dyed bottle brush trees for Christmas

Enjoy these articles? Get biweekly updates by joining my mailing list (no spam, no way, no how)

*These are affiliate links.  I only get money from these links if you decide to buy.  I was not compensated to mention this product and spent my own money purchasing, testing, and using similar items in developing these tutorials.

See more great DIY, Decor, & Crafts at these link parties: My Romantic Home, The Pin Junkie, Dream A Little Bigger

Posted on 8 Comments

Holy Sh*t: Bottle Brush Trees Really Bleach

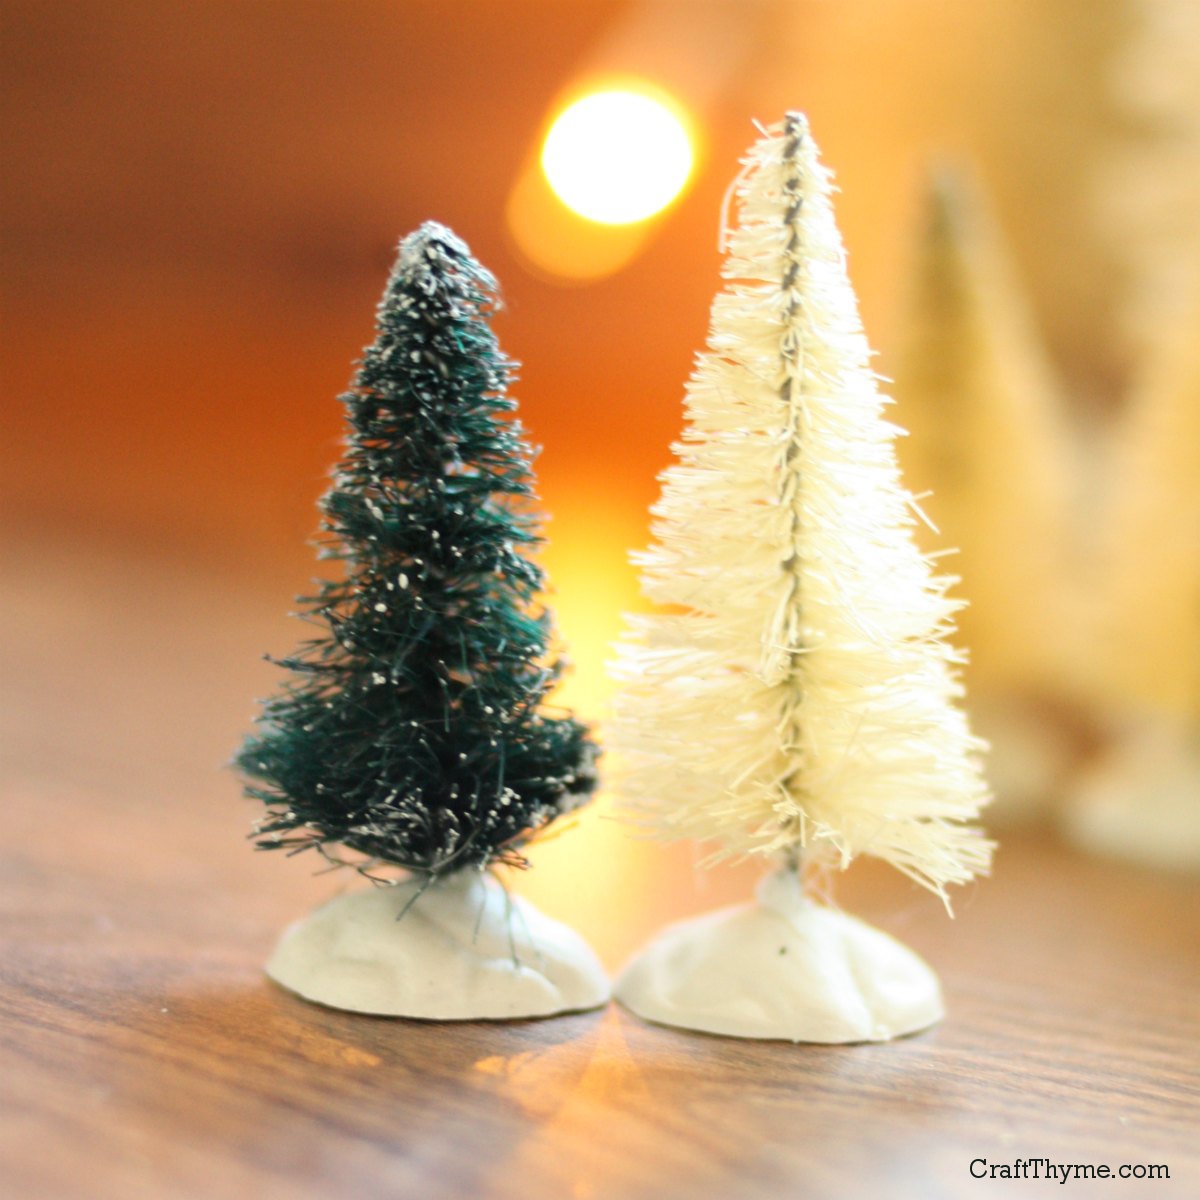
Before and after bleaching bottle brush trees

I have recently read a number of ‘How To Bleach Bottle Brush Tree’ tutorials.  All of them had a theme, grab some cheap bottle brush trees, throw some cap-fulls of bleach in water and glorious vintage looking trees shall emerge!!!

Kinda

Bottle brush trees are not cheap and It takes a crap ton more bleach than anyone says.  BUT the vintage glorious-es-ness that appears is amazing. Now see how to really bleach bottle brush trees.

Before and after bleaching bottle brush trees


Supplies

  • Bottle Brush Trees (Try Googling sisal trees too.  Honestly I got mine at Kmart (nope, they aren’t paying me).  I couldn’t beat 21 trees for $12.99 even online)
  • Bleach
  • Water
  • Sink or Bowl to bleach them in

Step 1

Fill up a sink or bowl with warm/hot water.  The warmer water bleaches faster.  Faster, being relative.  This process is gonna take a couple hours.  Throw in the trees, if you have ones that are made of a material that will bleach then they are going to sink as the soak up water.  Throw in two cups, that’s right two CUPS of bleach.  Don’t pussy out here with a couple cap-fulls.  Let’s get this bleaching party started. Gently stir the trees around so they are evenly submerged.  Gently.  You don’t want a matted mess to deal with later.

First bleach bath for bottle brush trees
These dark trees really do turn cream. Trust me I was a freaking shocked as you when it worked.

Step 2

After letting the trees set for about 20 minutes the water will turn a lovely color of ick.  Drain all that out and repeat step 1.  Oh hell yeah I said 2 MORE cups of bleach.  We are bleaching trees here people.  Not coddling them.  Let this mixture set for 30 min to an hour.  Depending on the tree, they bleached fully white in that time frame.  Well except one… I had one dud tree that refused to bleach fully.  That puppy is red now, but that is another story…

Process of bleaching bottle brush trees
I am naming the color ‘ick’

Step 3

Rinse the trees out.  Lightly rub the trees to remove any stuck on fake snow if your trees had them on it. Lightly shake the trees upside down to remove extra water and fluff the fibers.  Set them aside to dry and marvel that an internet tutorial actually worked!

DIY bleached bottle brush trees

Enjoy these articles? Get biweekly updates by joining my mailing list (no spam, no way, no how)

See other great DIY, Crafts, and Decor at these link parties: Craftberry Bush, Twigg Studios, Dream A Little Bigger