Posted on Leave a comment

A Felt Christmas

We want to wish you a Merry Felt-mas!  While much of our Christmas decor was Star Wars themed the other side of the house was all about felt Christmas.  I fell in love with some small felt Christmas birds a couple of years ago and the felt just grew from there.  Now we have even more felt birds, banners, trees, wreaths, table runners…  The felt list goes on and on.  You name it and we have felt Christmas’d it.  So to finish out this year’s Christmas posts and give you a final tour we welcome you to our felt Christmas.

Felt Christmas Decorations

In keeping with the felt Christmas theme we try to keep everything simple, cozy, and shades of red, green, and white.  The mantel features enough stockings for our family of six, a simple cut fabric banner, felt wreath, and some little felt animals.  We have a few Christmas pillows, that while not felt, have a warm crewel embroidered snowflake and birds.  Oddly, enough I don’t really even like birds that much IRL.  Apparently, I just like the felt ones.

Felt Christmas Mantel

In case you need some of your own felt Christmas birds I found these adorable ones on Amazon. (Affiliate links to follow)

Felt Christmas Birds

Since this is our main living room we put the live Christmas tree in there.  You will notice that the wreath is hung with the same ribbon on the tree.  I try to be all uniform and snazzy like that.  I have finally managed to replace 95% of my plastic ornaments with glass ones.  If you look closely you can see some mercury glass ornaments with everyone’s initials.  That was a splurge (even when they were on sale) from Anthropologie last year.  To add some pops we have started collecting white ceramic and glass ornaments.  Nothing really pops like white on a dark green tree.  Adam and I spent a lot of time carefully placing and re-placing each other’s ornaments.  Until we gave up on either of us getting them exactly like we wanted them.  Compromise is the soul of Christmas right?

Mercury glass letter Christmas ornaments

We add LOTs of lights (Cause why not make it glow like a thousand suns?!), crystals, but also some pretty cardboard stars to keep it glimmery but in keeping with the rustic felt Christmas theme.

Red, white, and gold Christmas tree in a felt Christmas living room.

The TV stand features a cut snowflake runner in… you got it… red felt.  With a matching tree like the one on the mantel and, of course, more felt animals.

Finally the bookcase showcases my true obsession with felt animals.  In case the fox and squirrel vignette wasn’t enough we also have a quartet of birds in felt camping and snow gear.  Don’t worry there are also Christmas books for the kids on the bookcase and a nice wooden ‘JOY’ sign to break up all the felt goodness.

Felt Christmas Animal Vignette

So if you are feeling our felt (and even if you aren’t) we just want you to know we wish you a Merry Christmas and a Happy New Year… felt Christmas style!

–Sincerely,

Adam & Brianna

Felt Christmas Birds

Posted on 7 Comments

Star Wars Christmas Tree

Ornaments for a Star Wars themed Christmas Tree

If you have read anything on our site you might have realized we are a bit nerdy.  So after finding a set of Star Wars stockings for the whole family it only made sense to make our own Star Wars Christmas tree.  However, have you seen how much Star Wars ornaments cost?  Holy night!  We had to turn to our DIY know how to make a full Star Wars Christmas tree complete with BB-8 topper and custom ornaments from all of the movies.  Here is a tour of our Star Wars Christmas tree with a few DIY and money saving tips, in case you want to make your own.

Star Wars stockings hung on a mantel as part of Star Wars Christmas Decorations

I love these stockings and you can still order them when I published this article (Affiliate links to follow).

Star Wars Christmas Tree

Here is the tree in all of it’s glory.  We stuck with colors of the light and dark side.  Blue, silver, red, and black.  With a touch of gold here and there for shimmer and C-3PO.  It is Christmas after all!  You can see here that the BB-8 tree topper is lit.  We created the topper from paper party lanterns.  I cut the excess metal from the frames and glued the lantern’s together.  Then I stuffed a small pack of battery lit LED lights.  They are on a timer and come on each evening.  They also stay cool to the touch making sure the paper lantern is nice a safe.  We got the lantern from the party section of Target but you can also order them off Amazon.

DIY advice and tutorial links on how to make your own Star Wars Christmas Tree

Star Wars Christmas Lights

If you look carefully you can see we sprung for a couple strands of Star Wars lights.  Yoda is donning a festive Santa hat and BB-8 is glowing.  We stumbled across these at CVS while waiting for flu shots.  They were way cheaper than Amazon and we got a 20% off coupon for getting flu shots in store.  You can opt to order them from Amazon. We also got some R2-D2 lights on sale recently, but we had already decorated the tree so we will save them till next year.

Details of a Star Wars Christmas Tree

DIY Star Wars Ornaments

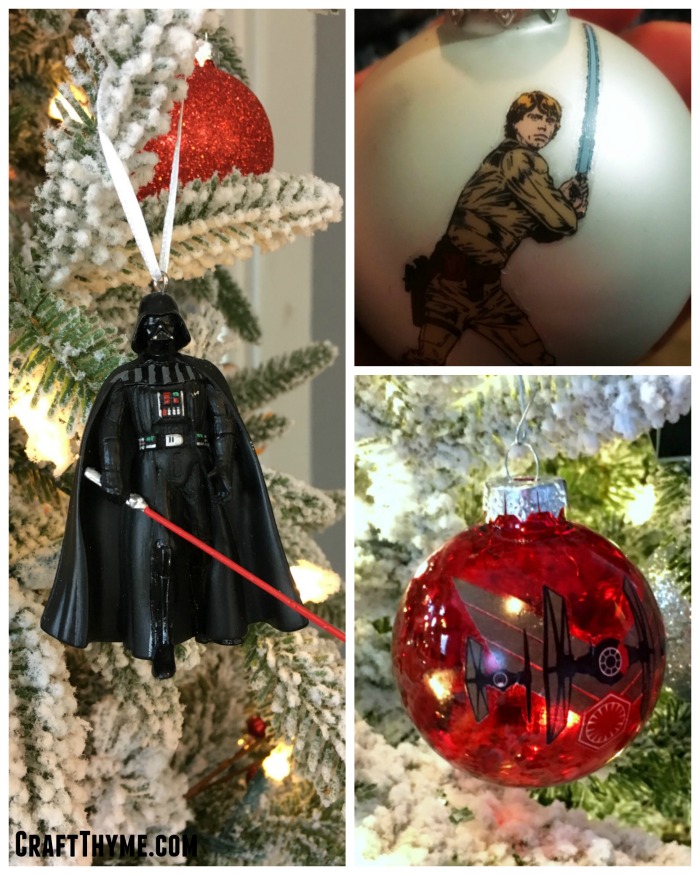
Most of the rest of the Star Wars Ornaments were made by us.  You can read all about how to make your own DIY Star Wars Christmas Ornaments on our detailed tutorial.  They came out for less than .50 an ornament and we got to have most of the main characters from all of the films.  Though we might have opted to skip Jar Jar Binks… Some of my favorites were Yoda and just the general Star Wars logo on a nice matte red Christmas ball.  You can see those details on the tutorial mentioned above.

Ornaments for a Star Wars themed Christmas Tree

While, we didn’t exactly DIY we did reuse lots and lots of Star Wars ships.  Our kids have quite a collection of ships and they chose to keep a few to play with and let us use the rest for the tree.  The gold millennium falcon made a nice touch near the top.  I would have loved to add Boba Fett’s Slave that we have in gold, but alas, I couldn’t get Conlan to part with it for the tree.

Millennium Falcon ornament decorating a Star Wars Christmas Tree

Finishing out the Star Wars Christmas Tree

To finish it off we opted to use some large paper cutouts of Tie Fighters and X-wings that we had left over from McClain’s birthday party.  They had been ceiling decorations that we cut apart and used as large focal points on the tree.  The most perfect coincidence happened when we had just finished decorating the tree.  Granny  & Papaw came by with the yearly gift of Christmas ornaments for the boys and what should appear? Darth Vader (Conlan), Yoda (McClain), BB-8 (Cooper) and Olaf (Keaton’s went on another tree). These ended up being the perfect complement to the tree.

If you are looking to purchase ornaments here are some options:

I grabbed some black flannel fabric on sale and wrapped it around the base for a tree skirt.  We made sure to find wrapping paper with lots of silver, black, red, and blue.  We even found some silver with geometric shapes that looked “Droid” like and blue “Galaxy” paper.  All in all the Star Wars Christmas Tree and presents ended up being the perfect compliment to the Star Wars stockings we had found.  I am really happy with how our Star Wars themed Christmas room turned out.  Especially since it didn’t end up costing a fortune!

Galaxy wrapping paper in a Star Wars themed Christmas room

Make your own Star Wars Christmas Tree with these easy tips

Posted on 8 Comments

Star Wars Christmas Ornaments DIY

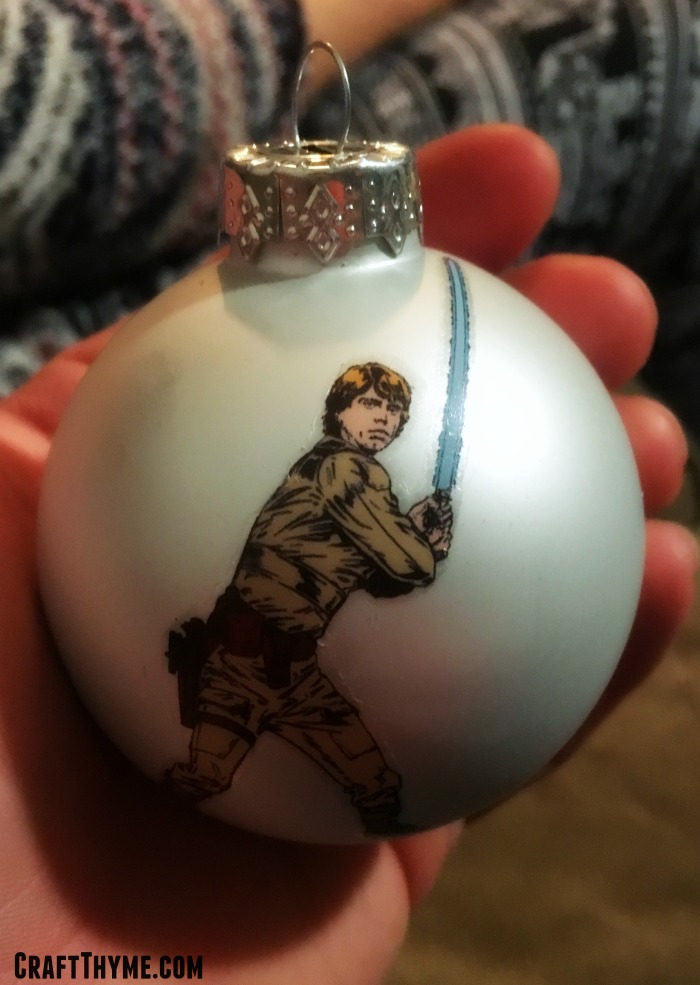
DIY tutorial that creates a Luke Skywalker Star Wars Ornament

Have you got light sabers, blasters, and the force flying around your house?  We sure do!  With 4 Star Wars obsessed boys and 2 Star Wars obsessed parents it only seemed fitting that we have a Star Wars Christmas tree!  However, to have a Star Wars themed Christmas Tree you have to have a Star Wars Christmas Ornaments and have you seen how much those puppies run?!  Ouch!!!!  I’ll have to admit, Adam, had the idea for how to make DIY Star Wars Christmas ornaments, but the execution is all mine!  By our calculations you can make 40 glass Star Wars Ornaments for $13 or .33 an ornament.

In the supplies below I happened to purchase my ornaments on half off Christmas decoration day at Target.  I happen to have this thing for real glass ornaments so I got the box of 40 for $10 and the package of temporary Star Wars tattoos was $3.  The below links are Amazon Affiliate links.

How to make Star Wars Christmas ornaments from temporary tattoos.

Star Wars Christmas Ornament Supplies

  • Glass Ornaments: Light Colors with matte finishes seem to work the best, but we mixed in silver & clear (for the Light Side) and Red & Black (For the Dark Side).  We bought multipacks that had glitter ornaments we used for color on the tree.  The tattoos do not stick to the glitter!
  • Temporary Tattoos:  Not all tattoos are alike.  We bought one pack at Target and despite the cover having Kylo Ren it had only Light Side characters!  Not a storm trooper to be found.  We ordered a second pack from Amazon and it had a better mix of characters from all of the movies (No Jar Jar Binks!!!).  Also some of the temporary tattoos brands are more opaque than others.  This matters if you are putting them on dark colored glass ornaments as it can change whites to pink etc.
  • Water
  • Wash Cloth

Supplies for DIY Star Wars Ornaments

Step 1: Cut It Out

Cut out your tattoo. Seems simple right? Wrong.  This might be the most important point; Star Wars tattoo selection and trimming.  For your first tattoo start with one you don’t like.  Maybe that 20th storm trooper or some such.  Then cut it out pretty close to the tattoo.  There are two reasons for this.  The first is that on some temporary tattoos they have a lot of clear gel? stuff? surrounding the picture.  You want to remove that as it shows on the ornament and we wants some freaking fantastic Star Wars Christmas Ornaments right?  Secondly, you are taking a flat item and adding it to a curved item.  This is why Greenland looks so damn big on the map.  Flat <> Round (Does not equal for all you non-nerds).  Removing material makes it much easier to mold to the surface.

Pro Tip: Any geometric tattoo is a P.I.T.A. and almost impossible to get perfect on the curved surface.  Do not start with these!

How to create Star Wars ornaments

Step 2: Place Your Face

Before you start this step have a bowl of water and a wash cloth handy.

Okay, not technically your face but potentially Princess Leia’s face needs to line up on the ornament.  Keep the plastic covering attached to the tattoo while you kind of hold it up and see where you want it.  Only when you feel ready to tackle this puppy peal the plastic backing off and lightly place the tattoo on the surface in the middle of the tattoo.  I say lightly for a reason.  If you touch the sticky side to the glass ball much at all it is stuck for good!  Let us just say I was glad there were 10 extra tattoos to mess with.

How to make cheap Star Wars ornaments

Step 3: May the Force Be With You (And with you also)

So we aren’t actually going to “force” the tattoo to adhere.  To get great looking Star Wars Christmas ornaments you need to use care and a deft dabbing hand.  Wring out the wash cloth until it is just slightly damp start smoothing the tattoo from the center outward with dry fingers.  Then lightly dab the paper until it is damp enough to mold easily to the glass.  I learned the hard way that too much water will seep under the tattoo and keep it from adhering to the ornament.  Once you have the entire tattoo stuck you can wet the paper more, but be careful to dab at 90 degrees.  I ruined a few ornaments by sliding the whole thing on the glass.

WAIT THE ENTIRE 30 SECONDS before pealing it back.  I know it is tempting, I know you want to see.  But just let it sit there for a minute.  Glass is much slicker than human skin and you need to give it a moment to settle and adhere correctly. Finally peel off the paper backing and admire your work.

DIY Star Wars Christmas Ornaments

I was careful not to touch anything.  I let it dry fully overnight.  After that just hang and enjoy!

DIY tutorial that creates a Luke Skywalker Star Wars Ornament

To recap:

  • Take the time to cut out extraneous paper
  • Less water is more
  • Dab don’t swipe

Since this is the first year we made them I can’t tell you how they will hold up over time.  But, it would certainly be easy enough to do them again if they happen to peel up.  We have had them on the tree for two weeks and they look really good.  In fact we had the pizza delivery person ask to take pictures!  Can’t ask for a more flattering situation than a random stranger asking to take photos of your Star Wars Christmas ornaments and Star Wars Christmas Tree.

Tutorial to create DIY Star Wars Christmas Ornaments.
Read this tutorial to make cheap Star Wars Christmas Ornaments at home.


Posted on 1 Comment

White and Silver Christmas Tree

My Christmas tree coordinates with the adjoining Snowy Woodland Mantel. However, I had to add a little more shimmer as you can see here.

Perhaps you have noted the diminutive size of this particular tree. Make no mistake, we carefully selected our special tree. We might have been the ONLY people out looking for our own perfect “tiny” tree. Certainly Lowe’s or Home Depot has expanded their tree selection to include some live tabletops in the last few years, but if you really want that elusive size above table-top but below 6 feet you are going to have to seek out a small grower.

Luckily for us we live in the land of tree farms. Neither Patrick nor I had visited one since our childhood, but we had someone mention a good one to visit and we set out in the early morning to gather ourselves the perfect tree. And oh what fun! I’m not sure I can ever go back to the supermarket tree.

Does anything say holidays like cutting your own tree on a crisp misty morning?

The morning consisted of visiting Santa (with better results), eating candy canes, and drinking hot cider and chocolate. Boyd Mountain Tree Farm offered activities for the kids (free), Santa photos (free), and refreshments (free). Seems they really just wanted to sell you a tree, garland, or wreaths. How refreshing! We wandered the mountain, picked one and they cut, baled, and loaded your tree. You can of course saw that puppy yourself if you want, but we weren’t feeling that rustic.

McClain was enamored with his first candy cane. Patrick and I were amazed by the tree baler that ties them right up.

Upon getting it home Patrick loaded it up in the tree stand and McClain and I decorated. We used just silver, white, and the crystal ornaments I made (tutorial here). Without a real tree-topper in the right colors (or the right size) I improvised and cut a snowflake topper out of metallic paper. I thought it went nice with the mantel snowflakes.

I can’t believe I got my two year old to listen when I said be gentle with the ornaments! To bad he ignores every other command.
Details of the store-bought and hand-made ornaments.

Best part about the tree? When McClain points at it in the evenings and says “Light! Light!” We switch it on and he adds “Ahhhh!” I see our Christmas traditions already being created!

“Ahhh!”

Well this pretty much completes my tour of Christmas. If you would like to see the rest of the holiday decorations then check these out.

Snowy Woodland Tablescape or my simple place setting redo in Red and Silver

Snowy Woodland Mantel

Crystal Ornaments

Or take the Whole Home Tour 2011

Metallic Frosty Tree

We would love to know who stopped by to see our tree! Please leave a comment below.

Posted on 18 Comments

Crystal Ornaments From Borax: How To Make At Home

I created a naturalistic looking crystal from borax without a lot of cost or time to decorate my tree. Follow this simple recipe to make these beautiful crystal ornaments overnight.

Crystal ornaments made with borax in less than 24 hours.


Supplies

(TBSP or 1/4 cup measure not shown)
  1. Borax (Found with the laundry detergent)
  2. Large glass jar, or steal borrow your husband’s pint glass
  3. Straw, dowel, piece of wire, bamboo skewer basically something to attach across the top of the glass
  4. Paper coated florist wire (or cotton string)
  5. Hot Water (not the kind you get in)
  6. Miscellaneous items to crystallize
You’re looking at a total of $7 for borax and some wire. Not bad since this would give you over 25 four to five inch ornaments. Even more if you wanted to make smaller ones.

Step 1: Assemble your ornament frame

Warning vague instructions ahead entitled: “How to make a frame for your crystals to grow on” or “I can’t tell you how to be creative.”
I tried a variety of materials and basically anything that will soak up a little water works as a fine frame for the crystals. Cotton string, paper, even synthetic fibers worked well. I ended up liking the coated floral wire because it allowed me to bend all kinds of shapes, was light weight, and made a nice hook for the tree. As a bonus I had some laying around. I also became pretty partial to these shiny pom-poms. They add a little sparkle through the crystal, make a nice round shape and I hadn’t figured out a craft to use them with before now.
Basically go wild. You can see here I shoved some wire through the pom-poms, bent a wonky snowflake, and made a spiral. This part is really up to your imagination. BTW, this is a very kid friendly project as well so let them have a go at making some shapes, just have an adult supervise or mix the borax solution.

Step 2: Suspend Your Shapes

You really don’t want to know how many pint glasses we have.
If you use wire then just bend it around the straw. Fibers and cotton thread can easily be tied into a small loop that will slide off the straw making a perfect place for an ornament hook.
Important note: make sure the ornament frames are suspended in the middle of the glass without touching the sides. Crystals will also grow on the inside of the glass and you don’t want the ornament to attach itself to the bottom. We are making ornaments not stalagmites.

Step 3: Mix The Solution

Okay this is a SUPER-Technical recipe. (insert sarcasm here)

Not complete till it is clear!

Mix one cup of water with 1/4 cup borax. Heat the water and stir till it is clear. (As a side note pint glasses take a little less than 2 cups of solution)

Equivalent is 8 ounces of water to 2 ounces of borax.

Couple of notes: Trust me, if you put a little more or a little less you are still going to end up with crystals. Just try to get around 3 tbsp of borax per cup minimum. I used fairly hard tap water so obviously it takes a lot to mess this recipe up. I heated the water on the stove-top and the microwave. The only difference I could see was making sure the solution was fully dissolved. The cloudier the solution then smaller crystals formed. Which, is not necessarily a bad thing, I just happened to want big chunky crystals for my project.

Step 4: The Hard Part; Waiting!

Pour the solution in the glass. DO NOT POUR BOILING LIQUID IN A COLD GLASS! I never got my solution that hot but if you do you are asking for a mess. Let the solution cool otherwise it could shatter the glass.

Go for a clearer solution. Do as I say not as I do.

Crystals will start to form in a couple of hours. For best results leave it overnight. I experimented and left my ornaments for different times. After about 24 hours there really wasn’t much more growth. The only way to get a lot more crystals to grow is to dip it in fresh solution, which, I never found necessary (and I am lazy). When done, just pull them out and dry on a towel. They are pretty sturdy so no need to fret about being super gentle when drying.

The End Result

Natural Crystal Ornaments

Clean Up

Don’t let your husband yourself freak out when you find a bunch of crystals stuck to his pint glasses the glass. Just pour a little warm water in and they come right out of the bottom. In fact, you can even take these crystals and once dry scatter them like glitter.

Other Options

As I stated at the beginning I tried a variety of solutions. I also made Alum crystals and Sugar Crystals. Okay… I tried to make sugar crystals (rock candy) and ended up making some crystals and mostly mold. The alum crystals were quite pretty but when I figured the cost it just didn’t make sense. Both the amount of alum and sugar needed made the cost quite high and for a result that was worse or equal to the borax crystals. Beyond that, the borax crystallized in less than 24 hours making it fast to make a bunch of ornaments. I wanted clear-white crystals so I didn’t try it, but I bet you could color them with food coloring mixed in the solution.

Want to see more holiday crafts? Click on the following:

Home-made and Removable Window Frosting

Snow/Flocking from Soap

Evergreen Wreath

Evergreen Garland