Thanksgiving, for me, is about food, family, and giving thanks for all my friends and loved ones. Plus it is the calm before the Christmas bonanza. My mantel decorations are simplistic to reflect that. Plus I like to have a nice clean look before the gobs of Christmas Decorations begin.
Do as I say, in the apple tutorial and line up your letters. Not as I do :).
Thanksgiving is still about Fall for me. I want to reflect the warm browns, russets, deep reds, and last golds of the season before giving over to the cold, crisp winter. Plus I have a fruit decor obsession.
Told you all those aged papers would come in handy
So enjoy the last days of fall and relaxation before the excitement of Christmas.
Tutorials Used:
Golden Apples
Aging Paper with Tea or Coffee
How To Easily Cover a Book
Just keeping it simple.
Enjoy these articles? Get biweekly updates by joining my mailing list (no spam, no way, no how)
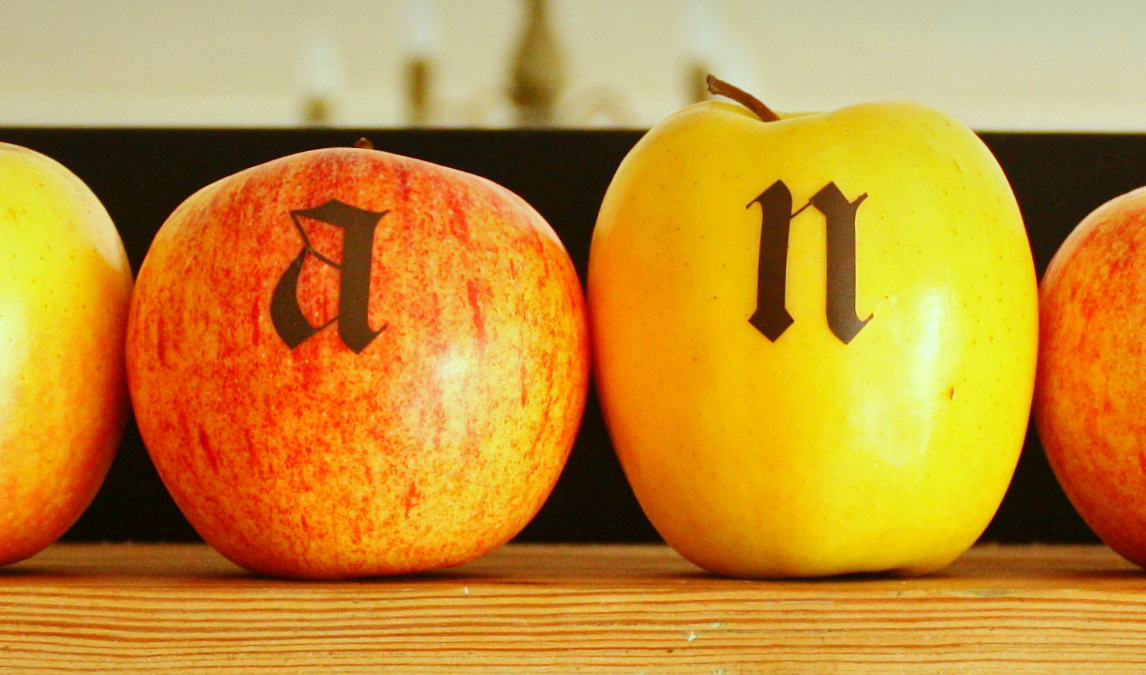
I know the traditional harvest decorations are corn and pumpkins but what about apples. Specifically golden apples. Ever heard of the goose that laid the golden apple? Yeah, this tutorial is kinda like that, but I’m not laying anything and we are making an golden apple… With letters… So basically not the same at all… Anyway on to the tutorial:
Supplies
Vinyl Letters* (I have a craft machine that cuts vinyl but any vinyl letters will work)
This is going to seem like a no-brainer tutorial but there are a couple tips you can use to make this go a lot smoother. First, measure the length of your apples. Measure a few of them and get an average. Because you will need to either cut or buy vinyl letters that fit. So don’t just measure one and assume all the letters are going to look good. (I can’t imagine how I learned this trick)
While you are measuring set the apples in there final location, because guess what?, they are fruit. A natural product. So is every apple going to sit nicely in your display? No.
Step 2 Vinyl: Not pleasant on your thighs in summer and not pleasant to adhere
Do not get me wrong. I love vinyl, but I also worked as visual manager and spent a few years of my life adhere vinyl decals to everything. Once you have worked with a 10 ft vinyl decal it becomes easier. That being said trying to adhere a flat decal to a rounded object, without a lot of bubbles and distortion is tricky.
See that tiny piece on the ‘T’? Yeah I had to adhere that decal twice to get it straight.
Remember to look at how your apples are sitting so you can get all the letters in line.
This is what I meant about in line. I am ATTEMPTING to get the ‘A’ and ‘N’ about the same level. Except I kinda failed. You have been warned… Do a better job!
Step 3: Bring on the Shine
Take your apple and spray it with metallic spray paint. What?! You can spray fruit?! Yeah fruit turns out lovely and inedible. Please tell me you wouldn’t dream about eating an apple covered in regular spray paint… Please.
The smooth surface of the apple takes the paint really well. I just did two quick coats, let it dry fully and got a really nice shiny surface.
Step 4: Peel
Don’t peel the apple! Just peel off the decal to let the apple color show through. For my thanksgiving mantel I only wanted one golden apple accent so I only painted the ‘T’ and peeled the vinyl away. I spelled the rest of the word using brown vinyl I left in place on the other apples.
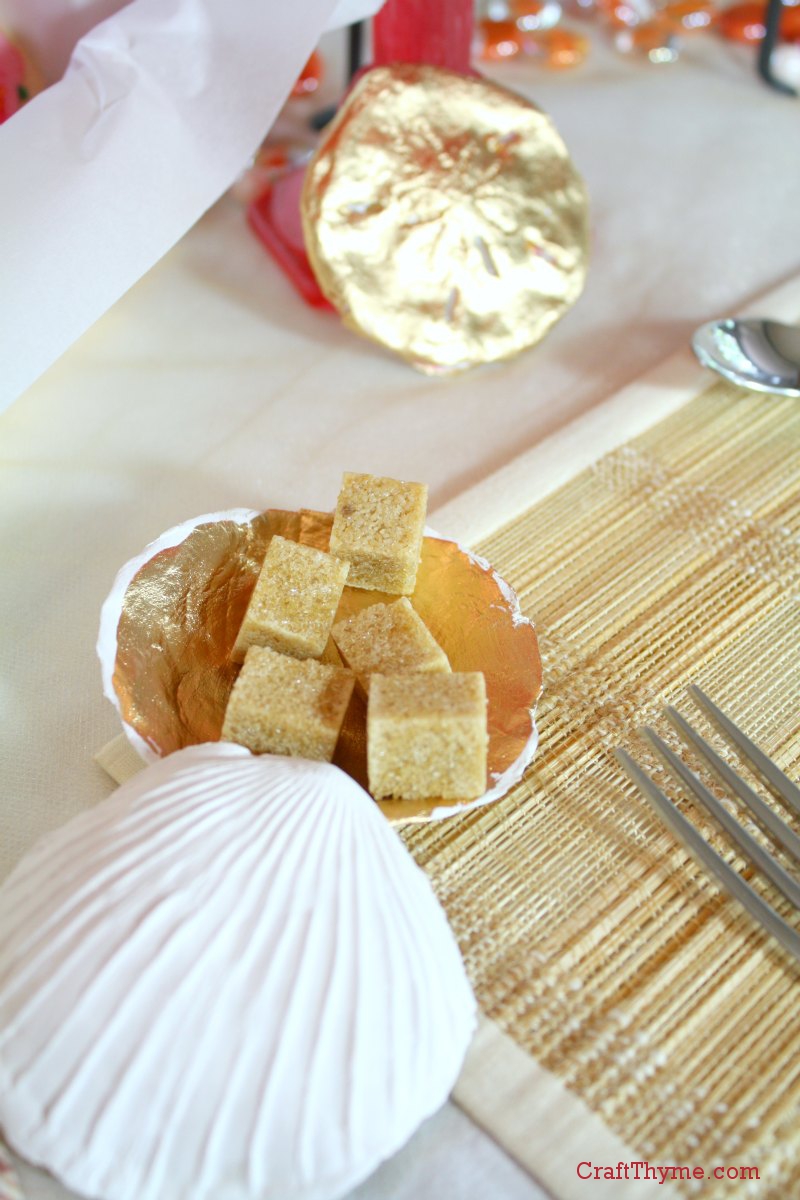
This isn’t so much a tutorial as more an answer to a few inquiries I had about the gold elements from the Pink Lemonade Table Decor. There are a variety of metallic paints, waxes, glazes, leafs, foils, etc. for when you want to add shine to a project. Each one has a place depending on the project and the look you are going for. In this case I wanted a poured metallic look to cover the inside of real and scultped seashells and the outside of paperclay sand dollars.
I used Liquid Leaf* to finish these items. The below picture is from Plaid’s website. They have not paid me to say these nice things. In fact I doubt they know this website exists…
You can achieve a leaf-like finish by thickly brushing on a coat and letting it dry. I use some throw away flux brushes so I don’t have to worry about clean up.
The paperclay items did need a wash of thin white acrylic paint so that the leaf wasn’t immediately sucked into the surface. Trust me, I forgot to prime one of them and it used a ton of leaf and left lots of paint strokes.
You can get a metallic accent by brushing a thin coat on as I did with this Goodwill tray. I did white-wash it with a layer of acrylic paint first and then used the liquid leaf along the bottom edge.
Finally liquid leaf works well on a lot of materials. I finished the inside of real seashells as well as my faux created ones.
To be honest I initially planned on using rub-n-buff but I couldn’t find the tube in the basement. However, I like the look of poured and cast metal that the liquid leaf created. I’ll definitely use it again when I need this particular effect.
Notes
Make sure to put a thick coat on if you want a poured look.
DO NOT touch until fully dry. Just don’t. Let it dry.
You may need to cover the with a clear acrylic top coat. Tarnish can occur and heavy use items will rub.
It stinks. Ventilation is key. Otherwise it is easy peasy to apply.
Enjoy these articles? Get periodic updates by joining my mailing list (no spam, no way, no how) or subscribing to my RSS feed.
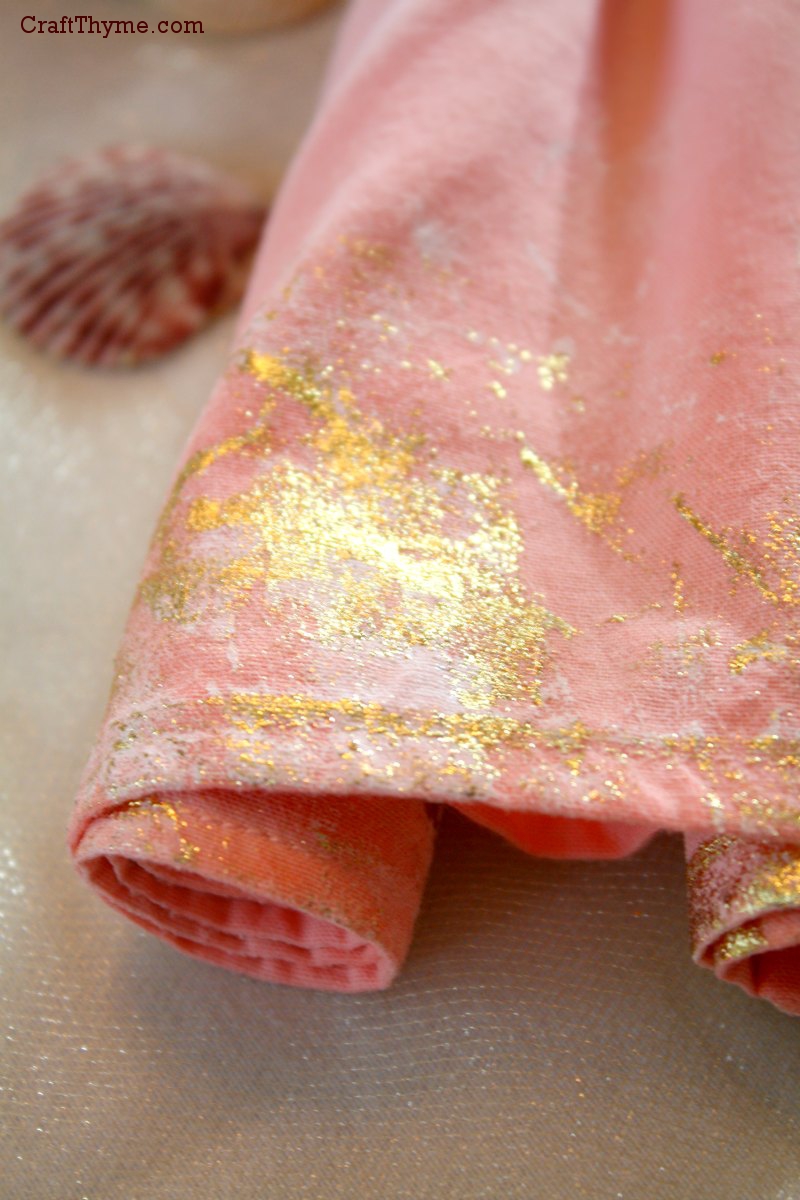
There are plenty of metallic fabric paints on the market, and while they excel at adding shimmer they don’t have that rich metallic leaf look that is so popular on various commercial t-shirts. It took a little bit of research but I finally figured out how they get gold leaf on fabric and keep it washable. Allow me to introduce you to Gold Foiling Fabric.
Transfer Adhesive* (Full disclosure about this affiliate link: I wasn’t thrilled with the Martha Stewart Transfer Glue I used here. I might try a different brand. The important point is that is is tacky when set and stays adhered through gentle washing. Maybe it was user error…)
Metallic Foil Sheets* (These are different than gold leaf. They are thicker and have a backing to the metallic portion)
Sponge applicator
Step 1: It’s Sticky
I wanted a random/worn pattern to my finished foil look so I put the glue at random and used varying thicknesses of glue. You can get a smoother finish by putting a nice, thick, even application of glue. You can even use a stencil and apply glue in a pattern. The important part is to get enough on that the glue quits soaking into the fabric and leaves an even coat on the top layer.
The directions will tell you how long to let the glue set. My suggestion is to lightly test with your finger. The glue should stick to your finger but not leave the fabric when set.
Step 2: Burnish and Repeat
Alright, I know this probably makes sense to everyone else, but put the shiny side up… You are gluing the backing to the fabric. That was one of my duh moments. To get a really good bond press the sheet into the glue. Then burnish the top of the foil with a precision instrument paint brush handle. Mostly because that was what I had laying around.
Slowly peel the foil from the fabric. The plastic sheet should peel off and the gold leaf effect remain. Leaving you with some nice shimmer like this.
I already mentioned one important point. Shiny-side up. When done I let mine sit for 24 hours to fully cure.
I did hand wash them and the gold stayed put. I believe it would hold up through a gentle cycle as well. I just wouldn’t put these napkins up to a BBQ or Crab leg challenge. But for a special occasion they work great.
It took a bit of practice to do a good application of glue and foil. If it is your first time I would suggest buying an extra sheet or two of foil to practice with. The napkins were completed after many trial runs that took to realize how to apply the glue and that burnishing helped.
Finally save your foil sheets if they have any left. The little flecks make for an interesting effect when pressed into glue
Enjoy these articles? Get periodic updates by joining my mailing list (no spam, no way, no how) or subscribing to my RSS feed.
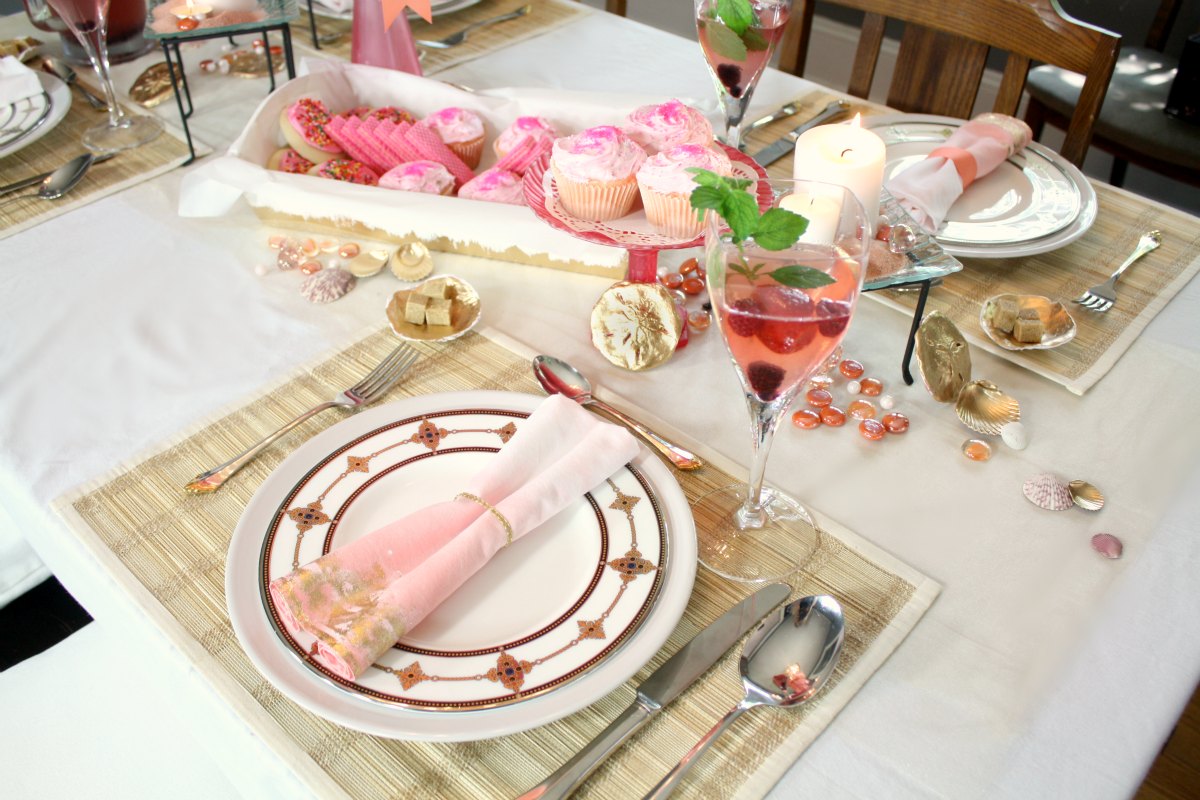
I initially had the idea for this table setting from some sea shells I found when scrounging through my mess of a basement. I had saved a small bag of pink scallop shells and thought they would make a good basis to start my summer decor. Though I live in the mountains my second love is the beach. I wish I was a lake girl, since so many lakes are so much closer, but the mud, the dark water, the… Nope it is sand and surf for me. However, any good mountaineer knows overdoing the surf theme just seems out of place. So here is my hybrid of pink, salmon, & gold. Call it pink sand, shore, and lemonade inspiration.
I’m so good at naming tablescapes… #sarcasm. Please suggest better names in the comments! Please!
The table setting is anchored by a diy ribbon chandelier (tutorial here) above and gold tulle net runner below. The gold accents unify the various shades of pink that run from rose to salmon. Shoo… okay I can say I used my art degree today to critique my design. Now on the the fun stuff!
PINK LEMONADE CUPCAKES!
I knew I wanted some fun pink desserts and, thank the grocery gods, I walked by a display for Pillsbury pink-lemonade cupcakes.
Read below to learn more about my awesome baking skills.
Yes I can bake… But can I decorate a cake? Oh hell no. It is a crafting skill that is just beyond me. Knowing this, I often take the easy way out with mixes, pre-made icing, and sugar sprinkles. As far as I can tell sugar sprinkles cover a multitude of sins. Plus who could walk away from a thing of icing labeled ‘Pink Lemonade”. And I swear I am not getting paid by Pillsbury to say all this awesome stuff. Though, if they would like to, feel free to give me a ring.
I like to call this the sugar, sugar, sugar portion of the table
Oh my! I almost forgot mixed berry sangria! Perhaps I should preface this with my Facebook status:Not to be a braggart but I make multiple awesome sangrias. Citrus, berry, peach, etc… One for every season. The recipe for this mixed berry and lemonade one will be up Thursday!
Gold Finger! A tutorial for creating your own gold sea shells and sand dollars from paper clay is in the works.
One of the things I enjoyed most about creating this display was learning to gold foil fabric (tutorial coming). I thought the ombre dyed napkins (another upcoming tutorial) really set of each place setting because of the gold edging. I’ll leave you with one more picture and a list of craft tutorials and how-tos required to recreate this summer table decor.
I would love to have a better name and ideas on what you like or would improve. Every table display is a learning experience so please leave comments. Other than the cupcakes… Those mo-fo’s were delicious!
Mold Making from Polymer Clay (Gold Seashells and Sand Dollars) I have photos and how tos but I am not sure how many people like to sculpt and make molds… I may or may not post a tutorial.
Enjoy these articles? Get periodic updates by joining my mailing list (no spam, no way, no how) or subscribing to my RSS feed.