Posted on 23 Comments

Make a Indoor Rabbit Hutch From a China Cabinet

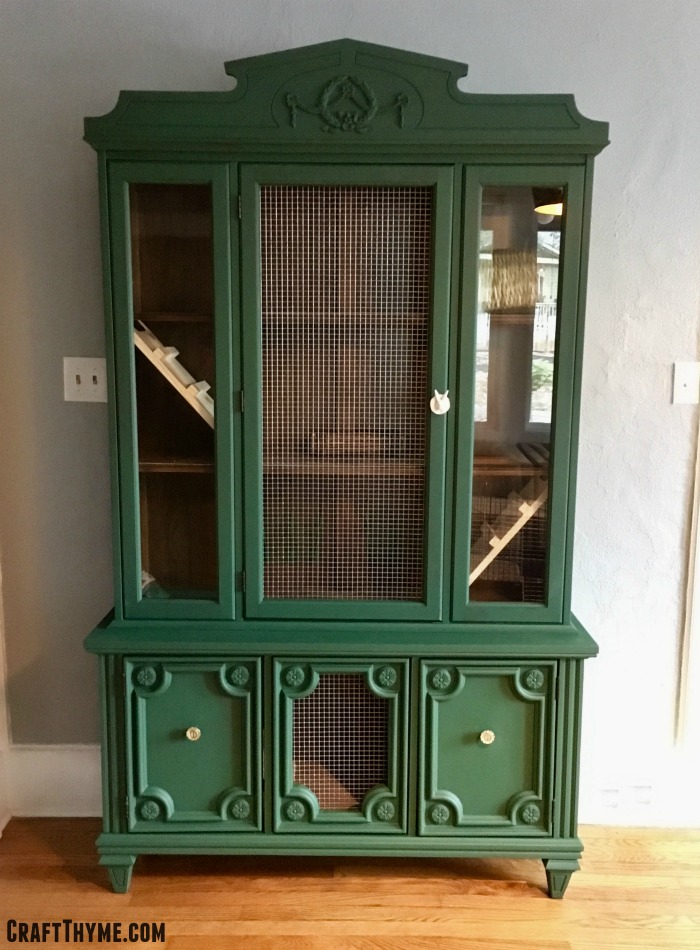
What?! A twenty-five dollar Craigslist china cabinet becomes what?! An indoor rabbit hutch. Perfect for your pampered bunnies.

Want a rabbit hutch that looks elegant?  Well, we did!  We wanted to DIY an indoor rabbit hutch for our new family members Ollie and Biscuit.  We got these rabbits from Adam’s work as a co-worker’s friend was trying to rehome her bunnies before embarking on a lot of travel.  You might wonder how we decided to get some rabbits and it went something like this:

Forwarded email from Adam: Want to get some rabbits?

Me via Instant message: Ummmm… Sure?

Adam via IM: The boys will love them.

Our new family members; Ollie and Biscuit our mini-lop rabbits

So we have rabbits.  All kids need pets, right?  These rabbits needed a indoor space…  We are talking adorable, cute, pampered, litter trained, indoor rabbits.  So we needed an adorable, awesome, and elegant space for the rabbits.  Queue the DIY indoor rabbit hutch.  We found an old china cabinet on craigslist for $25 that just said: refab me into the most awesome indoor rabbit hutch ever!

Of course, this china cabinet wouldn’t fit in any car we have… Because that would be waaaay to0 easy.  So, thanks again Richard, for helping deliver said china cabinet.  (No really THANK YOU!  I have had rabbits in the middle of my living room for two weeks…)What?! A twenty-five dollar Craigslist china cabinet becomes what?! An indoor rabbit hutch. Perfect for your pampered bunnies.

In comes the china cabinet and before you can even say “DIY indoor rabbit hutch” Adam has already ripped out the middle glass panel.  So yeah, no picture of that!  From that we did a lot of measuring, talking, internet research, and experience from having the rabbits.  Our main goals:

  • More space with interesting areas for the rabbits
  • Something that looked good in our house
  • Reduce how much litter, hay, and rabbit pellets end up all over the floor
  • Provided good ventilation for the buns
  • EASY TO CLEAN!  (Brianna’s major requirement)
  • Make it quirky and interesting

We designed the bottom hutch space to hold litter pans and sleeping areas.  There are ramps that go up to an eating area.  Above that are two more levels with a timothy hay tunnel, chewing twigs, and toys for fun.  We created areas for the hay to stay in the hutch and planned how to make this easy to clean!

What?! A twenty-five dollar craigslist china cabinet becomes what?! An indoor rabbit hutch. Perfect for your pampered bunnies.

Once we had the ideas sketched out we just got going!  It took minimal supplies. Affiliate links may follow:

DIY Rabbit Hutch Supplies

  1. 1 – 1 x 8. UNTREATED.  We used it to cut the ramps and grips.  Make sure it has no chemicals that could harm the bunnies.
  2. Hinges: We bought three hinges so that the ramps can be to clean.  They simply push up so we can just sweep and litter out from underneath
  3. Peel and Stick Tile 13 – 12 x 12 We lined all the shelves with peel and stick tile to make it easy to sweep bedding, litter, and bunny poops out of the hutch.
  4. 1/2″ Hardware Cloth (Chicken wire or other metal wire would work.  Indoor rabbit hutches don’t have to protect the rabbits from predators like an outdoor hutch would)
  5. Screws & Staples

Additional Supplies (Optional)

  1. Paint (We made our own chalk paint with this awesome recipe we had used before)
  2. New Knobs: Oh yes, that is a rabbit knob!  We happened to find three awesome knobs on sale for $2.50 at Anthropologie (Trust me I am too cheap to buy anything there full price)

Equipment

  1. Drill
  2. Saw

Optional Equipment

  1. Miter Saw
  2. Jig Saw
  3. Skil Saw
  4. Hand Sander

Transformation Steps

For this build we really winged it.  Adam used a skil saw to cut out holes for the ramps and a jig saw as a I wanted a fancy opening on the bottom.  Yep, that’s me, “Can we cut this center panel out?!  It will look hella cool and ventilation… But mostly it would look awesome…And RABBITS!”  Once the rough holes were cut, Adam, ran a quick sand on the pretty rough cut holes so the buns wouldn’t get hurt on rough edges.  We didn’t worry about beautiful cuts as we were going to cover the floor in tile anyway.Rough cuts are all that is needed to make this indoor rabbit hutch

Painting a Indoor Bunny House

As soon as the holes were cut on the DIY indoor rabbit hutch I went to work on the paint.  The cheap wood finish was pretty intact in the interior of the cabinet so I focused on a rustic look.  The green came from the deepest green of a painting we have in the living room.  Those poppies were painted by Adam’s grandmother and one of my favorite paintings.  (Poppies are my fav flower…  Now if I could just get them to grow!)

Painting that inspired the green diy rabbit hutch
Love this painting!!!!
Homemade chalk paint decorates an indoor bunny house
I actually taped for once!

Ramps for Rabbits

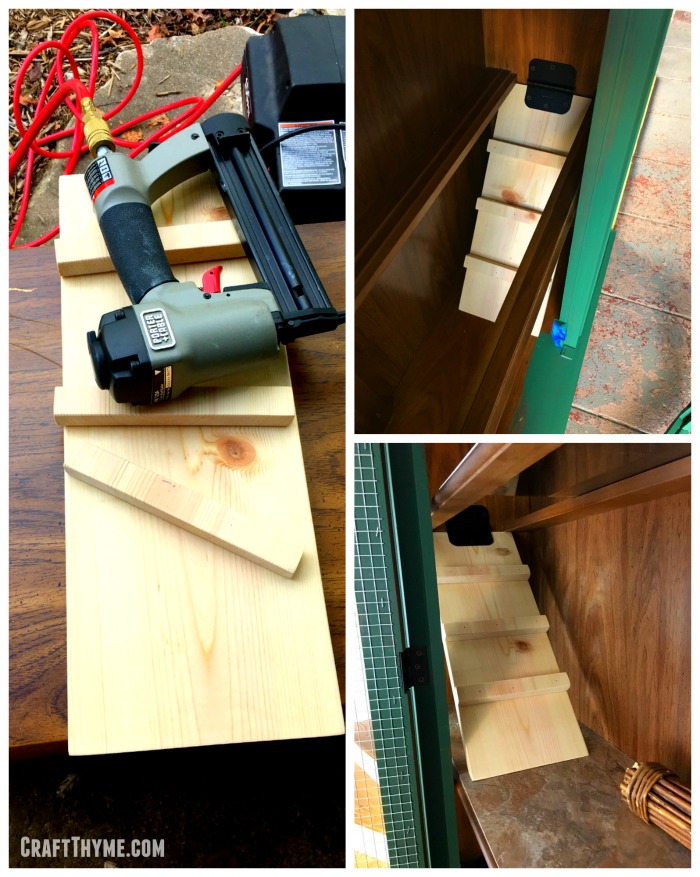
Adam made simple 45 degree cuts on the end of each ramp.  He just measured from holes to floor and took a guess on length.  He made small cuts to make the treads and give the rabbits something to grip while climbing.  Quick nails to hold everything together and then sanding to make sure none of the rabbits could get hurt.  We bought some hinges and connected them to the end to the end of each board and then to the inside of the rabbit hutch.

Details of building a rabbit ramp.

Other Items

Rabbits need lots of good ventilation (according to the internet :)) and make lots of poop (real life experience).  They also need free access to lots of timothy hay and water.  To accomplish all of these we did the following:

  1. We used heavy duty staples to affix the hardware cloth to the open panels.
  2. We lined all the shelves with peel and stick tile.  My hands will never be the same after cutting all that tile to fit the space! BUT poop clean up is as easy as sweeping it out of the shelf an into the trash.
  3. We drilled small holes to hold hay feeders along the back solid wall (helping to reduce the hay all over my living room)

After that it was simply a case of setting it in the living room and adding some fun toys like willow sticks and timothy hay tunnels!

Lots of details for the bunnies! White rabbit cabinet pulls, hay feeders, secret hiding spaces, ramps, and more in this DIY indoor rabbit hutch

OH!  And before I forgot.  The lovely lady who gave us the rabbits also gave us a metal rabbit playpen for them to run around in.  We added hooks to the back of the DIY indoor rabbit hutch so that we can simply hook the play space on.  We open the bottom door and let them run around.  Being litter trained the worst I have had to clean up was a few hard bunny presents from the living room.

In Practice with an Indoor Rabbit Hutch

We LOOOOOVVVVEEEE having something nice in the living room.  It allows the kids to interact with the bunnies and keep them as part of the household.

I might be a bit of a neat freak (As some people might have mentioned, Adam) and super sensitive to smells!  So I am psyched to be able to just renew litter easily and keep it from floating all over the house.  A cage was just allowing them to kick litter everywhere!  I just can’t stand a smelly animal space and want something that is super easy to clean and this fits the ticket.

Details of additional rabbit play space on our indoor rabbit hutch
They also have a play place!

Also, I honestly am over the moon about how cool it looks.  The green was perfect and looks great with the painting.  The chalk paint gave it a soft matte finish that keeps the color fun but not overwhelming.  I, frankly, would be happy with just a china cabinet that looks this good!  But it is even better as a nice home for Ollie and Biscuit!

Before and after of a Craigslist china cabinet turned into an DIY indoor rabbit hutch
Before and After
Posted on 5 Comments

Orange or Red Front Door?

How to paint an orange front door.

I have always loved a good solid red front door.  I love the pop of color, my mother has a beautiful red door, and red front doors are even supposed to be good luck.  BUT, what happens when you have green tinted trim?  Well I can decidedly say that mauve is not the answer.  Whomever decided that a mauve front door surrounded by green-grey trim and dusty dark blue was a good combo should probably be transported back to the 80’s where they belong.

So fine, the mauve had to go (I hated it from day one) but what color to replace the front door?  I wanted it to pop but I didn’t want to be known as the Christmas house.  So a red front door had to be out.  So, what looks good with blue and green? An analogous color would blend and give the necessary contrast plus orange is my current favorite color.  Adam picked up lots of dark/muted orange swatches on his way home from work.  The rest of the house looks like the blue and green had been muted with grey.  We wanted a pop of color not a freaking eye sore.  So this is how we choose front door colors.  Actually, this is how we choose all colors.:

  1. Whoever did NOT pick them out does an initial sort.  We assume the first person only picked colors they thought might work for the color situation.
  2.  Walk to the place we plan on painting.
  3. Hold up swatches and go: No, No, Maybe, No, Oooohhhh  I like that one, No, Maybe etc.  I particularly like where we toss the No’s around with abandon.  This process should not take more than 3-5 minutes.  Just a gut choice of possible or no.
  4. Repeat step 3 with the maybe’s.
  5. Hold up the final 2 or three, possibly tape them in place (only if it is a major tie), step back and make a decision.
  6. Pick up all of those no’s or ask one of the kids to take them to the trash.

I’m pretty sure we have never spent more than 15 min choosing a paint color, and so far, have never been unhappy.  More time <> better color.

Orange Front Door Color Chosen!

Paint decided, drive to the closest hardware store and holy-mother-of-$20+ for a quart of the chosen color.  Oh hell no, I have to paint one side of one door…  We can’t use samples as they are only interior base and you really need the more elastic exterior paint for a front door; even a porch protected one like ours.  We end up consulting with the paint counter specialists.  They point us to a much cheaper brand.  You may have to put on an extra coat but the end result is just as durable and color rich.  They end up color matching our chosen swatch and away we go!

Time to Paint the Orange Door

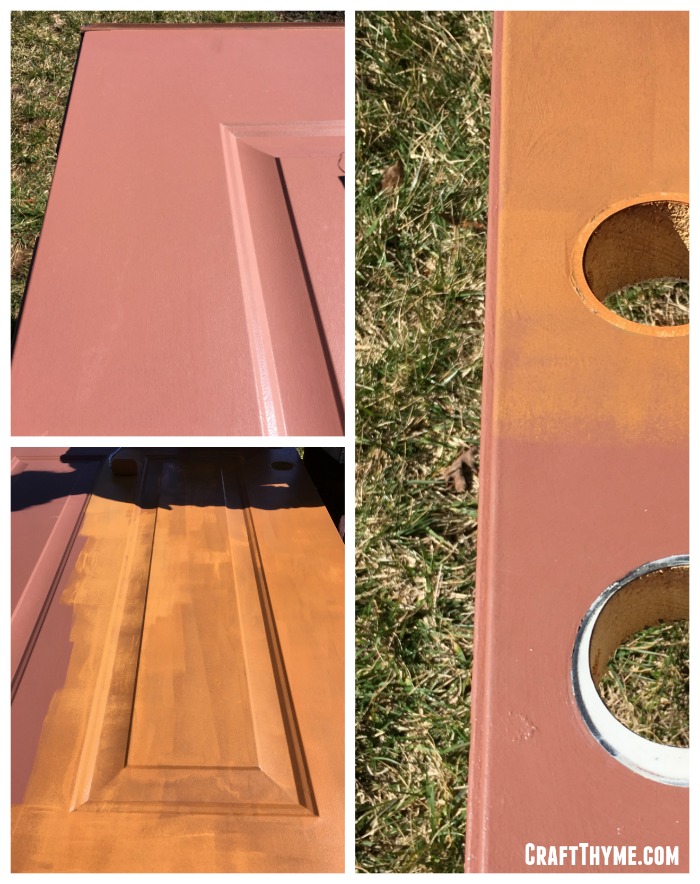
The same person who chose the horrific mauve also hired the laziest painters in the world.  Our house was new construction and for some unknown reason the painted the door, in place, with the hardware on.  Drips, brush marks, and paint splattered hardware abound.  The only way to truly fix all those issues was to sand it away.  Frankly, I have a life so we opted to smooth out their mistakes by removing the door hardware, taking the door down, painting it on sawhorses, and using a smooth foam roller.  That way I could get a smooth even coat with a thickness to hide some of the worst brush strokes.  Oh and did I mention this is a wood door clad in metal. Yeah I have no idea what is going on with that either.  What I do know is how a wood door is made, so, I painted all the sections as if they were assembled and had a wood grain.

Deciding on a red front door versus orange front door.
Check out the mauve situation we had going on.

First Coat

ROOKIE mistake.  I have been painting a long time.  What should you never do? Paint in the direct sun. Especially a god-forsaken door.  Painting a door is already a race to try to get all the panels painted with vertical strokes and the top, middle, and bottom in horizontal center pieces. ALL with smooth brush strokes. I thought I could get away with it since it was on the cooler side.  Nope.  Big cup of nope.  If this happens to you then do what I did and just rolled on a THIN patchy first coat let it dry in the .5 seconds it will take and move your painting location.  I moved to the backyard in a nice shady spot to roll on a nice thick coat.  Seriously, move to the shade.  Joking aside, it allows for a nice wet edge.  That is great when you want to make sure all the roll marks match on the panels.

Rolling Away

As the mauve paint disappeared and the orange darken I was certain we had made the right choice.  A nice pop, toned to mesh well with the existing house colors.  We liked it so much we even made ‘Orange Front Doors’ for the chicken coop.  They have winter panels we have to make them warmer when it is cold.

How to paint an orange front door
Adam said we needed an action shot. Here is my attempt to make rolling paint interesting.

Even if you can not do a red door think about a fun door.  Orange, yellow, a deep emerald green; so many choices beyond a basic white front door.  THOUGH, white is going to be a vast improvement over mauve.  What colors do you have for your front door? I would love to hear in the comments or email me a picture!

How to paint an orange front door.
I need to make a pretty vanity shot! We installed new hardware too.


Posted on 9 Comments

Faux Galvanized Metal Finish

Tutorial on how to faux finish galvanized metal

The exterior of our home has lots of galvanized metal finishes.  Our outdoor lights, conduit porch railings, galvanized accented DIY trellis and planter boxes all have that metal finish.  It was a no-brainer to continue to use the galvanized finish to accent our street numbers on the porch and mailbox.  However, when I started researching modern looking metal numbers, oh holy hell!  The cost!  Even if we bought the most basic metal numbers* off Amazon. We were looking at close to $40.00 for four numbers!  I can not imagine if you have one of those long street numbers and wanted to place it in more than one location. Enter faux galvanized metal finish to the rescue:

Galvanized Metal Finish: Super Easy Faux Finish!

Tutorial on how to faux finish galvanized metal

Materials

  1. Craft Paint*  (Cheap is fine here.  We are painting numbers, not the Sistine Chapel)
    1. Silver*
    2. Black*
    3. White*
  2. Brush*
  3. Wooden Numbers: We used 5″ numbers in a sans serif font (For a modern look). I am just going to tell you now that I can not, in good conscience, give you an affiliate link to wooden numbers.  They are WAY cheaper at a local craft store.  Think $1-$2 per number before the usual 40-50% off coupon.
  4. Finish Nails: For hanging.
  5. Paper towels or an old rag

Step 1: Slap it On

Yep, just paint a layer of straight silver.  The wood is going to soak it up, so you might have to slap a couple of coats on.

First coat of paint to create a galvanized metal faux finish

Step 2: Mix and Match

Mix two different shades of silver, one lighter and one darker.  The easiest way to do this is take a whatever surface you are using to mix paint (cardboard, paper plate, actual palette) and make two small pools of silver paint.  Maybe 1-2″ in diameter.  Then added 2 drops of black in one and 4 drops of white in the other.  Mix and repeat if the colors are not about two shades off from the original.  Always remember paint dries slightly lighter!

Step 3: Pattern Time

I had a chance to look at some pressed galvanized metal containers while I was at the craft store picking up the wooden numbers. You might take a gander at the floral section and see if they have any galvanized metal buckets.  I always find faux finishing easier if I just saw a real life example.  In case you can not find a real life example here is a decent picture from Andrew Beeston of what we are trying to achieve:

Galvanized metal by Andrew Beeston from Flickr

The easiest way to get the angular light and dark patches is to dip your brush and use the flat side to press into the number.  I did the dark first and then went back and did the light color… Or maybe the other way around… It really does not matter except that you want hard edges and overlap, not a wet paint blend.

Second coat of paint to create a galvanized metal faux finish

Step 4: On No!  We don’t have pictures!

Yes, I failed to adequately document this last step, but it is sooooo easy.  Once your layers of paint have dried you can do this final step to soften the paint strokes of step three and give it a bit of a weathered look.  Pour a tiny bit of black paint out and mix it half and half with water.  Quickly brush the black all over the surface of your letter.  DO NOT PANIC, that you have just completely ruined your hard work.  Count to 10 and then wipe the black paint mostly off the surface of the letter.  It should just leave the finest glaze of darkness over the silver paint and knock off a little of the shine.  Remember that galvanized metal is not super shiny!

If, for some reason, the black stuck to much just repeat the above step but with a watery silver.  Remember that in faux finishing you can always just repaint any mistakes!

Completed faux finish for galvanized metal numbers

Step 5: Clean Fresh and Modern

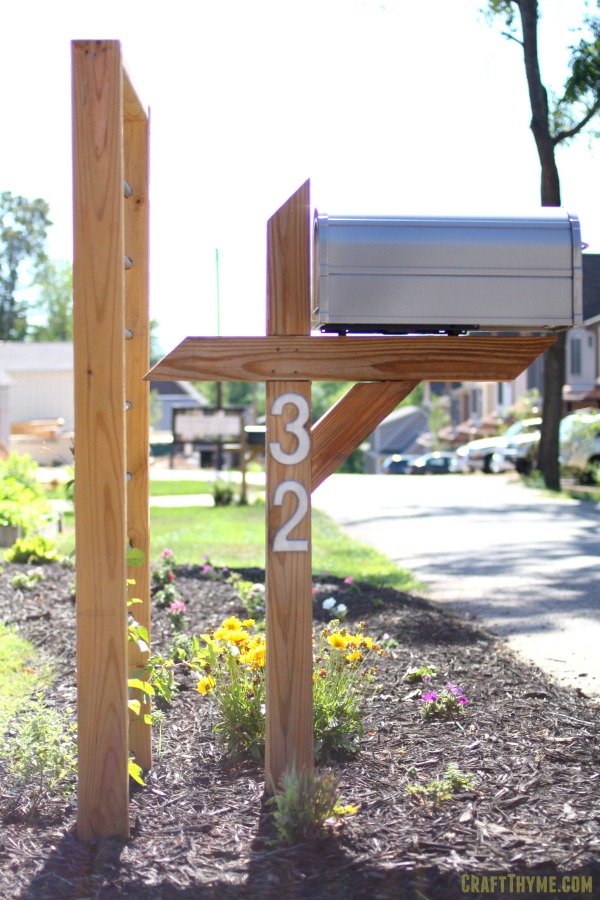
Since the numbers weigh next to nothing we were able to simply use a single nail to affix them to the mailbox and porch.  We choose to orient them in a straight vertical line to give a fresh, modern, vibe.

Replacing old tired numbers with faux metal finished street numbers.

Posted on 11 Comments

Pantry Door Ideas: A Quick Makeover

Navy blue door with orange accents

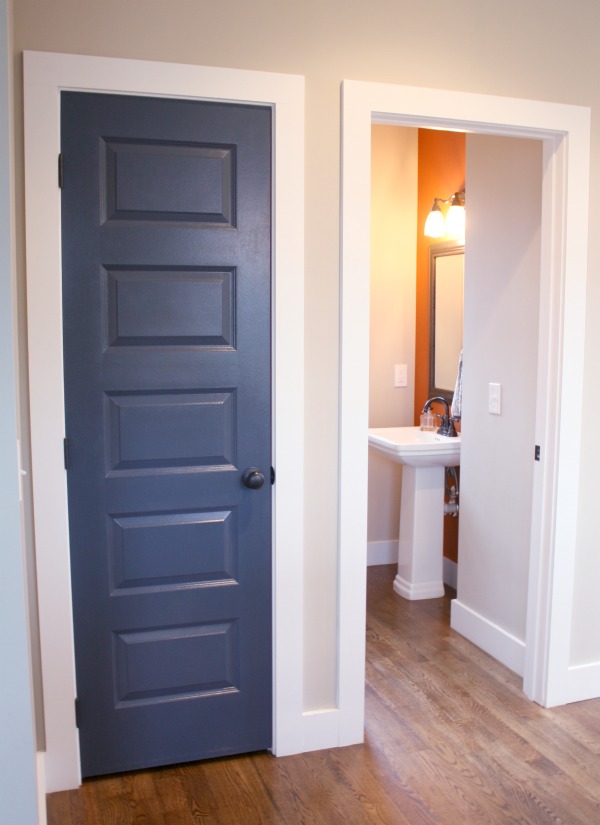
This is the first new construction house I have lived in.  Yea for 90 degree angles, boo for lack of character and patina.  Working to remedy the contractor white of the place led to a pantry door idea.  I thought I would give it a quick makeover with some navy blue blue paint.  Recalling an old Martha Stewart Article on doors, I thought it might be fun to also give the edge a pop. We had a bright orange left from painting an accent wall in the guest bathroom.  Since the navy and orange accents flowed through the entire downstairs it seemed like a good fit.

Pantry Door Ideas: Make Over Time!

Materials:

  • Paint
  • Sponge Roller
  • FrogTape :* Yes it is expensive, yes it is a name brand, yes it is worth every single cent, and no sadly frog tape is NOT paying me to say that.
Pantry Door Idea: Makeover Time
Just a plain pantry door in need of a little umph.  You can see the accent wall we added in the bathroom.

Quick Directions:

Paint the front of the door and then paint the edge…  So sarcasm aside, it is close to that easy.

First, I carefully taped the white edge, wisely realizing that it would take a number of coats of orange to cover any navy that smudges. NOT!

Of course I didn’t tape the edge the first time around.  But, I will get to that in a bit. I really wanted to take the door off the hinges, but it was impossible to get the last one loose.  Because of that I had to work really fast to not make roller marks in the glossy navy paint while only using the smallest amount of paint possible so it didn’t run down the vertical surface.  I failed, not once, not twice, but three coats.  Every evening the light would shine off the marks roller marks where I had hit an area that dried to quickly.  Ugh.

The only benefit of making that mistake is I had plenty of time to correct the door edge.  What a P.I.T.A.  I hate taping. Loath it.  However, after the first coat of orange I realized nothing short of taping a nice clean edge was going to give the effect I wanted.  I wanted the blue to show when closed and the orange to pop only when opening the door. Plus I wanted the edge to have a nice straight line.  The door had a slight bevel that was not noticeable until you ran a roller over it and smear blue or orange the wrong direction.  Seriously!  Take the time to tape this project. I was so much happier with the details once it was complete.

Navy blue door with orange accents
Just a nice navy blue door.
Navy blue door with orange accent
The kapow! Pop of orange edge.
Posted on 43 Comments

DIY Gold Leaf Lamp Shade

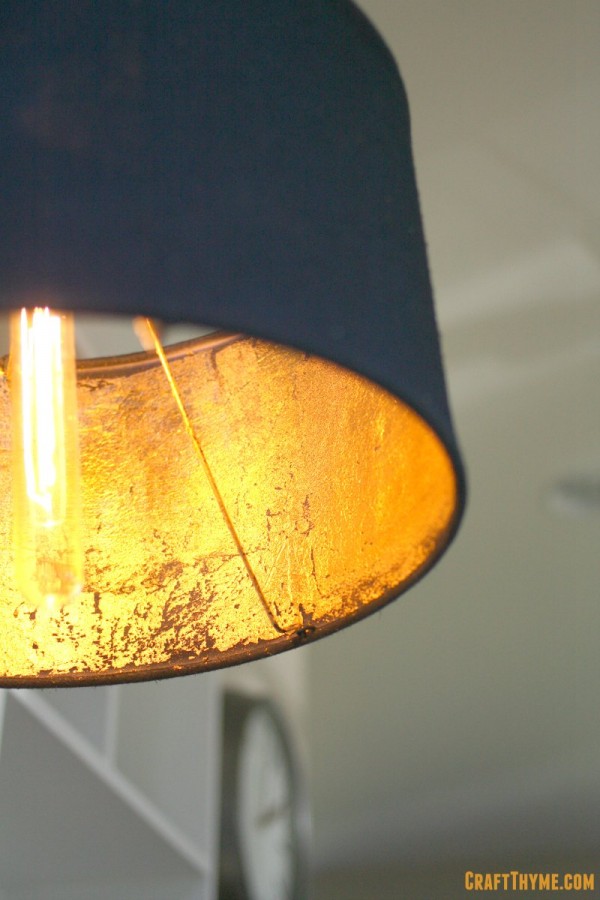
Completed gold leaf lampshade with edison bulb

I have always admired the look of a gold leaf lampshade, but I have not admired the price.  DIY to the rescue!  I did the DIY gold leaf lamp shade for two different shades.  I absolutely love the look of the gold leaf paired with the warm glow of  Edison bulbs.  I like it even better when I just squash my liberal guilt down and tell myself that it is an accent light and I don’t reaaaalllllyyyy need to be using the LED’s to save the environment… Anyway, back to the tutorial.

How to DIY Gold Leaf a Lamp Shade

Gold Leaf Lampshade

Materials Needed:

  • Lamp shade: Note the underline and bolding.  The lampshade selection is key to choosing the correct materials from this point forward!
  • Gold Leaf Sheets*:  I grabbed a Gold Leaf Kit* and ordered a refill.  I needed somewhere in the order of 40 sheets to do two normal sized lampshades.  I am not advocating using real gold here!  The gold toned sheets give a great finish at a tenth of the cost of actual gold.
  • Adhesive* (also called Sizing*):  Here is where the lampshade makes a difference.  Hard plastic interior lampshades work well with the paint on adhesive contained in a gold leaf starter kit, BUT you will really need a spray adhesive for a fabric lampshade.  The fabric soaks up the liquid adhesive quickly while a spray adhesive coats the surface of the fabric giving a good sticky edge to grab the leaf
  • Sealer*
  • Soft Brush: Does not need to be expensive and frankly I misplaced my bristle brush and just finished up with a sponge brush.  I might have been too lazy to dig through the paint supplies to find a nicer brush, though, the results would likely have a smoother finish.
  • Spray Paint: Only if you are changing the color of your lampshade
    Gold Leaf Supplies
    Replace this sponge brush with a nice soft bristle brush. Don’t be a lazy cow like me!

Step 1: Correcting Your Lamp Shade

Is your lamp shade old? ugly? Old and Ugly?  Give it a good cleaning, spray paint the hell out of it, and or bedazzle the exterior until you are happy with the look.  You’ll need to complete the outside prior to the gold leaf.  What’s that you ask?  Can you spray paint a cloth lampshade?  Hells yes you can.  Just remember it will soak up a lot of paint so be prepared to do a few coats.

Spray painting a fabric lampshade
Boring white to… Yeah it takes a lot of coats of paint. Lots of coats…

Step 2: Getting Sticky

All gold leaf applications require that you have a tacky adhesive set and ready prior to gold leafing.  What this means in layman’s terms is when you touch a prepared surface it will need to feel sticky to the touch.  Picture your counter after you have left some sugary substance dry and you get a nice sticky feeling.  Liquid adhesive is painted on and left to dry anywhere from 10-30 minutes.  Spray adhesive is instantly ready. Remember to only apply in areas large enough that you plan to work with soon.  The sticky places can overly dry or collect dirt and lint.  I worked in 1/4 shade size pieces.

Make certain to cover any areas that you do not want to gold leaf!  Small particles of leaf will flake off during the leafing process and cling to any sticky areas.  Great if you plan on having gold in that area, bad if you do not.

Prepping a lamp shade with adhesive for gold leafing
By covering, I might have meant just take some old fabric and cover the areas you do not want to be sticky. Oh look, I used some old cardboard as a work surface again.  I think the ship has sailed on me ever having a nice prepped work surface and all materials present at the time of crafting.

Step 3: Be Delicate

First and foremost, the gold leaf is not actually attached to the little booklet.  The pages in between are there as protective dividers.  Don’t be a dork (maybe like me) and spend a good amount of time trying to rip out a page.  Lightly touch the gold leaf with clean fingers and kind of fan out the leaf above your project.  Where ever it touch the sticky part it is going to be STUCK.  So just know that wrinkles, ripped pages, etc are going to be part of the first few attempts.  This worked fine as I wanted an industrial, patchy look.  Also if the interior surface is not hard, you are never going to get a smooth appearance.  You should check out my tutorial on gold foiling fabric for an alternative if you are looking for a completely smooth fabric finish.

Step 4: Burnish Away

Once the leaf has been laid down use a soft bristle brush to pat it into any crevices and remove any extra leaf.  After burnishing a sheet repeat step 3 with the slightest over overlaps on the next sheet.  I wanted a more random look so I applied sheets at different angles and used partial sheets to fill in gaps

Burnishing Gold Leaf

Step 5: Protect Your Baby

Gold leaf is delicate and faux gold leaf will tarnish and change when not protected.  The kits come with a paint on sealer but you can use any clear acrylic coat designed to cover metal.  Paint or spray your coating.  Once dry place your lampshade on and admire!

Completed gold leaf lampshade with edison bulb

PLEASE NOTE: INSERT SOME CAUTION HERE

Use common sense here!  You just added a reflective metal coating to an item that surrounds a hot light bulb.  Monitor the heat that your lamp is putting out.  Use a lower wattage or LED lightbulb if you detect any abnormal heat.  A good looking lampshade is never a reason to start a fire!!!