Why buy another useless item when you can have the lasting satisfaction of making your own? Find true joy in crafting and DIYing with these beginner and intermediate tutorials.
Goodnight Moon has been a staple throughout my Son’s lives. I have to admit that I originally did not see the appeal but after reading the book 6+ years I have grown to love it. It seemed fitting to have a Goodnight Moon theme party for our last son’s first birthday.
However, have you ever tried to find goodnight moon themed items for parties? Apparently, this book hasn’t reached massive commercialization. I found some good items on Etsy but instead of purchasing I decided to DIY it. Never underestimate the power of a scanner!
One of the most notable parts of the book is the color scheme. Can we say “Great Green Room”? The shades of green, red, yellow, and blue are unmistakable. I used those colors as the base for my decorations. We purchased matching plates, napkins, and silverware in a mix of those colors.
Since I wasn’t using the book for my own commercial gain I felt inclined to scan away and looked through google images to find source material. I printed out some of my favorite scenes to place in frames and make a centerpiece for the buffet. I also sat out the tattered copy of Goodnight Moon and Our World (the companion book). Adam, filled out that buffet space with lots of yummy grilled items!
It is possible to purchase some adorable mouse wrapping paper. However, by the time I found it, it was too late to get it shipped to my house. You know what does work? Tiling images in Picmonkey and taping together sheets of paper. Trust me, no one year old actually notices his present is made of lots of small sheets of paper. For that matter I do not think anyone noticed and it added a pretty pop of on theme color.
Obviously, at a Goodnight Moon theme party you will need a moon of some sort. I looked through my cardstock stash and found some metallic white and silver paper. I used a plate to make a nice circle and cut out a moon and then hand cut lots of stars. The cutting took a bit but it was fun. I lightly drew lopsided stars in pencil and then cut out a couple of sheets at a time. The book has all kinds of wonderful and playful star shapes so my hand cut items matched perfectly. I simply taped them to fishing wire and hung everything from the light fixture Adam hand crafted.
No first birthday party is complete without CAKE! Well cupcakes in this case. You may think what you like but I ordered them from Sam’s Club. They were super helpful matching the colors and they tasted great. To make them extra special we printed out tiny scenes from the book and made toppers with similarly colored toothpicks. Keaton got a special moon on top of his too! I would say he very much enjoyed his treat!
Finally, I made a fun game for both the adults and kids in attendance. I printed out 10 1/2″ images of the elusive mouse from the books. I then took the tiny mouse and taped him throughout the downstairs to windowsills, doors, Keaton’s highchair, etc. Everyone spent the day trying to find all 10!
With just a little ingenuity and a lot of Goodnight Moon inspiration we were able to come up with a creative and affordable theme party to celebrate the last first birthday in our house. Well that is until we have the grandkids. :) If you are not into DIY like we are or wanted some great gifts Amazon has some adorable merchandise. Affiliate links below.
The only thing that appears to be constant in our lives is change. Our youngest son just began walking, he and the next youngest have moved into the same room, Brianna and I cleaned out our master closet, moved a dresser into said closet to further our organization effort, our oldest started Kindergarten, and Brianna had a career change that sees her working from home periodically.
Realizing that we have no good place to work (much less concentrate) amidst the chaos of our family of six, creativity was forced upon us. We’ve always lacked an office space in our home (and with 6 people, we have no free rooms!), so our ability to set aside such a space has been significantly limited. Moving Keaton in with Cooper freed up a nice little corner of our master bedroom.
We’d looked at buying an industrial desk for our space, but we couldn’t find that perfect piece. Everything we’d looked at was either the wrong size or the wrong price. So, as typical, we decided to build something of our own!
Brianna and I measured our available space, and after drawing out a few different options, our plan was to build an industrial desk that was 18″ D x 40″ W x 30″ H that matched the general décor of our home. Follow along below to see how we got there and let us know how we did!
Lumber Selection and Initial Cuts
As always, pick out lumber that speaks to you. On the random Tuesday that I took off of work to focus on this build, the hardware store had some great, partially grayed untreated lumber. (Stress the on the untreated) Selection of colorful, knotted, and straight wood was easy. On to the lumber prep….
Given that the actual dimension of a 2″ x 4″ is 1.5″ x 3.5″, the easiest way to get to 18″ was to stack 12 2×4’s together (18 / 1.5 = 12). Super easy!
To get to 40″ wide, all we had to do was cut 40″ sections out of our lumber. If you’ve done the math, you’ll see that I have waaaaay more lumber than I needed for this project. Why have have 600″ when all I really need is 480″? I do this for two reasons: 1) I want to be able to use the most interesting sections of the lumber, and 2) I’m probably going to mess something up at some point.
There are multiple ways to handle your cuts. You can cut all 40″ sections and call it good, or you can strategically cut random length sections whose total lengths equal 40″. I chose the latter. With this, I don’t have a true final cut list for you, constant reader. Make it random and make it awesome.
But we didn’t stop there… oh no, that would be too easy.
While stacking 2×4’s together gave us the right depth dimension, there were two readily apparent design flaws: 1) 2×4’s aren’t square, they’re rounded squares; and 2) the thing was going to be really freaking heavy. To remedy, we broke out the table saw and ripped both sides of the previously cut 2×4’s to make everything nice and square. We ended up taking off around 1/4″ from each side. The end result was nice, square lumber that weighed an average of 7% less.
“Assistance Needed in the Pipe Cutting Area”
Having drawn out the basic design for our industrial desk’s frame (using Pencil*), we already had an idea of how we wanted to put things together.
We’d ordered everything except for the long length of pipe from Zoro.com and started calculating the lengths we would need to finish the frame’s build-out. I pre-assembled the feet of the frame, connected the front feet to the back using the 12″ nipples (such a silly term for a foot-long pipe), and started measuring. We needed the bottom of the desk for fall at 27″ high, and with some simple subtraction, we’d come up with the following pipe cut list:
2 – 24 (Front legs)
2 – 20 (Back legs)
1 – 32 (Back brace/Foot rest)
At that point, it was off to Lowe’s! Remember, your local big-box home improvement store will cut and thread pipe for you – most of the time for free!
Putting the Pieces Together – Industrial Desk Frame
Hands down, the easiest part of this project is the desk frame assembly. In a nice, open area, lay all of your pipe parts out and start putting things together as you’d planned. There’s no right or wrong order in this step. Give everything a good hand tightening as you get the pieces in their final position. Once you secure the frame to the desktop, everything will be stationary, so there’s no need to use any tools to aid you in this step.
(Colorful Balls and Toy Cars Optional)
If you’ve got a long enough level, go ahead and check your frame at this step in the process. Yes, you can always make adjustments later if necessary, but it is easiest at this point.
Putting the Pieces Together – Desktop
This step takes both time, and patience (frankly, personality traits I typically lack)….
Using large clamps and as flat of a surface you can find, lay out 2-3 pieces of your previously cut lumber in the order you’d like them glues together. Liberally apply wood glue to the back of your face board (I am a big fan of the squiggle application method), but it up against the second piece of lumber in the series, and clamp that baby together as hard as you can. For best results, clamp both on the ends AND in the middle. Repeat this steps as many times as you have clamps on hand.
Then wait….
Most wood glues actually have a drying time of only one hour. So while this process takes patience, you can probably knock it out over the span of the afternoon. Once your newly glued sections have set for their hour, continue this process for your remaining pieces of lumber. When you have 6 stacks of two, start gluing those together. And so on, and so on.
Depending on the size of the clamps you have, the last step of combining two stacks of 6 may be difficult (or frankly impossible). I had this problem, and for me, this spawned creativity. I went under the house and pulled out my crank straps. You know, the ones you use to tie a king-sized bed to an SUV that’s as wide as a full-sized bed? Believe it or not, these types of tie-downs make excellent large application clamps. Do your final gluing, wait an hour, and drink a beer as most of the hard work is complete.
Flattening out your Desk Surface
There are multiple ways to achieve that perfectly milled work surface. The BEST way is to use a mechanical planer to do the job for you. Unfortunately, we don’t own one of these bad boys.
So… we did what we could the old-fashioned way and used multiple grits of sandpaper to knock down edges quickly. As you’ll see below, there are lots of wood joints, knots, and saw blade “imperfections” that would make writing on this newly made solid surface rather difficult. Hitting the desk top with heavy-grit sandpaper on the powered hand-sander will take care of any significant surface changes. When finished with the high-grit, move to medium-grit across the whole surface, and finish it off with a fine-grit.
Before SandingAfter Sanding
Time to Stain and Poly
Choose your favorite stain(s) and desired polyurethane and get to work. For this project, we alternated the use of Minwax Early American with Rustoleum Dark Walnut. “Color blocking” best describes my technique on this particular piece: A block of one color here, a block of the other color there. Randomize the application of the stains (if you’re using more than one), wipe away, and see how it’s turning out. You can always make areas darker if need be by allowing for longer set-times or applying a darker stain over a lighter area.
I’ll admit, once the stain had been applied and had dried, I couldn’t wait to see how the industrial desk looked on the frame. So… rather than apply the coat of poly on my nice grocery-bag covered work space, I hauled it outside and set it on the frame to get a sneak peek of what the final product might look like.
Being happy with the progress we’d made, I decided just to keep the desktop sitting on the frame in order to apply a coat of Minwax Semigloss Polyurethane. I also went ahead and used some bronze colored wood screws to mount the desktop to the frame. One coat of poly was enough for this project. Let things dry as per the provided instructions.
As avid DIYers we love to save money on all our projects. Over time we have worked out strategies to save money at Lowe’s. Personally, I am not comfortable scamming anyone, even large companies, so every suggestion on how to save money is on the up and up! Also, we are not currently a Lowe’s affiliate so all of these links and suggestions are simply from our own personal experience. We love all hardware stores, but Lowe’s is so close by that we often use them as a matter of course.
10 Ways to Save Money at Lowe’s
Email Sign Up $10 off $50 Purchase
This offer sometimes goes away so you may need to google around to find the current link. All you have to do is enter your email address and information in Lowe’s website and they should send you a coupon good for 7 days after receipt. Here is a recent link.
In Store Pickup/Online Sales
I can not say enough about Lowe’s in-store pickup! There is nothing better than to just walk in, get your order, sign a piece of paper, and walk out. Especially on busy days like Saturday and Sunday. However, you might wonder how this saves you money at Lowe’s… Not all Lowe’s stores have the same price. Oh YES, believe it or not this is sooooo true. If you have two or more Lowe’s in reasonable driving distance CHECK THEIR PRICES. I can not stress this enough. When we were trying to outfit our whole house with roman shades we discovered this little fact simply because no single store had enough inventory to cover the whole house. We then maximized our orders so that we got the cheapest inventory at each store. Spent one afternoon picking up all our orders, but it was totally worth the $50+ savings even when looking at gas and time. Sometimes the online price is cheaper than in-store shelf tag. Check, check, check! You can order it online, but they will match that price if it is their store you are viewing online.
Sales
Can you wait? Because Lowe’s has weekly sales and they are GOOD. We tend to stock up on seasonal items especially during their sales. For example, we just scored tons of suet cakes for the wild birds and chickens for .88 when they usually go for $1.50-$2.50. Whatever we do not use this winter we will store for next year. Besides just seasonal items Lowe’s tends to routinely put large appliances, paint, and gardening items on regular sales. If you are near a holiday, even something as small as President’s day, WAIT. They will always have a special sale for holidays.
Clearance Racks
ZOMG, I can not explain how important these clearance racks are. You will have to learn the locations in your particular store but usually there is a rack near the paint section, back of gardening, and somewhere near flooring. Why are these so important? Because when Lowe’s does clearance they are ready to move it on out. I calculated that I got close to over $1000 in annuals, perennials, and trees for over 80% off last year. Simply because they were no longer flowering, frost nipped, or at the end of the season. Can you shout FIVE DOLLAR FRUIT TREES?! In my blasted landscape it was a blessing to be able to fill it with some decent vegetation. Ditto for paint, brushes, light fixtures, etc. These all make their way to the clearance sections.
None of the plants cost more that $1. Like my coffee break? Gotta have coffee when digging through the Lowe’s clearance racks.
Price Match Policy
I haven’t used this often as Lowe’s and competitors are often so similarly priced that it doesn’t seem worth the effort for just a few pennies. However, when we were shopping for a new washer and dryer it paid to shop around! Make sure to have good documentation to bring with you as they will want to make sure it is the exact same model for price matching. Also if the price is a percentage off they will only match to the net price. So a 20% off deal somewhere else might not mean 20% off Lowe’s price, but the final price will be the same. You can read all the details here.
Haggle
This one is one of the hardest for me. Or at least it was, a recent trip to India taught me a ton about haggling! Anyway, haggling is accepted at Lowe’s and managers/certain salespeople are able to price adjust purchases. Lowe’s doesn’t have a published competitor’s coupon agreement but that is a great way to start the conversation. Additionally, never buy a large appliance without haggling a bit, especially, if you are willing to take a slightly used floor model. If you are like me and not a huge fan of haggling then you can always ask “Is this the best price I can get?” Be polite and nice and often they will take a little off the price of large purchases.
Lowe’s Credit Card
I hesitate to mention this one because the savings here is really all rolled into how disciplined you are with credit cards. Unless you can stick to paying them off in a specified time (for special financing) or in full each month (5% off) then you are really costing yourself money. That being said, I purchased my first new stove by taking advantage of free financing. Got a small discount by haggling and then had 12 months to pay it off. By paying it off in the specified time I got to keep my savings in my savings account earning interest the entire time I paid for the stove. Just remember these discounts are an either/or scenario. The 5% does not get stacked with the special financing, and sometimes the special financing will not be zero percent. Just be really careful when using this tactic.
Military/Veteran’s Discount
Found this one while researching other ways to save money at Lowe’s. You can read all about it here, but in general active duty and those on VA benefits always get 10%. All veterans can get 10% on Memorial Day, 4th of July, and Veterans Day. They extend these discounts to immediate family at times too.
Rebates
I honestly feel if you buy a can of paint without a sale or rebate you are paying too much. They often run $10-$15 rebates on paint and larger ones on appliances and tools. They have a searchable list of Lowe’s and manufacturer rebates, online submission, and tracking of rebates at Lowe’s Rebate Center. Sure it may take a bit to get the money back but it is certainly worth it and Lowe’s makes it much easier than many companies.
Garden Club Signup
If you are in the market for garden supplies Lowe’s offers a separate email signup for garden offers. They will often notify you of sales and occasionally have exclusive offers such as buy a certain number of plants and get one free.
Add-ons to Saving Money at Lowe’s
While they may not save you cash up front these additional services give you value all for free. You can read the entire list of Lowe’s Store Services here.
Build and Grow: I can not rave about this enough. We have 4 boys, three at the age to do crafts. They let you do an entire craft for free. FREE. And it is a nice wooden object. Besides the fact you get to take home things like monster trucks and birdhouses, they also give you a kid sized Lowe’s work apron and a nice fabric, iron-on badge for each project complete. Adorable and (can I say it again?) Free. Just remember to sign up in advance because they actually fill up.
Cutting Services: Sometimes there is a nominal (.05) a cut or threading charge BUT this is so much less expensive than buying things like pipe threading machines. They do all types of cutting services, pipe, wood, blinds, chain. We have saved a fortune by buying chain, rope, etc in the exact lengths we need. Additionally carefully placed cuts have allowed us to buy larger and less expensive boards that we can fit in the car.
Design Services: This is the only item on the list I can not say I have personally used. Many people rave about Lowe’s in store design services. If I ever have to remodel I would love to see what a designer comes up with. If nothing else I could use the computer generated models as a starting ground for my own designs.
I love a good deal and Lowe’s makes it easy to save money and get great appliances, tools, gardening items, and DIY products. Just remember the big items; always check their sales, website, and clearance sections. Taking that short time can save you hundreds of dollars if you DIY or garden often.
Do you have kids at the age to learn colors and color mixing? Do you need a rainbow activity for St. Patrick’s Day? Do YOU need an activity, using household ingredients, that will teach both colors, color mixing for kids, scientific theory, and potentially cause 4 boys six years and under to pause for more than 10 seconds? You don’t? Good for you for making that life choice that shrinks the human population. For the rest of us breeders read on!
Color Mixing Activity for Children
Let’s not ask why we have so many pint glasses from so many breweries…
Supplies
Coffee (optional) Husband (Can I say optional? This post certainly wouldn’t have happened without him) Kids (Needed unless you just love color) Way too many pint glasses for adults to own (regular glasses will do) Liquid Food Coloring*(Yellow, Red, Blue) Water Paper Towels* Post-it Notes*or Scratch Paper
Step 1 The Set-up
Groggily slug down coffee while the kids tuck in breakfast and vaguely note that husband is exclaiming that today we will “Science”. Watch as Adam starts setting out 7 glasses, fills 4 with water, and raise eyebrow as he hands you paper towels.
Joking aside, line up the seven glasses and fill every other one 80%-90% full with water. Since we aren’t doing rocket-surgery (yes, you read that correctly) I think we can combine all the set-up in one step. Fold 6 paper towels lengthwise twice. Set out your droppers of food coloring and call over the kids.
Picture just in case anyone needs help folding paper towels. See optional coffee above if this step is hard to complete.
Step 2 Paint the Town Red
I’m not sure there is anyone in the world who doesn’t like to watch food color mix into water. The kids will love to come watch. In the glasses of water drop 6 drops of red in the first glass, 8 drops of yellow in the next water, 6 drops of blue in the following, and 6 drops of red in the final water glass. Your line up will be: R0Y0B0R
Step 3 Patience and Hypothesis
You are going to take your wicking paper towels and place them from glass to glass as seen in the next photo. Adam could weigh in on why the paper towel needs to be a certain length, as I never read the original info on this activity. Suffice to say it is better if it touches near the bottom of both glasses.
Our small children immediately got ants in their pants because the process takes a bit for the colors to start moving. This is the perfect time to grab some post-it notes and teach kids about having a hypothesis. First, we discussed what they thought might happen. I may have mentioned the words water and cohesion and then realized that was a little nerdy even for my kids. So we decided that maybe the colored water would magically move. IF that happened we took guesses on what color each glass would turn. I stuck the sticky notes down in front of the empty glasses and wrote everyone’s guesses. Found out that no one knew what colors mix to make secondary colors… I have failed my art degree yet again!
Step 4 Free Play
Let the kids go play, use their imaginations, etc. Not very moment needs to be structured with activities! About the time someone is getting annoyed that someone else is smacking them with a lightsaber, ‘borrowing’ their toy car, or knocking down their carefully crafted block tower it will be time to look at the results. Even though they were in plain sight the whole time, the kids were so excited to see that the water had moved and mixed colors. They simply had forgotten to look!
These are not photoshopped! I was so surprised this color mixing activity worked so well.
Side Notes
I found it incredibly interesting that each of them had thought they guessed all the colors correctly. I had to show them their initial guesses on paper… I sense that I may not be the only person who will have to be right in this household.
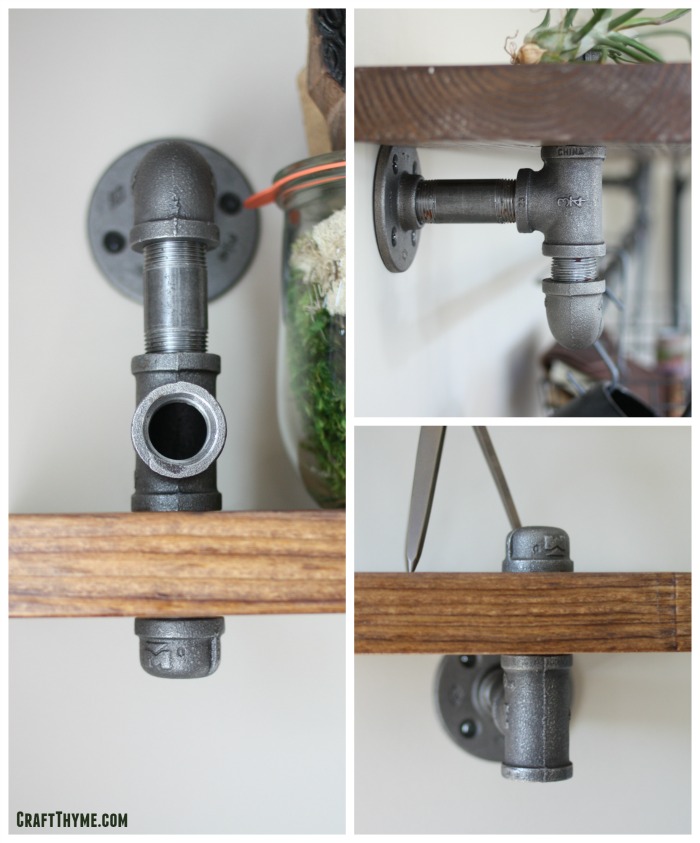
Remember our posts on Achieving an Industrial Décor with Black Iron Pipe – Part I, Part II, and Part III? In this post, Brianna and I are back for more tips on adding functional industrial décor with a quick tutorial for building some pretty awesome industrial pipe bookshelves with – you guessed it – black iron pipe and spare lumber.
Throughout our travels, Brianna and I have collected knick knacks from across the globe to remind us of where we’ve been, what we’re capable of, and where we can go if we put in the effort. Unfortunately, these precious mementos rarely have a place in our home at the time of purchase. This can lead to what might as well be a four-letter word: CLUTTER. (gasp)
Trying to get a handle on cleaning and clutter management in the new year, I can’t tell you the number of clickbait posts we’ve admittedly clicked on this January claiming hold the secrets to the latest storage and organization techniques that will completely transform your home. Let me save you the trouble of clicking through the masses and boil everything down into one simple point for you: Everything has a place. If your clutter isn’t in it’s place, put it there.
Our problem? We’d run out of space. The solution? Build more space! (In the form of bookshelves in our master bedroom)
Supplies
You can take a lot of liberties on how you attack this project. Styles and wall sizes vary, and the supplies listed below are those used for this particular adaptation.
In this project, we built 4 industrial pipe bookshelves in three different styles:
1 – 3′ x 1/2″ Black Iron Pipe (Whaaaa? What do you need this for?? Keep reading!)
8 – Heavy Duty Drywall Anchors
Craft Thyme
For each shelf, the basic steps are the same:
Select your lumber,
Cut your lumber to size,
Sand, rough, and buff,
Cut your mounting holes,
Test fit,
Stain and poly,
Assemble, Mark, Disassemble, Install, and Reassemble
Select Your Lumber
Selecting your lumber is strictly a matter of personal preference. You’ll do best to find a piece of wood that speaks to you. Spend time digging through the lumber stocks searching for that perfect knot, grain, or imperfection. For this order, I decided to leave the lumber we used up to the random choosing of a Lowe’s employee by ordering online for in-store pickup.
Cut your Lumber to Size
Each wall we were looking to fill was 62″ wide. Not wanting to fill the space from edge-to-edge, we chose 46″ for the widest (bottom) shelf and a smaller 20″ shelf to be placed as a higher accent piece. Cut your lumber to size using whatever mechanism you have at your disposal. We used our smaller miter saw to make the cuts.
Sand, Rough, and Buff
Once your cuts have been made, you’re going to want to distress your wood a bit. Why? 1) It looks cool, and 2) SAFETY! The way we’re going to mount the shelves will leave them sticking out 8″ from the wall. Sharp, fresh cut lumber corners jutting out from a wall are just an accident waiting to happen.
Take some time to sand down your newly cut corners and edges. Feel free to be overly drastic in how you do this – it will surely make your end result that much better! And leave those imperfections there for everyone to see.
Cut your Mounting Holes
Symmetry comes naturally to me; it’s just the way my mind thinks. (Brianna loves and hates this about me all at the same time.) For this project, I chose to drill out the mounting holes in the same position on either side of the shelves-to-be. Symmetry could be optional for you, just ensure that your shelf is properly supported in the design you chose to go with.
Use a 1-1/8″ hole saw or drill bit to cut the holes for your 3/4″ wide pipe. I’ve tried this many different ways (including rocking a 1″ bit when drilling) in an attempt to find the perfect hole size. Trust me, 1-1/8″ is the way to go. There’s no need to sand these cuts (unless you’re more of a perfectionist than I am), because the actual opening will be hidden in the final product.
Test Fit
It goes without saying that you should test fit your pipe into your newly drilled holes. Use the 2″ nipples to make sure that they fit well.
If they fall right through, don’t worry and remember that you’ll have a pipe cap and an elbow or tee on the other end for support. If the opposite happens and you find that your pipe doesn’t fit into your hole, you can either try the rocking method mentioned earlier (not recommended – you can hurt yourself if you aren’t careful), or use a rubber mallet to tap the nipple into place.
Stain and Poly
Once your lumber has been properly cut, sanded, and drilled, break out your favorite stain and polyurethane finish. For this application, we used Minwax Early American as the stain, and Minwax Semi-Gloss Polyurethane as a finish. Apply the stain, let it dry overnight if possible, and apply the poly the next day. Waiting for everything to dry is the hardest part, but the end result is well worth the wait.
Assemble, Mark, Disassemble, Install, and Reassemble
Yes, it sounds like a lot of steps in one, but at least they’re simple:
Go ahead and assemble each shelf as you intend. HAND TIGHTEN ONLY. (Interested in what we did? See the final orientation of parts in the photos below.)
With a partner, hold and level the shelf where you’d like it to hang.
Mark the holes in the flanges with a pencil. (Pro tip: Have two pencils – one for each of you. You’ll avoid yelling about loosing level status this way)
Pull the shelf down, and disassemble.
Install your drywall anchors where your marked your flange holes. (I go over the top here and use anchors capable of supporting 143 lbs each)
Install your flanges (only) using your freshly installed anchors and provided screws.
Into the flanges, install all of the hardware you plan to install besides the shelf itself and the black pipe caps.
Install your shelf over the nipples that you test fitted earlier.
Secure your shelf by adding the black pipe caps to the nipple peering out of your shelf. A strong hand-tightening should be sufficient to ensure stability.