Posted on 5 Comments

Orange or Red Front Door?

How to paint an orange front door.

I have always loved a good solid red front door.  I love the pop of color, my mother has a beautiful red door, and red front doors are even supposed to be good luck.  BUT, what happens when you have green tinted trim?  Well I can decidedly say that mauve is not the answer.  Whomever decided that a mauve front door surrounded by green-grey trim and dusty dark blue was a good combo should probably be transported back to the 80’s where they belong.

So fine, the mauve had to go (I hated it from day one) but what color to replace the front door?  I wanted it to pop but I didn’t want to be known as the Christmas house.  So a red front door had to be out.  So, what looks good with blue and green? An analogous color would blend and give the necessary contrast plus orange is my current favorite color.  Adam picked up lots of dark/muted orange swatches on his way home from work.  The rest of the house looks like the blue and green had been muted with grey.  We wanted a pop of color not a freaking eye sore.  So this is how we choose front door colors.  Actually, this is how we choose all colors.:

  1. Whoever did NOT pick them out does an initial sort.  We assume the first person only picked colors they thought might work for the color situation.
  2.  Walk to the place we plan on painting.
  3. Hold up swatches and go: No, No, Maybe, No, Oooohhhh  I like that one, No, Maybe etc.  I particularly like where we toss the No’s around with abandon.  This process should not take more than 3-5 minutes.  Just a gut choice of possible or no.
  4. Repeat step 3 with the maybe’s.
  5. Hold up the final 2 or three, possibly tape them in place (only if it is a major tie), step back and make a decision.
  6. Pick up all of those no’s or ask one of the kids to take them to the trash.

I’m pretty sure we have never spent more than 15 min choosing a paint color, and so far, have never been unhappy.  More time <> better color.

Orange Front Door Color Chosen!

Paint decided, drive to the closest hardware store and holy-mother-of-$20+ for a quart of the chosen color.  Oh hell no, I have to paint one side of one door…  We can’t use samples as they are only interior base and you really need the more elastic exterior paint for a front door; even a porch protected one like ours.  We end up consulting with the paint counter specialists.  They point us to a much cheaper brand.  You may have to put on an extra coat but the end result is just as durable and color rich.  They end up color matching our chosen swatch and away we go!

Time to Paint the Orange Door

The same person who chose the horrific mauve also hired the laziest painters in the world.  Our house was new construction and for some unknown reason the painted the door, in place, with the hardware on.  Drips, brush marks, and paint splattered hardware abound.  The only way to truly fix all those issues was to sand it away.  Frankly, I have a life so we opted to smooth out their mistakes by removing the door hardware, taking the door down, painting it on sawhorses, and using a smooth foam roller.  That way I could get a smooth even coat with a thickness to hide some of the worst brush strokes.  Oh and did I mention this is a wood door clad in metal. Yeah I have no idea what is going on with that either.  What I do know is how a wood door is made, so, I painted all the sections as if they were assembled and had a wood grain.
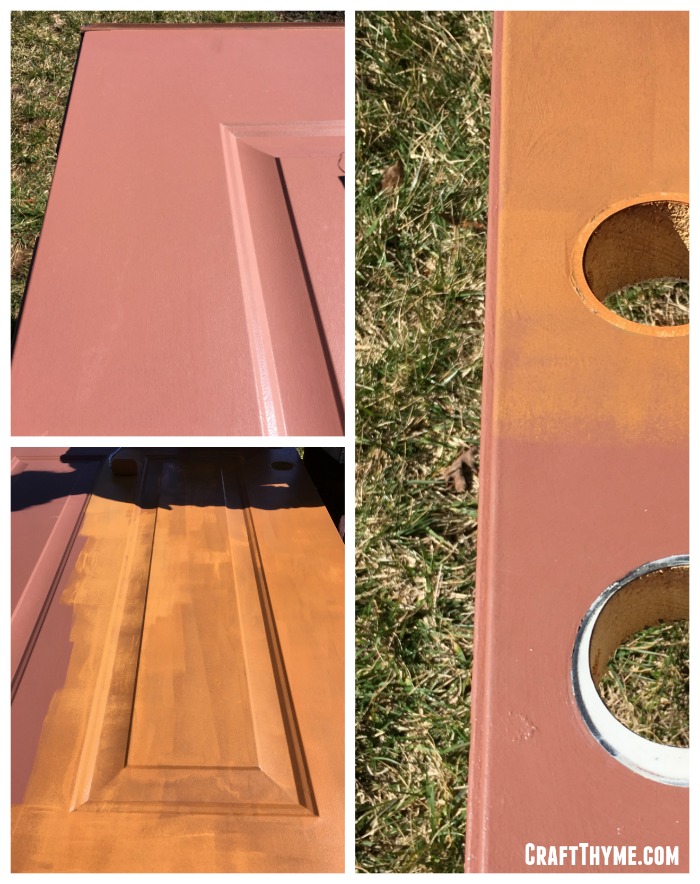
Deciding on a red front door versus orange front door.
Check out the mauve situation we had going on.

First Coat

ROOKIE mistake.  I have been painting a long time.  What should you never do? Paint in the direct sun. Especially a god-forsaken door.  Painting a door is already a race to try to get all the panels painted with vertical strokes and the top, middle, and bottom in horizontal center pieces. ALL with smooth brush strokes. I thought I could get away with it since it was on the cooler side.  Nope.  Big cup of nope.  If this happens to you then do what I did and just rolled on a THIN patchy first coat let it dry in the .5 seconds it will take and move your painting location.  I moved to the backyard in a nice shady spot to roll on a nice thick coat.  Seriously, move to the shade.  Joking aside, it allows for a nice wet edge.  That is great when you want to make sure all the roll marks match on the panels.

Rolling Away

As the mauve paint disappeared and the orange darken I was certain we had made the right choice.  A nice pop, toned to mesh well with the existing house colors.  We liked it so much we even made ‘Orange Front Doors’ for the chicken coop.  They have winter panels we have to make them warmer when it is cold.

How to paint an orange front door
Adam said we needed an action shot. Here is my attempt to make rolling paint interesting.

Even if you can not do a red door think about a fun door.  Orange, yellow, a deep emerald green; so many choices beyond a basic white front door.  THOUGH, white is going to be a vast improvement over mauve.  What colors do you have for your front door? I would love to hear in the comments or email me a picture!

How to paint an orange front door.
I need to make a pretty vanity shot! We installed new hardware too.


Posted on 15 Comments

Goodnight Moon Theme Birthday

Details of how to create your own Goodnight Moon birthday Party
Goodnight Moon has been a staple throughout my Son’s lives.  I have to admit that I originally did not see the appeal but after reading the book 6+ years I have grown to love it.  It seemed fitting to have a Goodnight Moon theme party for our last son’s first birthday.

However, have you ever tried to find goodnight moon themed items for parties?  Apparently, this book hasn’t reached massive commercialization.  I found some good items on Etsy but instead of purchasing I decided to DIY it.  Never underestimate the power of a scanner!

One of the most notable parts of the book is the color scheme.  Can we say “Great Green Room”?  The shades of green, red, yellow, and blue are unmistakable.  I used those colors as the base for my decorations.  We purchased matching plates, napkins, and silverware in a mix of those colors.

Details of how to create your own Goodnight Moon birthday Party

Since I wasn’t using the book for my own commercial gain I felt inclined to scan away and looked through google images to find source material.  I printed out some of my favorite scenes to place in frames and make a centerpiece for the buffet.  I also sat out the tattered copy of Goodnight Moon and Our World (the companion book).  Adam, filled out that buffet space with lots of yummy grilled items!
Details of how to create your own Goodnight Moon birthday Party

It is possible to purchase some adorable mouse wrapping paper.  However, by the time I found it, it was too late to get it shipped to my house.  You know what does work?  Tiling images in Picmonkey and taping together sheets of paper.  Trust me, no one year old actually notices his present is made of lots of small sheets of paper.  For that matter I do not think anyone noticed and it added a pretty pop of on theme color.
Details of how to create your own Goodnight Moon birthday Party

Obviously, at a Goodnight Moon theme party you will need a moon of some sort.  I looked through my cardstock stash and found some metallic white and silver paper.  I used a plate to make a nice circle and cut out a moon and then hand cut lots of stars.  The cutting took a bit but it was fun.  I lightly drew lopsided stars in pencil and then cut out a couple of sheets at a time.  The book has all kinds of wonderful and playful star shapes so my hand cut items matched perfectly.  I simply taped them to fishing wire and hung everything from the light fixture Adam hand crafted.

Details of how to create your own Goodnight Moon birthday Party


No first birthday party is complete without CAKE!  Well cupcakes in this case.  You may think what you like but I ordered them from Sam’s Club.  They were super helpful matching the colors and they tasted great.  To make them extra special we printed out tiny scenes from the book and made toppers with similarly colored toothpicks.  Keaton got a special moon on top of his too!  I would say he very much enjoyed his treat!


Details of how to create your own Goodnight Moon birthday Party


Finally, I made a fun game for both the adults and kids in attendance.  I printed out 10 1/2″ images of the elusive mouse from the books.  I then took the tiny mouse and taped him throughout the downstairs to windowsills, doors, Keaton’s highchair, etc.  Everyone spent the day trying to find all 10!

With just a little ingenuity and a lot of Goodnight Moon inspiration we were able to come up with a creative and affordable theme party to celebrate the last first birthday in our house.  Well that is until we have the grandkids.  :)  If you are not into DIY like we are or wanted some great gifts Amazon has some adorable merchandise.  Affiliate links below.


Details of how to create your own Goodnight Moon birthday Party

Posted on

Building a Custom Industrial Wooden Desk

DIY stacked wood desk tutorial

The only thing that appears to be constant in our lives is change.  Our youngest son just began walking, he and the next youngest have moved into the same room, Brianna and I cleaned out our master closet, moved a dresser into said closet to further our organization effort, our oldest started Kindergarten, and Brianna had a career change that sees her working from home periodically.

Realizing that we have no good place to work (much less concentrate) amidst the chaos of our family of six, creativity was forced upon us.  We’ve always lacked an office space in our home (and with 6 people, we have no free rooms!), so our ability to set aside such a space has been significantly limited.  Moving Keaton in with Cooper freed up a nice little corner of our master bedroom.

We’d looked at buying an industrial desk for our space, but we couldn’t find that perfect piece.  Everything we’d looked at was either the wrong size or the wrong price.  So, as typical, we decided to build something of our own!

DIY stacked wood desk tutorial

Supplies

Craft Thyme

Brianna and I measured our available space, and after drawing out a few different options, our plan was to build an industrial desk that was 18″ D x 40″ W x 30″ H that matched the general décor of our home.  Follow along below to see how we got there and let us know how we did!

Lumber Selection and Initial Cuts

As always, pick out lumber that speaks to you.  On the random Tuesday that I took off of work to focus on this build, the hardware store had some great, partially grayed untreated lumber.  (Stress the on the untreated) Selection of colorful, knotted, and straight wood was easy. On to the lumber prep….

Step in creating DIY industrial desk from lumber and pipe

Given that the actual dimension of a 2″ x 4″ is 1.5″ x 3.5″, the easiest way to get to 18″ was to stack 12 2×4’s together (18 / 1.5 = 12).  Super easy!

To get to 40″ wide, all we had to do was cut 40″ sections out of our lumber.  If you’ve done the math, you’ll see that I have waaaaay more lumber than I needed for this project.  Why have have 600″ when all I really need is 480″?  I do this for two reasons: 1) I want to be able to use the most interesting sections of the lumber, and 2) I’m probably going to mess something up at some point.

There are multiple ways to handle your cuts.  You can cut all 40″ sections and call it good, or you can strategically cut random length sections whose total lengths equal 40″.  I chose the latter.  With this, I don’t have a true final cut list for you, constant reader.  Make it random and make it awesome.

But we didn’t stop there… oh no, that would be too easy.

Step in creating DIY industrial desk from lumber and pipe

While stacking 2×4’s together gave us the right depth dimension, there were two readily apparent design flaws:  1) 2×4’s aren’t square, they’re rounded squares; and 2) the thing was going to be really freaking heavy.  To remedy, we broke out the table saw and ripped both sides of the previously cut 2×4’s to make everything nice and square.  We ended up taking off around 1/4″ from each side.  The end result was nice, square lumber that weighed an average of 7% less.

“Assistance Needed in the Pipe Cutting Area”

Having drawn out the basic design for our industrial desk’s frame (using Pencil*), we already had an idea of how we wanted to put things together.

Sketch for our tutorial on creating a DIY pipe desk for our industrial decor.

We’d ordered everything except for the long length of pipe from Zoro.com and started calculating the lengths we would need to finish the frame’s build-out.  I pre-assembled the feet of the frame, connected the front feet to the back using the 12″ nipples (such a silly term for a foot-long pipe), and started measuring.  We needed the bottom of the desk for fall at 27″ high, and with some simple subtraction, we’d come up with the following pipe cut list:

  • 2 – 24 (Front legs)
  • 2 – 20 (Back legs)
  • 1 – 32 (Back brace/Foot rest)

At that point, it was off to Lowe’s!  Remember, your local big-box home improvement store will cut and thread pipe for you – most of the time for free!

Putting the Pieces Together – Industrial Desk Frame

Hands down, the easiest part of this project is the desk frame assembly.  In a nice, open area, lay all of your pipe parts out and start putting things together as you’d planned.  There’s no right or wrong order in this step.  Give everything a good hand tightening as you get the pieces in their final position.  Once you secure the frame to the desktop, everything will be stationary, so there’s no need to use any tools to aid you in this step.

Tutorial on how to create an industrial desk from wood and pipe
(Colorful Balls and Toy Cars Optional)

If you’ve got a long enough level, go ahead and check your frame at this step in the process.  Yes, you can always make adjustments later if necessary, but it is easiest at this point.

Putting the Pieces Together – Desktop

This step takes both time, and patience (frankly, personality traits I typically lack)….

Using large clamps and as flat of a surface you can find, lay out 2-3 pieces of your previously cut lumber in the order you’d like them glues together.  Liberally apply wood glue to the back of your face board (I am a big fan of the squiggle application method), but it up against the second piece of lumber in the series, and clamp that baby together as hard as you can.  For best results, clamp both on the ends AND in the middle.  Repeat this steps as many times as you have clamps on hand.

Step in creating DIY industrial desk from lumber and pipe

Then wait….

Most wood glues actually have a drying time of only one hour.  So while this process takes patience, you can probably knock it out over the span of the afternoon.  Once your newly glued sections have set for their hour, continue this process for your remaining pieces of lumber.  When you have 6 stacks of two, start gluing those together.  And so on, and so on.

Depending on the size of the clamps you have, the last step of combining two stacks of 6 may be difficult (or frankly impossible).  I had this problem, and for me, this spawned creativity.  I went under the house and pulled out my crank straps.  You know, the ones you use to tie a king-sized bed to an SUV that’s as wide as a full-sized bed?  Believe it or not, these types of tie-downs make excellent large application clamps.  Do your final gluing, wait an hour, and drink a beer as most of the hard work is complete.

Flattening out your Desk Surface

There are multiple ways to achieve that perfectly milled work surface.  The BEST way is to use a mechanical planer to do the job for you.  Unfortunately, we don’t own one of these bad boys.

So… we did what we could the old-fashioned way and used multiple grits of sandpaper to knock down edges quickly.  As you’ll see below, there are lots of wood joints, knots, and saw blade “imperfections” that would make writing on this newly made solid surface rather difficult.  Hitting the desk top with heavy-grit sandpaper on the powered hand-sander will take care of any significant surface changes.  When finished with the high-grit, move to medium-grit across the whole surface, and finish it off with a fine-grit.

Tutorial on how to create an industrial desk from wood and pipe
Before Sanding
Tutorial on how to create an industrial desk from wood and pipe
After Sanding

Time to Stain and Poly

Choose your favorite stain(s) and desired polyurethane and get to work.  For this project, we alternated the use of Minwax Early American with Rustoleum Dark Walnut.  “Color blocking” best describes my technique on this particular piece: A block of one color here, a block of the other color there.  Randomize the application of the stains (if you’re using more than one), wipe away, and see how it’s turning out.  You can always make areas darker if need be by allowing for longer set-times or applying a darker stain over a lighter area.

Tutorial on how to create an industrial desk from wood and pipe

Step in creating DIY industrial desk from lumber and pipe

I’ll admit, once the stain had been applied and had dried, I couldn’t wait to see how the industrial desk looked on the frame.  So… rather than apply the coat of poly on my nice grocery-bag covered work space, I hauled it outside and set it on the frame to get a sneak peek of what the final product might look like.

Tutorial on how to create an industrial desk from wood and pipe

Being happy with the progress we’d made, I decided just to keep the desktop sitting on the frame in order to apply a coat of Minwax Semigloss Polyurethane.  I also went ahead and used some bronze colored wood screws to mount the desktop to the frame.  One coat of poly was enough for this project.  Let things dry as per the provided instructions.

Tutorial on how to create an industrial desk from wood and pipe

Finished Product

Pipe legged desk and stacked wood top. Tutorial included.


Tutorial on creating an industrial desk from black iron pipe

How to make an industrial desk from pipe

Posted on 72 Comments

Industrial Pipe and Wood Bookshelves

Using pipe to make industrial brackets for shelves.

Remember our posts on Achieving an Industrial Décor with Black Iron Pipe – Part I, Part II, and Part III?  In this post, Brianna and I are back for more tips on adding functional industrial décor with a quick tutorial for building some pretty awesome industrial pipe bookshelves with – you guessed it – black iron pipe and spare lumber.

Using pipe to make industrial brackets for shelves.

Throughout our travels, Brianna and I have collected knick knacks from across the globe to remind us of where we’ve been, what we’re capable of, and where we can go if we put in the effort.  Unfortunately, these precious mementos rarely have a place in our home at the time of purchase.  This can lead to what might as well be a four-letter word: CLUTTER. (gasp)

Trying to get a handle on cleaning and clutter management in the new year, I can’t tell you the number of clickbait posts we’ve admittedly clicked on this January claiming hold the secrets to the latest storage and organization techniques that will completely transform your home.  Let me save you the trouble of clicking through the masses and boil everything down into one simple point for you:  Everything has a place.   If your clutter isn’t in it’s place, put it there.

Our problem?  We’d run out of space.  The solution?  Build more space! (In the form of bookshelves in our master bedroom)

Supplies

You can take a lot of liberties on how you attack this project.  Styles and wall sizes vary, and the supplies listed below are those used for this particular adaptation.

Industrial pipe bookshelves from pipe tutorial with step by step how to

In this project, we built 4 industrial pipe bookshelves in three different styles:

Short Shelves (times 2):

Long Shelf (Standard)

Long Shelf (Over Desk):

Craft Thyme

For each shelf, the basic steps are the same:

  1. Select your lumber,
  2. Cut your lumber to size,
  3. Sand, rough, and buff,
  4. Cut your mounting holes,
  5. Test fit,
  6. Stain and poly,
  7. Assemble, Mark, Disassemble, Install, and Reassemble

Select Your Lumber

Selecting your lumber is strictly a matter of personal preference.  You’ll do best to find a piece of wood that speaks to you.  Spend time digging through the lumber stocks searching for that perfect knot, grain, or imperfection.  For this order, I decided to leave the lumber we used up to the random choosing of a Lowe’s employee by ordering online for in-store pickup.

Cut your Lumber to Size

Each wall we were looking to fill was 62″ wide.  Not wanting to fill the space from edge-to-edge, we chose 46″ for the widest (bottom) shelf and a smaller 20″ shelf to be placed as a higher accent piece.  Cut your lumber to size using whatever mechanism you have at your disposal.  We used our smaller miter saw to make the cuts.

Sand, Rough, and Buff

Once your cuts have been made, you’re going to want to distress your wood a bit.  Why?  1) It looks cool, and 2) SAFETY!  The way we’re going to mount the shelves will leave them sticking out 8″ from the wall.  Sharp, fresh cut lumber corners jutting out from a wall are just an accident waiting to happen.

Industrial shelves from pipe tutorial with step by step how to

Take some time to sand down your newly cut corners and edges.  Feel free to be overly drastic in how you do this – it will surely make your end result that much better!  And leave those imperfections there for everyone to see.

Cut your Mounting Holes

Symmetry comes naturally to me; it’s just the way my mind thinks.  (Brianna loves and hates this about me all at the same time.)  For this project, I chose to drill out the mounting holes in the same position on either side of the shelves-to-be.  Symmetry could be optional for you, just ensure that your shelf is properly supported in the design you chose to go with.

Industrial shelves from pipe tutorial with step by step how to

Use a 1-1/8″ hole saw or drill bit to cut the holes for your 3/4″ wide pipe.  I’ve tried this many different ways (including rocking a 1″ bit when drilling) in an attempt to find the perfect hole size.  Trust me, 1-1/8″ is the way to go.  There’s no need to sand these cuts (unless you’re more of a perfectionist than I am), because the actual opening will be hidden in the final product.

Test Fit

It goes without saying that you should test fit your pipe into your newly drilled holes.  Use the 2″ nipples to make sure that they fit well.

Industrial shelves from pipe tutorial with step by step how to

If they fall right through, don’t worry and remember that you’ll have a pipe cap and an elbow or tee on the other end for support.  If the opposite happens and you find that your pipe doesn’t fit into your hole, you can either try the rocking method mentioned earlier (not recommended – you can hurt yourself if you aren’t careful), or use a rubber mallet to tap the nipple into place.

Stain and Poly

Once your lumber has been properly cut, sanded, and drilled, break out your favorite stain and polyurethane finish.  For this application, we used Minwax Early American as the stain, and Minwax Semi-Gloss Polyurethane as a finish.  Apply the stain, let it dry overnight if possible, and apply the poly the next day.  Waiting for everything to dry is the hardest part, but the end result is well worth the wait.

Assemble, Mark, Disassemble, Install, and Reassemble

Yes, it sounds like a lot of steps in one, but at least they’re simple:

  1. Go ahead and assemble each shelf as you intend.  HAND TIGHTEN ONLY.   (Interested in what we did? See the final orientation of parts in the photos below.)
  2. With a partner, hold and level the shelf where you’d like it to hang.
  3. Mark the holes in the flanges with a pencil.  (Pro tip: Have two pencils – one for each of you.  You’ll avoid yelling about loosing level status this way)
  4. Pull the shelf down, and disassemble.
  5. Install your drywall anchors where your marked your flange holes.  (I go over the top here and use anchors capable of supporting 143 lbs each)
  6. Install your flanges (only) using your freshly installed anchors and provided screws.
  7. Into the flanges, install all of the hardware you plan to install besides the shelf itself and the black pipe caps.
  8. Install your shelf over the nipples that you test fitted earlier.
  9. Secure your shelf by adding the black pipe caps to the nipple peering out of your shelf.  A strong hand-tightening should be sufficient to ensure stability.

The Final  Industrial Pipe Bookshelves

DIY pipe shelf tutorial with directions

DIY pipe shelf tutorial with directions

Industrial shelf made from pipe.

DIY industrial shelves. Tutorial and instructions.

DIY pipe shelf tutorial with directions

DIY industrial shelves and pipe desk. Tutorial and instructions.

How to make diy industrial shelves from black iron pipe.

Posted on 10 Comments

How to Make Evergreen Garland Video Tutorial

How to make Evergreen Garland for Christmas

If you have come here to learn how to DIY evergreen garland for Christmas you have come to the right place!  I have revamped the original tutorial with a video showing the tricks and techniques to make lovely, fresh evergreen garland for your home.  You can watch the video below and scroll down for a list of supplies and detail photos.  Or read the original How to Make Evergreen Garland or Swags post.

Supplies Needed

  1. 24 Gauge Floral Wire*
  2. Rustic Wire 18 Gauge* or Rope
  3. Pruning Shears*
  4. Gloves*: Wear the Gloves!!!!
  5. Evergreen pieces

Details: Starting the Garland

To start the evergreen garland make a loop with the thick wire.  This will be useful for hanging your garland later and give you a base to anchor the floral wire.

How to start making an evergreen garland

Really, put on your gloves after this part.  Otherwise be prepared for scratch, resin covered, hands.

Details: Wrapping the Evergreen

While, I may be awful at rapping, I am very good at wrapping.  This simple step is all you need to repeat to make a beautiful hand tied garland.

How to wrap a DIY evergreen garland.

Tips

  1. Evergreen items are cheap to free.  Walk around your back yard.  Ivy, pine, boxwood all make interesting additions.  Ask you neighbors and make sure to just cut small amounts so it does not even appear that you have been there.
  2. Do not be afraid to decorate your garland.  Additional branches, beads, and lights can make it look fabulous!
  3. Work outdoors if possible.  While the video was taken inside due to the wind, you are going to have a lot of pine needles around your house from the construction.
  4. Gloves. I am bad about wearing them. Which is why my hands are always cut and rough.

Remember if you need a full pictorial tutorial you can get a recap of the video.  Just visit my How to Make Evergreen Garland post.

How to make Evergreen Garland for Christmas

Feel like it is too much to make your own garland?  Well then read my tutorial on how to Make Artificial Garland Look Real for tips to cheat the DIY process and come out with beautiful Evergreen Christmas Garland.