Posted on 9 Comments

Liquid Leaf

The sugar cube seashell holder and sand dollar were made out of paperclay and covered in liquid leaf. I like the poured look.

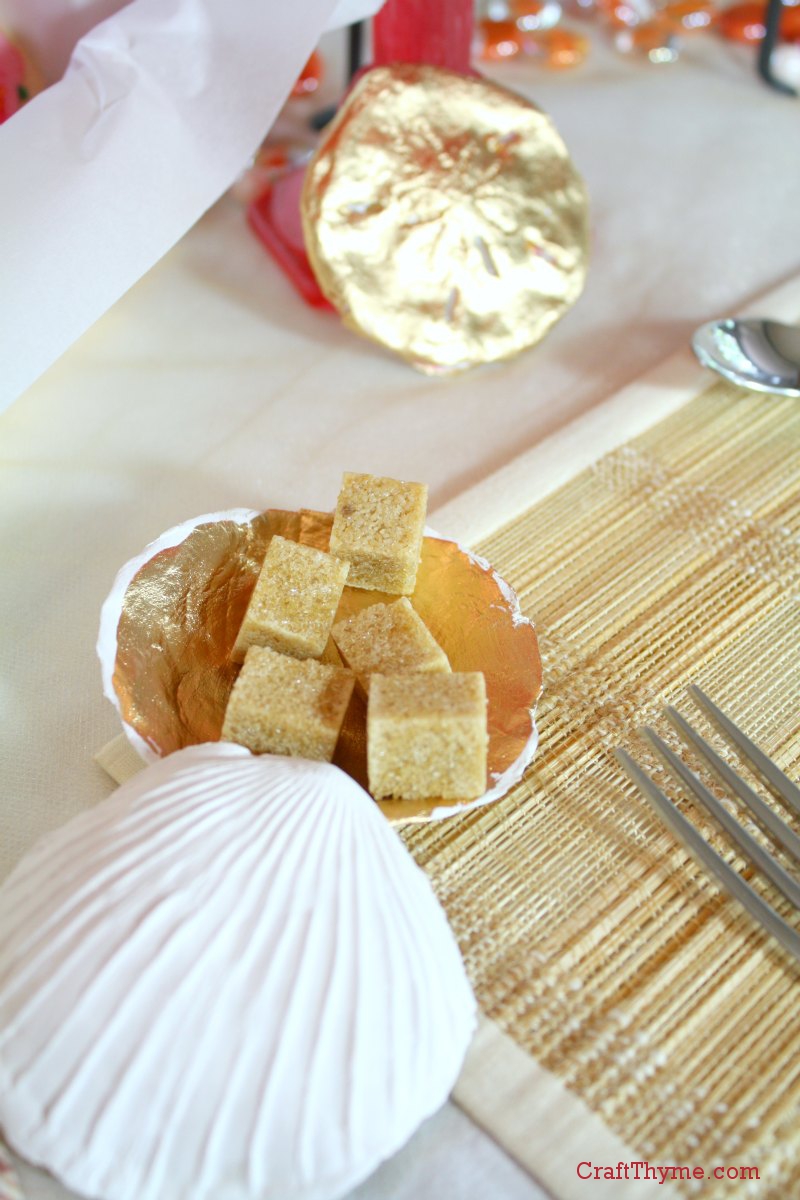
This isn’t so much a tutorial as more an answer to a few inquiries I had about the gold elements from the Pink Lemonade Table Decor.  There are a variety of metallic paints, waxes, glazes, leafs, foils, etc. for when you want to add shine to a project.  Each one has a place depending on the project and the look you are going for.  In this case I wanted a poured metallic look to cover the inside of real and scultped seashells and the outside of paperclay sand dollars.

I used Liquid Leaf* to finish these items. The below picture is from Plaid’s website. They have not paid me to say these nice things. In fact I doubt they know this website exists…

Liquid Leaf

You can achieve a leaf-like finish by thickly brushing on a coat and letting it dry.  I use some throw away flux brushes so I don’t have to worry about clean up.

The sugar cube seashell holder and sand dollar were made out of paperclay and covered in liquid leaf. I like the poured look.
The paperclay items did need a wash of thin white acrylic paint so that the leaf wasn’t immediately sucked into the surface. Trust me, I forgot to prime one of them and it used a ton of leaf and left lots of paint strokes.

You can get a metallic accent by brushing a thin coat on as I did with this Goodwill tray.  I did white-wash it with a layer of acrylic paint first and then used the liquid leaf along the bottom edge.

tray accented with liquid leaf

Finally liquid leaf works well on a lot of materials.  I finished the inside of real seashells as well as my faux created ones.

Vignette with various items accented in liquid gold leafTo be honest I initially planned on using rub-n-buff but I couldn’t find the tube in the basement.  However, I like the look of poured and cast metal that the liquid leaf created.  I’ll definitely use it again when I need this particular effect.

Notes

Make sure to put a thick coat on if you want a poured look.

DO NOT touch until fully dry.  Just don’t.  Let it dry.

You may need to cover the with a clear acrylic top coat.  Tarnish can occur and heavy use items will rub.

It stinks.  Ventilation is key.  Otherwise it is easy peasy to apply.

Enjoy these articles?  Get periodic updates by joining my mailing list (no spam, no way, no how) or subscribing to my RSS feed.

Posted on Leave a comment

Mixed Berry Sangria

Mixed berry sangria garnished with lemon balm

Sangria is perfect for anytime of year.  But this mixed berry sangria recipe adds a hint of lemonade, making it perfect for summer. It is a super easy recipe for sangria that everyone will rave over at dinner parties.  You can pretend it took a lot of time and labor.  I won’t tell.Mixed berry sangria garnished with lemon balm

Ingredients

1/2 to 1 bottle of White or Blush Wine (don’t go for super expensive but don’t go for super cheap)

1/4 Cup Chambord

1/4 Cup Peach Schnapps

Lemonade

Superfine or Confectioners Sugar (if not using a sweet commercial lemonade)

2 Cups mixed berries (frozen or fresh)

Lemon Balm (for garnish)

Mixed berry and lemonade sangria recipe

Directions For Awesomeness

Fill a pitcher 1/2 full with wine.  Add the liqueurs and the berries.  Top off with lemonade.  Taste test and add sugar till sweet enough for your tastes (I like mine tart so I don’t add sugar).  Allow the mixture to set overnight as it will develop more berry flavor.  Pour into glasses and garnish with fresh lemon balm.

Pitcher of mixed berry sangria


While you are waiting for the Sangria to develop you probably have an almost full bottle of Chambord and Schnapps with a half a bottle of wine…  Do I need to fill your time in for you?

Have you ever had Chambord over ice cream?  I mean what is there not to like about alcohol and ice cream? Or Schnapps in lemonade? Or alcohol in alcohol… Did I mention I have two boys.  Ages 3 and 1. Yeah I know my way around some alcohol.  Hope you enjoy as well ;).

Enjoy these articles?  Get periodic updates by joining my mailing list (no spam, no way, no how) or subscribing to my RSS feed.

See more great crafts and decor at these link parties: Pink Recipe Box, Somewhat Simple, The Stitchin’ Mommy, Lovely Crafty Home, Pint Sized Baker

Posted on 8 Comments

Sea Shells & Lemonade = Table Decor?

Sea shell inspired table decor.

I initially had the idea for this table setting from some sea shells I found when scrounging through my mess of a basement.   I had saved a small bag of pink scallop shells and thought they would make a good basis to start my summer decor.  Though I live  in the mountains my second love is the beach.  I wish I was a lake girl, since so many lakes are so much closer, but the mud, the dark water, the…  Nope it is sand and surf for me.  However, any good mountaineer knows overdoing the surf theme just seems out of place.  So here is my hybrid of pink, salmon, & gold.  Call it pink sand, shore, and lemonade inspiration.

Table decor inspired by pink sea shells
I’m so good at naming tablescapes… #sarcasm. Please suggest better names in the comments! Please!

The table setting is anchored by a diy ribbon chandelier (tutorial here) above and gold tulle net runner below.  The gold accents unify the various shades of pink that run from rose to salmon.  Shoo… okay I can say I used my art degree today to critique my design.  Now on the the fun stuff!

PINK LEMONADE CUPCAKES!

I knew I wanted some fun pink desserts and, thank the grocery gods, I walked by a display for Pillsbury pink-lemonade cupcakes.

Table setting inspired by pink seashells
Read below to learn more about my awesome baking skills.

Yes I can bake…  But can I decorate a cake?  Oh hell no.  It is a crafting skill that is just beyond me.  Knowing this, I often take the easy way out with mixes, pre-made icing, and sugar sprinkles.  As far as I can tell sugar sprinkles cover a multitude of sins.  Plus who could walk away from a thing of icing labeled ‘Pink Lemonade”.  And I swear I am not getting paid by Pillsbury to say all this awesome stuff.  Though, if they would like to, feel free to give me a ring.

Pink and Gold table decor
I like to call this the sugar, sugar, sugar portion of the table

Oh my!  I almost forgot mixed berry sangria!  Perhaps I should preface this with my Facebook status:pink-fb-statusNot to be a braggart but I make multiple awesome sangrias.  Citrus, berry, peach, etc… One for every season.  The recipe for this mixed berry and lemonade one will be up Thursday!

Salmon and Pink place settings
Gold Finger! A tutorial for creating your own gold sea shells and sand dollars from paper clay is in the works.

One of the things I enjoyed most about creating this display was learning to gold foil fabric (tutorial coming).  I thought the ombre dyed napkins (another upcoming tutorial) really set of each place setting because of the gold edging.  I’ll leave you with one more picture and a list of craft tutorials and how-tos required to recreate this summer table decor.

Sea shell inspired table decor.


I would love to have a better name and ideas on what you like or would improve.  Every table display is a learning experience so please leave comments.  Other than the cupcakes… Those mo-fo’s were delicious!

Tutorials:

How to Dye Sand

Permanent Sea Glass Finish

Modern Ribbon Chandelier (yes it is supposed to look like that)

Mixed Berry Sangria

Ombre Dyed Napkins

Gold Foiling Fabric August 8, 2013

Mold Making from Polymer Clay (Gold Seashells and Sand Dollars) I have photos and how tos but I am not sure how many people like to sculpt and make molds…  I may or may not post a tutorial.

Enjoy these articles?  Get periodic updates by joining my mailing list (no spam, no way, no how) or subscribing to my RSS feed.

See more great crafts and decor at these link parties: Our Home Away From Home, Today’s Creative Blog, Daisy Cottage Designs, Shabby Creek Cottage, House of Hepworths, Live Laugh Rowe, The Crafty Blog Stalker

Posted on 2 Comments

Fourth of July Decorations

The 4th of July is right around the corner and I wanted to create some mantel decorations to move into Summer and mark the holiday.  We have had some job/educational changes recently so full blown decorating had to be done on the cheap.  In comes stars and firework paper-craft mantel decorations.  The entire thing was created with 6 sheets of decorative paper (.20 a sheet on sale) and 8 sheets white cardstock (from a giant pack so more around .10 a sheet).

Paper fourth of July Mantel

$2.00 for the new supplies put this mantel within budget.  I had a few supplies, like super sticky Zots, and staging items such as candles already on hand.  In fact the mirrors and candlestick were revamped Goodwill finds from a few years ago.

fourth-july-mantel-detail

The mantel was supposed to invoke a vintage Americana feeling.  I used a palette of subdued reds, blues, and golds with pops of clean white for interest.  Kind of a faded “old glory” theme.

4th-july-mantel-craft

The gold and mirrors act to reflect a little light reminiscent of the stars.  It twinkles nicely at night.

fourht-july-paper-medallions

The decorative paper was used to create the paper medallions to represent fireworks.

fourth-of-july-details

This look would be easy to recreate yourself.  I’ll post tutorials on making paper medallions and 3-D stars later this week and next.  You will find the links here when they are live.

Folded Paper Stars 6/20

Pleated Paper Medallions 6/24

Enjoy these articles?  Get periodic updates by joining my mailing list (no spam, no way, no how) or subscribing to my RSS feed.

See more great crafts and decor at these link parties: Do Small Things With LoveCrafty Confessions, Today’s Creative Blog, Not Just a Housewife, It Happens in a Blink, The Shady Porch, and The Winthrop Chronicles


Posted on Leave a comment

Easter Table Setting: Florals

Decorated table setting for Easter

I always have a ton of ideas when it comes to creating any table setting.  Easter is no exception.  It is more a case of me trying to stick with 1 theme and make a cohesive look for any of my crafts and decorations.  This year I settled on a floral theme.  Initially, when I thought of florals; I thought pink!  Well let’s be frank, for me, a little pink goes a long way.  So bring on a fresh new color for Easter.  Orange!

Easter Decorations and Table Setting

Obviously, these Easter place settings used my hand-made chargers, no-sew napkins, and patterned Easter eggs.  However, I always have to add some details.

DIY Floral Table Setting


I wanted to layer a number of patterns to create a bohemian feel.  Strips of various floral patterned fabric dressed up white table cloth.  While I quickly colored the floral part of various paper doilies to complement the colors already used in the fabrics.

Decorated table setting for Easter

I also tried to bring in a little spring green, white, and tan to balance out the colors.

Floral Easter Place Setting

I am pleased that the table setting and Easter decorations came out Spring-like and feminine without resorting to a pink bonanza.  Here is one more shot of some of the details.  Below that are all the accompanying tutorials for creating your own DIY Easter decorations.

Easter decorations and decorTutorials

Enjoy these articles?  Get periodic updates by joining my mailing list (no spam, no way, no how) or subscribing to my RSS feed.